Homemade Chocolate Cream Pie Recipe
This post may contain affiliate links, see my disclosure policy for details.
This is the only homemade Chocolate Cream Pie recipe you’ll ever need. It only has a few simple ingredients, but it tastes like a chocolate lover’s dream. After one bite of this pie, you’ll never look at a pudding pie again.

This post may contain affiliate links. See my disclosure policy for details.
This is the dessert I’m convinced got me married. My husband is a simple man, but one thing he loves is a buttery pie crust, a little bit of chocolate pudding, and a whole ton of whipped cream. When I’m looking for a crowd pleasing dessert, this is one of my favorite recipes.
This pie is a dream for all chocolate lovers and pie enthusiasts.
The creamy filling has a rich chocolate flavor and is silky smooth. It’s very similar to a ganache vs a pudding, because there is no whole milk or constarch invovled. Instead, it’s just heated cream poured over chocolate chips, touch of sugar and eggs.
The chocolate pie filling is poured into a homemade pie crust. I use my traditional pie crust recipe which is the same one I use for my apple pie and blueberry pie cookies. The all butter crust adds a flaky contrast to the silky filling.
This is a great beginner recipe for anyone trying their hand at pie making and it has everything you love about a classic chocolate cream pie, but without all the stovetop time.
Why You’ll Love This Chocolate Cream Pie

Why You’ll Love This Chocolate Cream Pie Recipe
- It’s chocolate. Therefore it’s automatically delicious.
- This pie is the perfect make-ahead dessert. It needs chilling time to set, and can be made days ahead
- No standing over a stovetop making filling.
How to Make Chocolate Cream Pie

You can use a storebought or homemade pie dough recipe, the instructions on how to make dough from scratch and how to blind bake the crust are on the recipe card at the bottom of the post.
Chocolate Filling Ingredients:
- Semisweet chocolate chips
- Granulated sugar
- Kosher Salt
- Large eggs, cold*
- Heavy Cream
- Vanilla extract
- A single blind baked pie shell
- Whipped Cream (for serving)
Recommended Equipment
A food processor (14 cup capacity)
Tip:
Liquid pasteurized egg can be substituted for the raw eggs, see the substitutions section for details..
To Make The Chocolate Cream Pie Filling
Instructions:
In the bowl of a food processor, blend together the chocolate chips, sugar, and salt until coarsely ground.

Add in your eggs and process until well combined. At this point the mixture will still look lumpy, that’s ok.
Heat 2 cups of cream in a small saucepan over medium heat until very hot, but not boiling. You want it to just start bubbling around the edge.
With the food processor running, slowly and carefully pour in the cream into the chocolate and egg mixture.
Let that blend for 30 seconds and add in the vanilla. Continue to let it process until all the chocolate is melted and the mixture is smooth.

Pour the chocolate filling through a strainer into the prepared pie crust, use a rubber spatula to get every bit of chocolate out! Pop any air bubbles on the surface of the filling (they don’t go away!) and place the pie in the fridge to set for at least 8 hours, but overnight is best.
TIP: I leave the pie uncovered, so the plastic doesn’t make unsightly lines on the surface of the filling. Don’t worry, a skin won’t form.
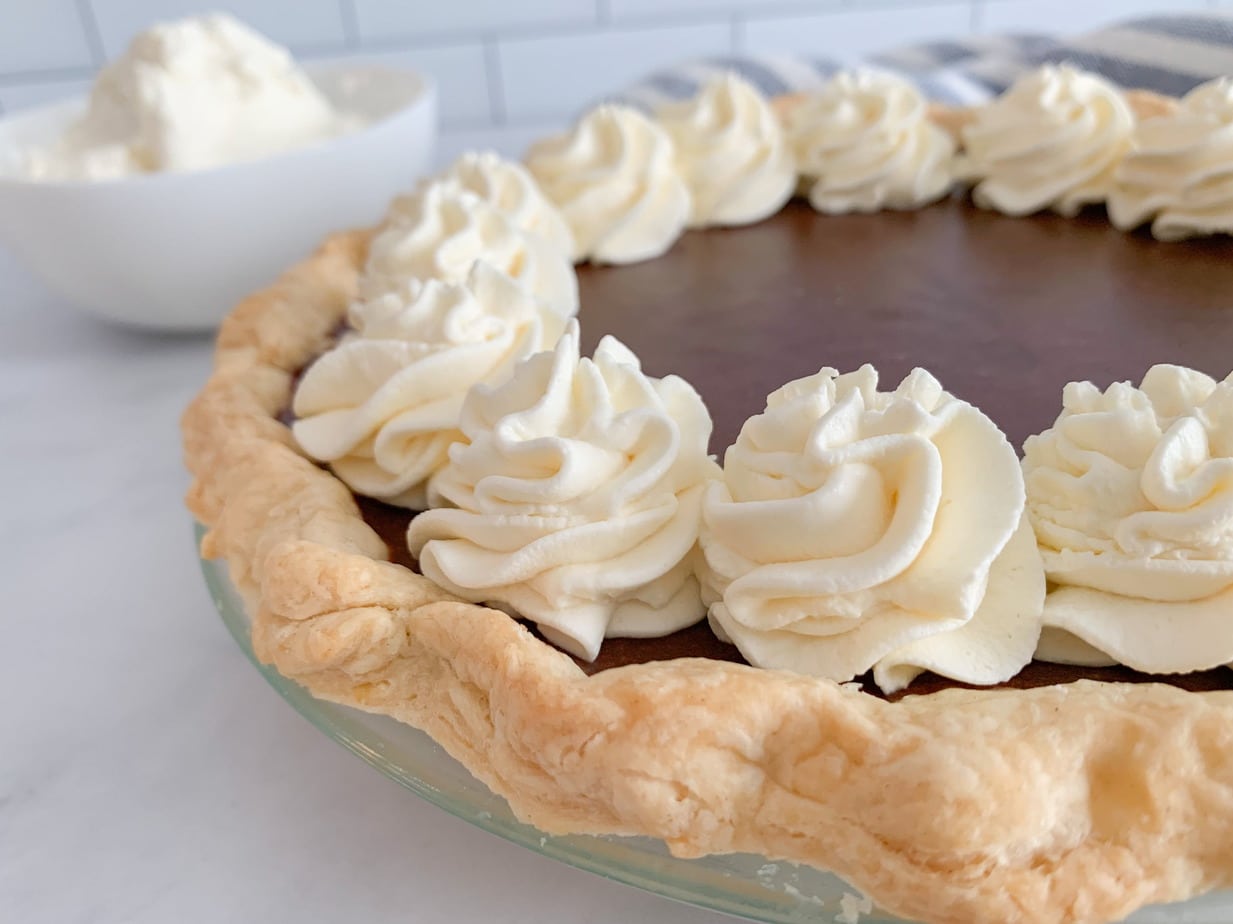
Once the whole pie has finished setting and is firm, slice the pie, wiping the blade of the knife between each cut. Garnish with whipped cream and sprinkle mini chocolate chips or chocolate shavings and fresh raspberries on top of the whipped cream.
How to Make Chocolate Cream Pie Ahead of Time:
Pie dough can be kept in the freezer (up to 1 month) or fridge (2 days), whether it’s shaped in the pie plate or wrapped in plastic. A baked crust will keep for 2 days at room temp or in the fridge. Since the finished pie needs about a full day to chill, you can make it 1–2 days ahead. You can also freeze the whole pie for up to a month—just thaw before serving.
Chocolate Cream Pie Recipe Variations and Substitutions
Substitutions
- Eggs:If you’re concerned about eating raw eggs, substitute with pasteurized liquid eggs! I’ve used them before and they work PERFECTLY in this recipe. Just follow the conversion info on the container. I believe 2 eggs= 1/2 cup of the pasteurized egg. But confirm with the label, as brands are all different!
- Chocolate: Chopped semisweet or bittersweet chocolate can be substituted for the chocolate chips.
- Gluten Free: You can use your favorite gluten free pie crust in place of butter crust made with all purpose flour.
Variations
- Add instant espresso powder to the cream while you’re heating up for extra richness and flavor
- Swap the butter pie crust for your favorite graham cracker crust or Oreo cookie crust. Here’s the graham cracker crust I use for pies and my favorite Oreo crust recipe. You’ll need enough cookie crumbs to come up the bottom and sides of a 9″ pie pan.
Serving Suggestions for Chocolate Cream Pie
Serve with whipped cream or a drizzle of chocolate sauce. McCleod’s Restaurant always added chopped walnuts to the top, and you could too for authenticity. I recommend serving this pie alongside a strong cup of coffee or a sweet espresso martini.
How to Store Homemade Chocolate Cream Pie
After the pie is has set overnight, serve slices with fresh whipped cream.
This pie needs to be kept refrigerated until ready to serve, due to the eggs that are in the filling.
Leftovers (if there’s any) should also be stored in the fridge, covered with plastic wrap for up to 5 days.
More Pie Recipes You’ll Love


Save This Recipe
Just enter your email below and we will send this recipe right to your inbox, plus we will send more yummy recipes and ideas.

Homemade Chocolate Cream Pie Recipe
Ingredients
For The Filling
- 2 cups of semisweet chocolate chips
- 2 tablespoons of granulated sugar
- 1/4 teaspoon of salt
- 2 large eggs, cold
- 2 cups of heavy whipping cream
- 1 teaspoon vanilla extract
- 1 9" fully baked pie shell (recipe below)
- Whipped Cream, for serving
For The Pie Crust
- 1 1/2 cups all purpose flour
- 3/4 cup 1 1/2 sticks of unsalted butter, very cold and cut into cubes
- 1/2 teaspoon salt
- 5 tablespoons of ice water
- 1 32 oz bag of dried beans or pie weights
Instructions
- To Make The Pie Crust :In the bowl of a food processor, add the flour and salt. Pulse a few times to combine.
- Add in cold, cubed butter and pulse until the mixture looks like coarse sand. Alternatively, you can cut the butter into the flour with your fingertips or a pastry cutter if you don't have a food processor.
- Drizzle in the water and pulse until the mixture starts to form clumps. Add more water a tablespoon at a time if the mixture looks too dry and won't clump together when squeezed in your hand.
- Dump pie crust out onto a piece of plastic wrap. Quickly and gently form into a ball and flatten into a disc. Do not knead the dough or work with it too much, or the crust will be tough. Wrap in plastic and chill in the fridge for one hour.
- After chilling, lightly flour the table and roll the pie dough about 1/4" thick and large enough to cover the 9" pie plate. Gently lift the dough and and press the dough into the pie plate.
- Trim off any excess dough hanging over the sides so it’s even with the edge of the pie plate. Pinch the edges to form a border, use trimmings to patch thin spots, and flute with your knuckles for a pretty edge.
- Use a fork to poke small holes in the bottom and along the inside edges of the crust—just enough for steam to escape, not big holes. Freeze for 30 minutes, or until firm.
- Blind Bake the Crust: Preheat the oven to 425°F. Spray a piece of foil with cooking spray, and line the crust with the foil (greased side down). Make sure it hangs over the edges of the crust to protect them from burning.
- Pour your beans or pie weights into the foil lined crust. Bake at 425° for 20 minutes. The edges of the pie should just be starting to brown.
- Take the crust out of the oven and carefully remove the beans/weights and foil. The crust won't look done at this point, the dough should look very pale and a little wet.
- Put your crust back in the oven. Turn the oven down to 350° and bake for 15-20 minutes longer, until crust is dry and golden brown. Remove from the oven and let cool before filling.
- To Make The Filling: In the bowl of a food processor, blend together the chocolate chips, sugar, and salt until coarsely ground.
- Add in your eggs and process until well combined. At this point the mixture will still look lumpy, that's ok.
- Heat 2 cups of cream until very hot, but not boiling. You want it to just start bubbling around the edge.
- With the food processor running, slowly pour in the cream. Blend for 30 seconds, then add the vanilla. Continue processing until the chocolate is fully melted and the mixture is smooth.
- Strain the chocolate filling into a bowl and stir to release any air bubbles. Pour into the prepared crust, scraping the bowl clean with a spatula. Refrigerate for at least 8 hours, or overnight for best results.
Notes
- Liquid pasteurized egg can be substituted for the raw eggs
- A graham cracker crust is 100% wonderful as well.
- You do not have to make the pie crust from scratch, feel free to use storebought and blind bake per the instructions on the package.


Yum this looks delicious!!!
So much chocolate, so much goodness!