Mini Egg Cheesecakes

This post may contain affiliate links, see my disclosure policy for details.
These Mini Egg Cheesecakes are an easy no-bake Easter dessert made with a graham cracker crust, creamy cheesecake filling, crunchy Cadbury Mini Eggs, and my secret ingredient that gets no bake cheescake to set every time!

Each mini cheesecake is topped with toasted coconut nests and chocolate eggs, making them perfect for Easter brunch, dessert tables, or spring parties.
Why You’ll Love These Mini Easter Cheesecakes
- Make ahead dessert that only gets better as it chills.
- No baking required and NO WATER BATH
- These mini treats are perfect for little hands, and the kids will love decorating their own cheesecakes.
- Portable, and easy to bring to a family gathering or potluck!
How to Make Mini Egg Cheesecakes

Ingredients For The Graham Cracker Crust
- A standard 12 cup muffin pan and cupcake liners: for the perfect size and easy cleanup. Making mini cheesecakes in a muffin pan helps them to set faster too!
- Graham crackers: I love the plain honey flavor, but you can use your favorite variety or even crushed cookies–like shortbread or golden Oreos. You’ll need about 1 cup of crushed cookies for the perfect base.
- Melted unsalted butter: for binding the crust crumbs together.
- Granulated sugar: for flavor, but the sugar will also work as a glue to keep the crust together
- A pinch of salt: for adding flavor and balancing out all the sweet elements of the recipe.
Ingredients For the Cheesecake Filling
- Cream Cheese at room temperature: Softened cream cheese blends smoothly and prevents lumps in the filling. Make sure to use full fat cream cheese
- Sour cream: for added tang and acidity. The sour cream helps to balance out all the richness and sweetness, while also providing structure to help the filling set.
- Granulated sugar: for sweetness and flavor. White sugar also melts beautifully into the filling as it sets.
- Heavy whipping cream: The cream is whipped to fold into the cheesecake filling. This will relieve the heaviness of the dense cream cheese.
- White chocolate, melted: White chocolate is the secret ingredient to help these mini cheesecakes set up firm without baking. The melted chocolate solidifies after chilling, allowing the cheesecakes to hold their shape and not turn soft or runny. For best results, use white chocolate bars rather than chips, since chips contain stabilizers that prevent them from melting as smoothly. It also adds a rich, creamy flavor that pairs perfectly with the Cadbury Mini Eggs.
- Vanilla extract and lemon juice: to add more flavor and balance to the filling.
- Cadbury Mini Eggs: These add texture and flavor, and really make these mini cheesecakes festive for Easter! I use a 9-oz bag for this recipe. That will be enough for both the filling and the topping.
For The Nest Topping
This step is optional, but highly recommended—especially if you want everyone to say, “AWW, these are so cute!” when you serve them!
- Shredded sweetened coconut: toasted to make super fast and adorable nests.
- Cadbury Mini Eggs: to make the topping of these cheesecakes look like real bird nests, and to make these extra festive for Easter.
Instructions
Prepare the Crust for the Cheesecakes
Line a 12-cup muffin tin with paper liners and set it aside.
In the bowl of a food processor, add the graham crackers and sugar and process until fine crumbs.
Add in the melted butter and pulse until the crumbs are evenly moistened and will clump together when squeezed in your hand.
Distribute the crumbs among the 12 muffin cups. It’ll be about 1 tablespoon + 1 teaspoon of crumbs per muffin cavity.
Using the bottom of a clean glass, tamp down the crumbs until they are even and compact.

Pop the muffin pan in the freezer while you make the cheesecake batter.
Making the Cheesecake Batter
Measure ¾ cup (about 48 Cadbury Mini Eggs) and place them in a sturdy Ziploc bag. Using a heavy measuring cup, rolling pin, or pot, crush the candies into small pieces—slightly smaller than a chocolate chip. Set aside.
In the bowl of a stand mixer fitted with the whisk attachment, add the cold heavy cream.
Whip on medium speed until foamy, then increase to medium-high and continue whipping until stiff peaks form (about 2 minutes). The cream is ready when it stands straight up on the beater without drooping.

Carefully transfer the whipped cream to another bowl and place it in the fridge.
Without washing, return the whisk attachment and bowl to the stand mixer.
Add the cream cheese to the mixer bowl and whip on medium speed until smooth.
Mix in 1 tablespoon of sour cream, then scrape down the sides and bottom of the bowl with a rubber spatula.
Add the sugar and beat until fully incorporated.
Pour in the melted white chocolate and mix briefly to combine.
Finally, add the lemon juice and vanilla extract. Scrape down the bowl once more, then give it a final mix to ensure everything is fully incorporated and smooth.
Fold in the whipped cream and Mini Eggs
Remove the bowl from the stand mixer and grab the whipped cream from the fridge. Gently spoon the whipped cream onto the cream cheese filling. Using a rubber spatula, gently fold in the cream until almost completely integrated.

Pour the crushed egg candies into the batter.

Finish folding gently until no more streaks of whipped cream are showing, and the candy eggs are evenly distributed.

Fill the Muffin Cups
Remove the graham cracker crusts from the freezer. Gently spoon the filling over the crusts. Make sure to spread the batter all the way to the sides of each muffin cavity to prevent any gaps between the bottom of the batter and the crust. Fill the center of each cup slightly above the muffin liners with the cheesecake batter.
Tip: I spoon the batter up the sides of the liners first and fill in the centers after. The batter should be slightly fuller in the center and just barely come up above the muffin liners.
Smooth out the tops of each cake and chill for a minimum of 4 hours, but overnight is best.
Make the Topping for the Cheesecakes
To make the little nest topping for the Mini Egg cheesecakes, start by toasting your coconut flakes.
In a cold, dry skillet, add the sweetened coconut. Toast the coconut over medium to medium low heat, stirring constantly to prevent burning. Toast until the coconut is crisp and golden brown, about 6-7 minutes.
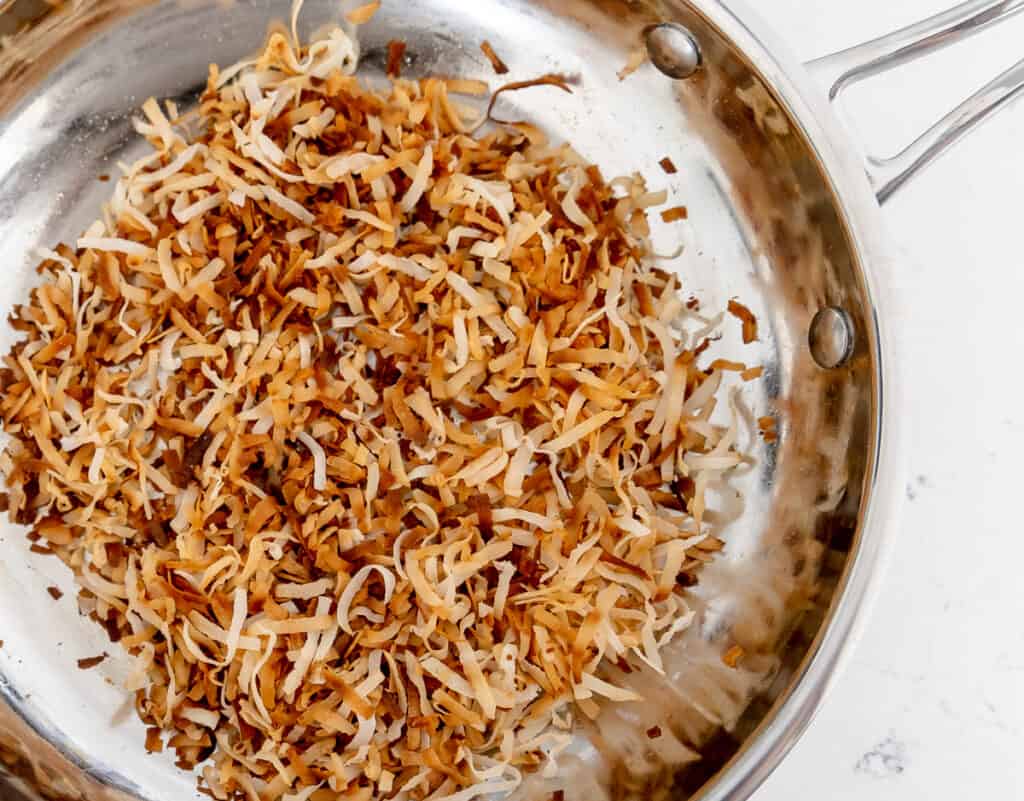
Remove the coconut from the heat and set aside to cool.
Once the cheesecakes are fully chilled, you can take them out of the muffin pan and set them on your final serving dish.
You can also remove the muffin liners at this time, or feel free to leave them on if you prefer that look. If you are removing the liners, do it while the cakes are still cold.
Top the center of each cheesecake with a heaping teaspoon of the toasted coconut. Use your finger to make a little depression in the center of each coconut pile and add 1-2 Mini Cadbury Eggs to make a”nest”.

Serve the cheesecakes immediately or return them to the fridge to stay chilled until ready to serve.
Expert Tips
- Make sure your cream is super cold and whipped to stiff peaks. If the cream is too warm, it won’t whip up stiff enough. And if the cream isn’t whipped enough, the batter may fall or become too dense or runny.
- Crush your eggs into small pieces. you want to crush your Mini Eggs into pieces slightly smaller than a standard sized chocolate chip. You don’t want dust, but you want the candy pieces small enough to allow the cheesecake batter to fill the muffin cup easily.
- Make sure your white chocolate isn’t too hot before adding it to the cream cheese mixture. You may run the risk of melting the cheese if the chocolate is too hot.
- Freeze the crust. This helps to give you a sturdy base without baking!
- Chill for the recommended time. Under chilling will cause the cakes to become too soft and not pull away from the paper wrapper.
- Overfill your muffin cups. The batter should come up just slightly above the muffin liner. This is to replicate how a baked cheesecake will rise in the oven. Generously filling each muffin cup will give you the perfect crust to filling ratio.

Removing the Cheesecake From the Muffin Pan
Use a butter knife to gently lift the cheesecake out of the pan. The cheesecakes will come out of the muffin pan easily by lifting them out by the paper liners. Make sure to do this while the cheesecakes are really cold, that way you won’t squish the sides of the cakes in the process.
Remove the cupcake paper from the cheesecakes while they’re still very cold to ensure clean removal.
Storage
These Mini Egg cheesecakes will keep for 6-7 days in the fridge. Over time, the graham cracker crust will soften a bit, but the cakes will still remain solid enough to remove the wrappers easily and eat with your hands! Make sure to store your leftover cheesecakes in an airtight container.
Frequently Asked Questions
Yes! These cheesecakes freeze beautifully.
To freeze, leave the muffin liners on and place the cheesecakes in an airtight, freezer-safe container. They’ll keep well for several weeks.
When ready to serve, take out as many as you need and let them thaw in the fridge for about an hour until soft enough to eat. You can remove the liners either while they’re still frozen or after they’ve thawed—whichever you prefer!
As long as the cheesecakes have chilled sufficiently, the liners will peel away cleanly.
Tip: Hold each cheesecake by the bottom crust when removing the wrappers to avoid squishing the soft filling. Unlike baked cheesecake, no-bake cheesecake is more delicate. For the best results, remove the liners immediately after taking the cheesecakes out of the fridge—as they warm up, the filling softens, making it trickier to get a clean release.
No-bake cheesecakes naturally have a softer texture than their baked counterparts, but this recipe ensures a firm set, allowing you to remove the muffin liners without losing shape or risking a runny filling.
If your cheesecake didn’t set properly, here’s what might have gone wrong:
Not Enough Chilling Time – These Mini Egg cheesecakes require at least four hours in the fridge, but overnight is best. A longer chill ensures both the edges and centers are fully set.
Whipped Cream Wasn’t Stiff Enough – If the heavy cream wasn’t whipped to stiff peaks, it lacked the structure needed to stabilize the filling. Without enough air, the cream collapses over time, leading to a softer texture. Curious about the science of whipping cream? [Read more here!]
Improper Folding Technique – Folding gently incorporates whipped cream without deflating the air that helps set the cheesecake. If overmixed, the air is lost, resulting in a less stable filling. New to folding? This video tutorial is a great place to start!
By following these steps, you’ll get perfectly set, no-bake cheesecakes every time!
More Easter Desserts


More Cheesecake Recipes


If you make this recipe, give it a 5 STAR Rating and Leave a Comment!
Save This Recipe
Just enter your email below and we will send this recipe right to your inbox, plus we will send more yummy recipes and ideas.

Mini Egg Cheesecake Recipe
Ingredients
For the crust
- 9 graham crackers 1 cup crushed
- 5 tablespoons unsalted butter melted
- 1 tablespoon of granulated sugar
- 1/4 teaspoon kosher salt
For the No Bake Mini Egg Filling
- 3/4 cup of heavy whipping cream, cold
- 8 oz of cream cheese, room temperature
- 1 tablespoon of sour cream
- 1/3 cup of granulated sugar
- 3 oz of white chocolate (not chips), melted and slightly cooled
- 1 teaspoon of vanilla
- 1 teaspoon of lemon juice
- 3/4 cup (about 48 whole) Cadbury mini eggs
For The Nest Topping
- 1/2 cup of sweetened coconut flakes
- 24 whole Cadbury Mini Eggs
Instructions
Make The Crust:
- Line a 12-cup muffin pan with paper liners.
- Crush graham crackers fine crumbs (food processor or zip-top bag works). Add the sugar and mix until combined.
- Pour in the melted butter and stir until the crumbs hold together when pressed.
- Add about 1 tablespoon + 1 teaspoon of crumbs to each muffin cup.
- Press down firmly using the bottom of a glass, to make a packed down crust. Place the muffin pan in the freezer while you make the filling.
Make The Cheesecake Filling:
- Add ¾ cup Mini Eggs to a zip-top bag. Crush into small pieces (about the size of chocolate chips) and set aside.
- In a large bowl, whip cold heavy cream until stiff peaks form (it should stand up on the whisk). You can use a stand mixer or a handheld mixer for the job. Once whipped, keep the cream in the fridge while you make the rest of the cheesecake filling.
- In the same bowl (no need to wash), beat the cream cheese until smooth. Then mix in the sour cream.
- Add the sugar and beat until combined.
- Pour in the melted white chocolate and give it a quick mix to combine. Then add the vanilla and lemon juice. Mix until smooth.
- Grab the whipped cream from the fridge and the crushed Mini Eggs and gently fold them into the cream cheese filling. Do not overmix and do not stir, or else you’ll deflate the whipped cream.
- Spoon the filling over the crusts, filling each cup slightly above the liner. Tip: Spoon filling around the edges first, then fill the center—this helps avoid gaps.
- Smooth the tops and chill in the fridge for at least 4 hours (overnight is best).
Make The Coconut Nests:
- Add coconut to a dry skillet. Toast over medium-low heat, stirring often, until golden (about 5–7 minutes). Let cool.
Decorate and Serve:
- Remove the cheesecakes from the pan. If you’re serving these without the paper liners, remove them while the cakes are still very cold.
- Decorate by adding a spoonful of toasted coconut on top of the cheesecakes. Press a small dip in the center of the coconut and add 1–2 Mini Eggs. Repeat this on all the mini cheesecakes until they’re decorated.
- Serve immediately or keep in the fridge until ready to serve.