Easy Mini Cheesecake Bites
These adorable mini cheesecake bites are the perfect treat! It’s everything you love about traditional cheesecake served in a bite sized bundle!

Want to save this recipe?
Enter your email & I’ll send it to your inbox. Plus, get great new recipes from me every week!
For this recipe, we use a mini muffin pan and paper liners. This allows the mini cheesecakes to bake quickly, evenly, and without a water bath! And because these cheesecake bites are so tiny, the chilling and setting time is only a fraction of what it would take to set a whole cake. The perfect dessert? We think so!
Why you’ll love this recipe
- Making mini cheesecakes is the perfect way to get started if you find making a whole cheesecake overwhelming. You get all the flavors of a traditional cheesecake but in a manageable portion.
- The bites are made in a mini muffin pan. They’ll bake up way quicker and more evenly, no water bath is needed!
- The mini cheesecake cups can hold any of your favorite toppings like sauces, fruits, and whipped cream.
- These bites are perfect for a crowd! This recipe can be doubled easily to accommodate your party size.
- Cheesecake bites freeze beautifully and are easy to keep on hand for when a craving strikes
- They take minutes to make and only a few hours to chill.
Cheesecake Bites Ingredients
- Graham cracker crumbs (or your favorite cookie crumbs)
- Melted butter
- A pinch of salt
- Cream cheese
- Sour cream
- Sugar (for the graham cracker crust and the filling)
- Lemon juice and vanilla
- Eggs
- Mini muffin pan and mini cupcake liners
The ingredient list is short and makes the richest and most creamy little bite sized cheesecakes. The graham cracker crust is nice and thick, adding a toasty crunch to the velvety filling.

Instructions
- Make the crust by combining the graham cracker crumbs, sugar, salt, and melted butter in a bowl.
- Line a mini muffin pan (24 cups) with mini cupcake liners. Divide the graham cracker crumbs among the muffin cups and bake until lightly browned.
- While the crusts are baking, make the cheesecake filling by beating together cream cheese, sour cream, and sugar until smooth. Flavor with the lemon juice and vanilla. Add in the egg last and mix until the batter is silky smooth.
- Spoon the cheesecake batter over the mini graham cracker crusts and bake until puffed and not jiggly. Turn off the oven, leave the oven door open a crack, and let the cheesecakes sit in the warm oven for 30 minutes. Take the bites out of the oven and let them cool to room temperature before chilling for a few hours to set.
- Once the cheesecake bites are chilled completely, top them with your favorite toppings and enjoy!
Pro Tips
- Make sure cream cheese, sour cream, and eggs are at room temperature. This will help all the ingredients mix together nicely and give the cheesecake filling a velvety smooth texture.
- Use an electric mixer. You can use a stand mixer or hand held mixer for this recipe. This is the best way to prevent lumps in the cheesecake batter.
- Add the egg to the filling last. This will help keep the batter from getting overmixed –which results in cracking– and it allows you to taste the batter and adjust the flavorings without consuming raw egg.
- Prebake the crusts. This will give you a nice crisp crust, which is perfect for a creamy cheesecake filling.
- Do not overbake the mini cheesecake cups. Because these cheesecake bites are tiny, they bake a lot quicker than a full size cheesecake. You can tell the bites are done when they’ve puffed up like a cupcake, do not look wet, and do not jiggle. Start watching your cheesecakes around the 10 minute mark.
- Let the cheesecakes sit in a warm oven after baking. When the cheesecake bites are done baking, they need to stay in the oven (turned off), with the oven door cracked for at least 30 minutes. This will help the mini cheesecakes cool gently, finish cooking, and prevent cracks.
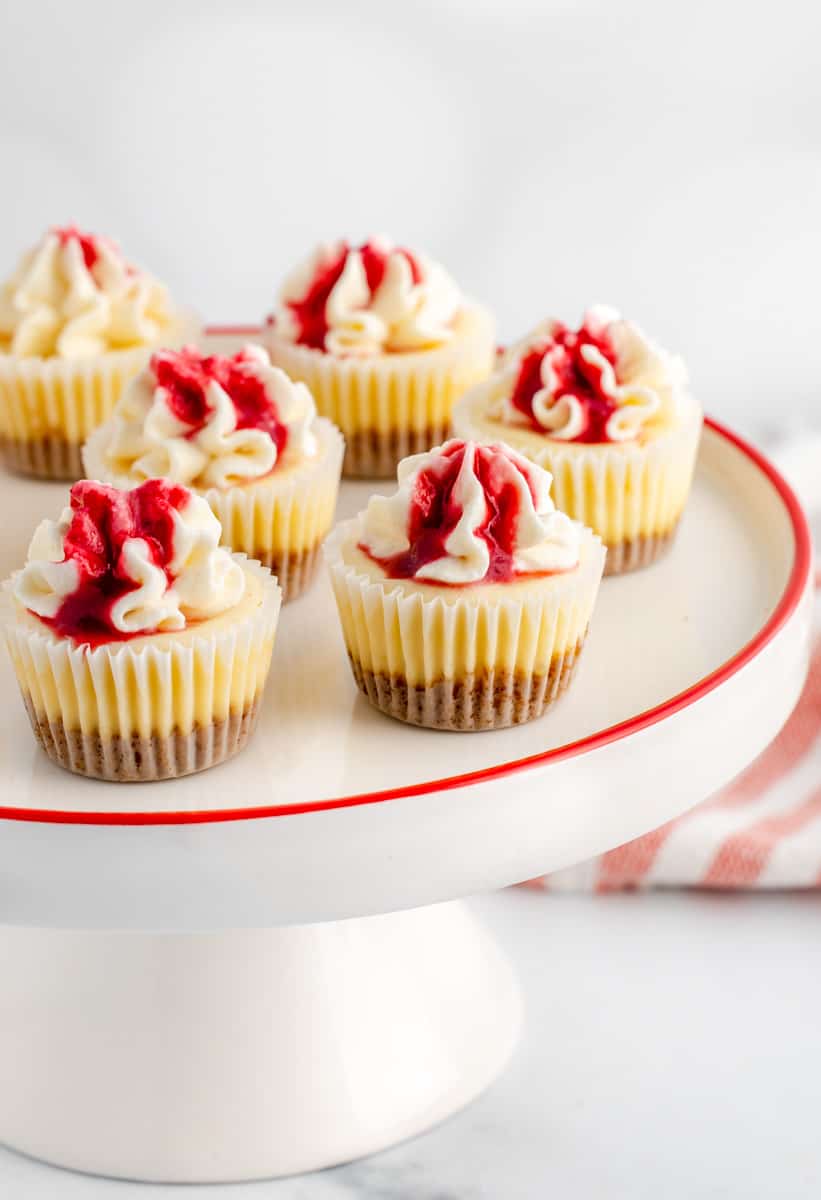
Topping Ideas and Variations
Mini Strawberry Cheesecake Bites: Prepare the cheesecake bites as above and top them with the easy homemade strawberry compote we use for our mini strawberry cheesecakes.
Cherry Cheesecake Bites: Top your cheesecake bites with a homemade cherry pie filling, to make a bite sized version of our favorite Cherry Cheesecake.
Lemon Blueberry Cheesecake Bites: Add some grated lemon zest to your cheesecake filling and top with a homemade blueberry sauce.
Oreo Cheesecake Bites: swap the graham cracker crumbs for 10 tablespoons of crushed Oreo cookies, and stir in some Oreo cookie chunks into the cheesecake batter!
Change the crust: You can swap out the graham cracker crumbs for your favorite cookie crumbs instead! You’ll need 10 tablespoons of crumbs for this recipe, and make sure to crush the cookies into fine crumbs.
Add a crunchy topping: Add chopped toasted nuts, chunky cookies, candy bars, or toffee crumbles, for added texture and crunch.
No bake Cheesecake Bites
If you prefer to skip the baking altogether and learn how to make a no bake cheesecake filling, you can use my recipes for no bake lemon cheesecake or no bake chocolate cheesecake. You can easily cut the recipes in half to get a smaller quantity of mini cheesecakes, or freeze any extra bites!

Frequently Asked Questions
Cheesecake is one of the best desserts to make in advance. You can make these cheesecake bites at least two days ahead of when you need them.
These cheesecake bites will stay fresh for up to 5 days and even longer if frozen.
Yes! These little cheesecakes freeze beautifully. Let them chill completely before popping them in a freezer safe, air tight container. I freeze them with the paper liners on, but you can remove them if you want. The bites will keep for up to a month in the freezer. When you’re ready to serve, take out the quantity needed and let them thaw in the fridge for a few hours or overnight before enjoying.
These cheesecake bites cook very quickly. You’ll want to start watching your bites around the 10 minute mark. Depending on your oven, they’ll be done baking after 11-14 minutes. You’ll know the bites are done when they’ve puffed up and rounded on top like a cupcake and don’t jiggle. They should not be browned. Keep an eye out for cracks too. If you see tiny cracks forming, turn off the oven they’re done.
No. Each muffin cup holds a very small amount of batter and there is a lot of space for the air and heat to get around each cup. This lets each bite bake quickly and evenly.

Mini Cheesecake Bites Recipe
Creamy bites of cheesecake on a crisp graham cracker crust, made in a mini muffin pan! These bites come together in minutes and are perfect for a crowd!
Ingredients
Graham Cracker Crust
- 4 Whole graham crackers (10 tablespoons of crumbs)
- 2 teaspoons granulated sugar
- Pinch of salt
- 3 tablespoons of unsalted butter, melted
Cheesecake Filling
- 8 oz of cream cheese, softened to room temperature
- 3 tablespoons of sour cream
- 1/3 cup + 2 tablespoons of granulated sugar
- 1/2 teaspoon of vanilla extract
- 2 teaspoons of lemon juice
- 1 large egg, room temperature
Instructions
To make the crust
- Move your oven rack to the 3rd shelf position up from the bottom, preheat the oven to 350º, and line a 24 cup mini muffin pan with mini paper liners--no cooking spray needed.
- Next, crush up your graham crackers into fine crumbs. This can be done in a food processor or using a ziploc bag and a rolling pin.
- Transfer your crumbs into a bowl and add the sugar and pinch of salt. Give the mixture a stir to combine.
- Pour the melted butter into the graham mixture and stir until the crumbs are evenly moistened and clump together when squeezed in your hand.
- Divide the crumbs among the mini cupcake liners, you'll use about 1 teaspoon of crumbs per muffin cup. Press the crumbs into a compact layer with a bottle cap or a fancy tamper if you have one.
- Bake at 350º for 5-7 minutes until the crusts are lightly golden brown around the edges.
- Remove the mini crusts from the oven and turn the oven temp down to 325º.
To make the filling
- Add the cream cheese to a mixing bowl and beat on medium low speed until smooth, about 30-45 seconds.
- Next, add in the sour cream and beat until smooth.
- Add in the sugar, mix until blended, and then use a rubber spatula to give the bowl a scrape.
- Turn the mixer to low and add your lemon juice and vanilla extract. Mix until the batter is super smooth. Give the mixture a taste and add a few more drops of lemon juice or vanilla if desired.
- Once you're happy with the flavor, on low speed, add the egg. Mix until the egg is just incorporated.
- Give the bowl a scrape one more time and then finish mixing on low for about 30-45 seconds, until the batter is silky smooth.
- Divide the batter among the 24 muffin cups, about 1 tablespoon of cheesecake batter per cup. They will be full and that's what you want.
- Bake at 325º for 11-14 minutes until the cheesecakes are puffed like cupcakes, but have no color and do not jiggle. Once baked, turn the oven off and leave the door open a crack. Let the cheesecake bites sit in the warm oven for 30 minutes before taking them out.
- Allow the mini cheesecakes to cool completely before chilling in the fridge for at least 4 hours, but overnight is best.
- Serve your cheesecake bites topped with your favorite fruit sauce, berries, and whipped cream.
Notes
Once fully cooled, cheesecake bites can be frozen with or without their muffin papers attached, and stored in the freezer for up to a month. When you're ready to serve, let the bites thaw in the fridge for a couple of hours until soft enough to eat.
Nutrition Information:
Yield: 24 Serving Size: 1Amount Per Serving: Calories: 69Total Fat: 5gSaturated Fat: 3gTrans Fat: 0gUnsaturated Fat: 2gCholesterol: 22mgSodium: 50mgCarbohydrates: 4gFiber: 0gSugar: 2gProtein: 1g

Could I use standard size muffin tins instead of mint? I don’t want to buy mini tins If yes how woul I adjust cooking time?
Yes! I have a recipe for that exact size: https://barefootinthepines.com/mini-strawberry-cheesecakes/. You can omit or serve the strawberry sauce on the side. The cheesecake is a NY style cheesecake made in a muffin pan!
Yum! Very good recipe and easy. Making them for Christmas tonight and putting in freezer tomorrow. Thank you
So delicious! I made these for a Christmas party. However at least half of them sunk! I’m suspicious my oven isn’t hot enough, could that have been the issue? They needed more baking time?
It might be an issue of the oven running too hot, making the sides rise quicker than the centers or the cakes may have been underbaked slightly.
Hi. Just made these and they’re fully cooked but seem really soft. I haven’t put them in the fridge yet. Will that make them seat better?
Yes! They’ll firm up once they’re chilled.