Cherry Cheesecake
This post may contain affiliate links, see my disclosure policy for details.
Cherry Cheesecake adds an elegant and homemade touch to any special occasion or holiday celebration.

This post may contain affiliate links. See my disclosure policy for details.
A smooth and creamy NY Style Cheesecake topped with the most amazing homemade cherry sauce. The topping is sweet and tangy, complementing the rich and delicious cheesecake underneath.
This cheesecake recipe is super straight forward and it’s the same filling I use for all my favorite cheesecake recipes, like my Chocolate Chip Cheesecake and my Mini Strawberry Cheesecake Cups. I break out my buttery and simple homemade graham cracker crust, for a classic flavor to hold the decadent filling.
This recipe is simple to make and will quickly become a family favorite this holiday season.
How To Make Cherry Cheesecake
Let’s start with the graham cracker crust.
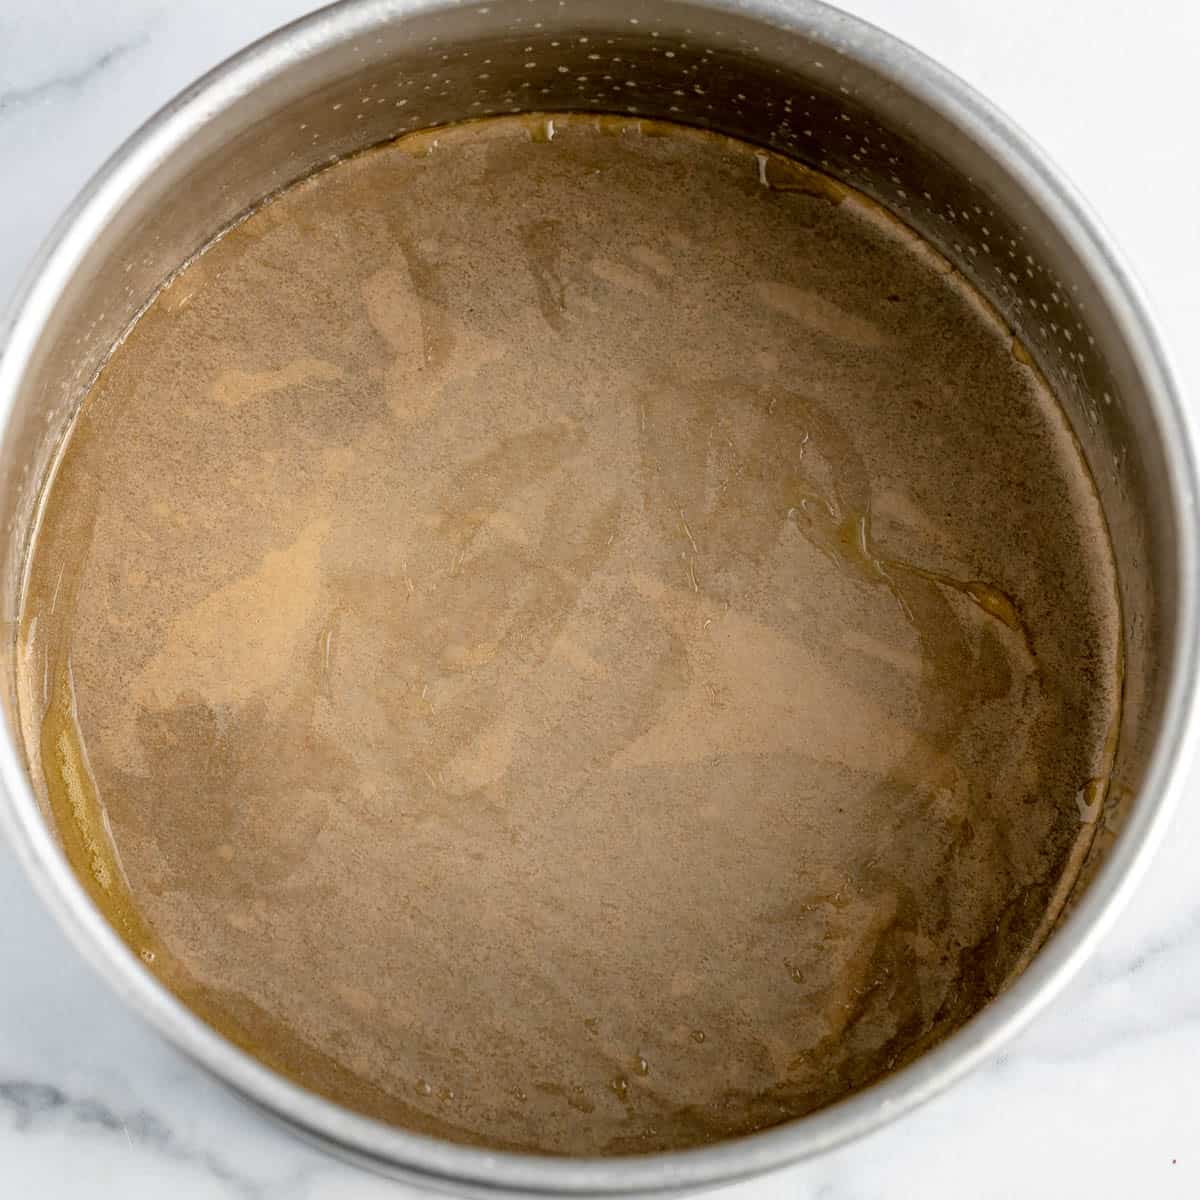
For this recipe, use an 8″ or 9″ springform pan or a regular cake pan with high sides (that’s what I use).
Preheat the oven to 350º and spray your cake pan of choice with cooking spray. Line the bottom of the pan with a piece of round parchment paper and spray the parchment too.

Crush the graham crackers into fine crumbs. You’ll need about 1 1/3 cups of crumbs. This can be done in a food processor or with a rolling pin and a Ziploc baggie.
In a medium bowl, combine the graham cracker crumbs, sugar, and salt and give it a mix.
Pour over the melted butter and stir until the crumbs are evenly moistened and will clump together when squeezed.
Use a drinking glass with a flat bottom to press the crumbs into the bottom of the springform (or cake) pan in an even and compact layer.


Bake the crust at 350º for 12-15 minutes until golden brown around the edges. Once baked, remove the crust from the oven and lower the oven temperature to 325º.
To make the cheesecake filling:
Add cream cheese to a large mixing bowl and beat on medium low speed until smooth—about 30-45 seconds.
Add the sour cream and mix until incorporated. Once mixed, use a rubber spatula to scrape the sides and bottom of the bowl.
Next, add the sugar and beat until well mixed. Turn the mixer down to low speed and add 3 tablespoons of lemon juice and the vanilla extract, mix until blended. Give the batter a taste and add another tablespoon of lemon juice or a couple of drops more of vanilla if desired.
Turn the mixer back up to medium low, and add the eggs one at a time, mixing each egg thoroughly before adding the next. Give the mixing bowl a final scrape and finish mixing until the batter is smooth and all the ingredients are completely blended.
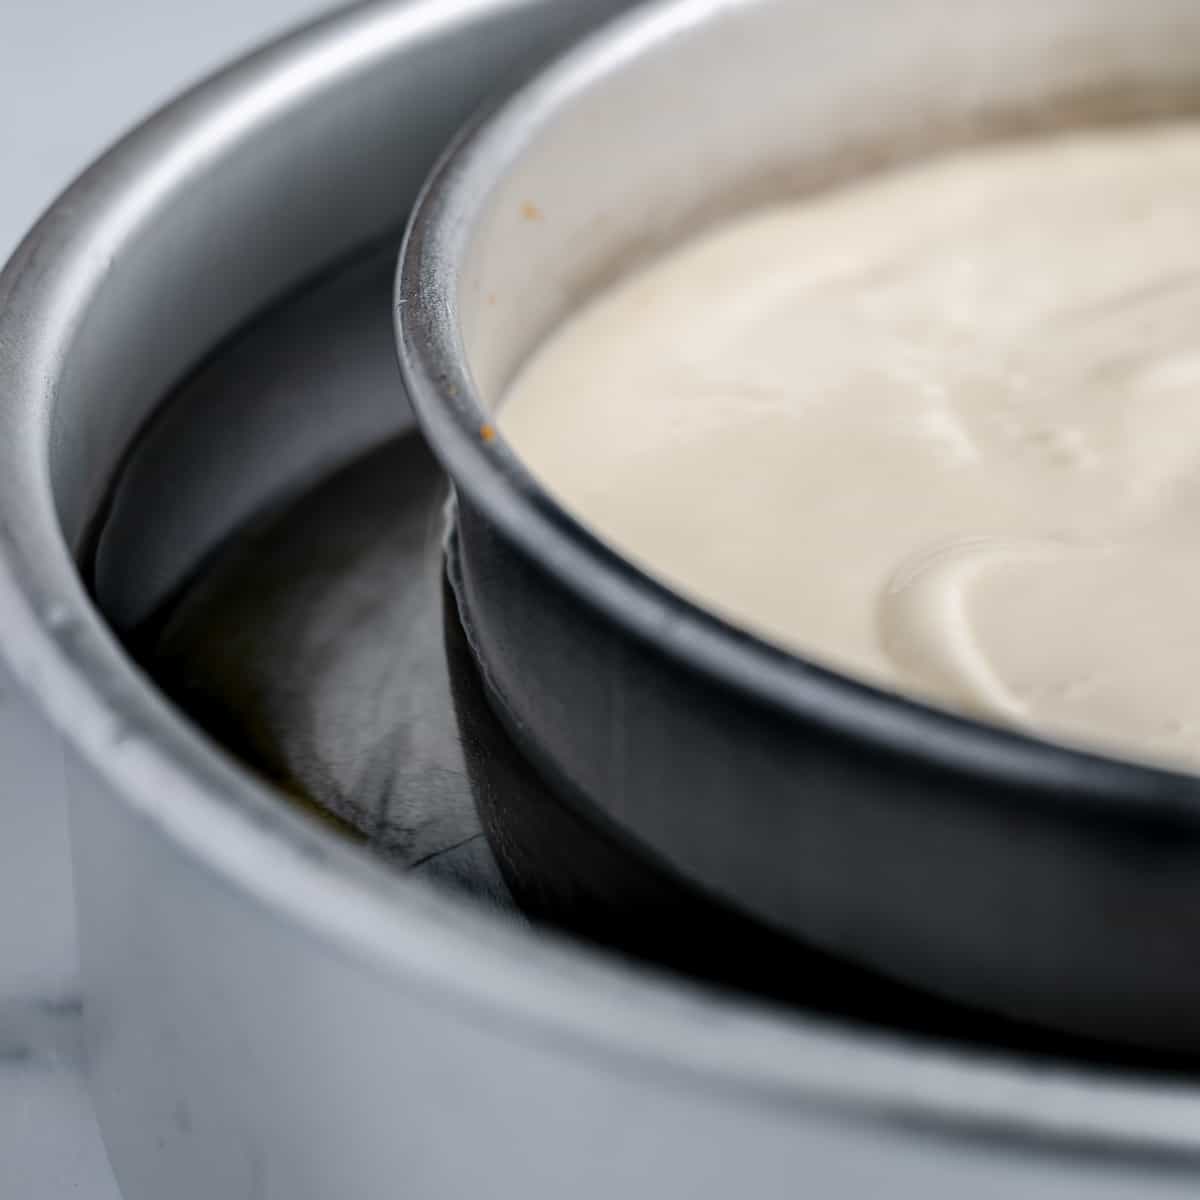
Pour the cheesecake filling over the prepared graham cracker crust.
Next, you’ll need to prepare your water bath. Grab another cake pan or a roasting pan that is larger than the cake pan holding the cheesecake.
If using a springform pan, wrap the bottom and sides in foil to prevent water from getting into the cheesecake, if you’re using a high sided cake pan, you can just set your cheesecake into the larger pan.
Pour hot, steaming water into the roasting pan, being careful not to splash water into the cheesecake. Add enough water to the roasting pan so that it comes up to the same height as the batter sitting in the cake pan.

Carefully transfer the water bath and cheesecake into the oven and bake at 325º for 55-65 minutes. The cheesecake is done when the sides have risen and puffed and the center jiggles but doesn’t look wet. It should jiggle like gelatin, not like a liquid.
Turn off the oven and stick a wooden spoon in the oven door to keep it open a crack. Let the cheesecake cool in the oven for 1 hour.
Remove the cheesecake from the oven and the water bath and allow it to cool to room temperature before chilling overnight.
How to make the cherry topping for the cheesecake
In a 2 quart saucepan, combine frozen cherries, sugar, lemon juice, and cornstarch. Stir to coat the cherries.


Over medium high heat, heat cherries until boiling.
Once the fruit mixture has come to a boil, allow the mixture to continue boiling for 5-7 minutes, stirring frequently to prevent burning. If the mixture bubbles too furiously, turn the heat down.
The sauce is done when the cherry juice is thick and syrupy, coats the back of a spoon easily, and the mixture has reduced to 2 cups.

Allow the cherry mixture to cool completely before topping the cheesecake or storing it in the fridge.
FYI-The sauce will thicken as it cools.
Unmolding and topping the cheesecake
Once your cheesecake has chilled completely and the cherry topping has cooled, it’s time to unmold the cheesecake.
If using a springform pan: Simply run a thin knife along the edge between the cheesecake and the pan to loosen, and make sure to get down to the crust. Unhook the buckle and gently lift off the ring of the springform pan.
If using a cake pan without a removable bottom: Run a thin knife along the edge between the cake and the pan to loosen, and make sure to get down to the graham crust. Heat up some water until very hot and steaming, and pour it into a roasting pan or larger cake pan. Carefully dip the cheesecake pan in the very hot water for about 15 seconds and remove. Grab a dinner plate and place it over the top of the cheesecake pan and then flip the cake pan over. The cheesecake should slide out slowly onto the dinner plate, crust side up. If the cake doesn’t slide out easily, dip the bottom of the cake pan again for a few seconds. Finally, grab your serving plate or a cake circle and carefully flip the cheesecake right side up.


After unmolding, spoon the cherry topping over the cake and serve.

Tips
- Use room temperature cream cheese. This will ensure that the cheesecake filling will be perfectly smooth and creamy.
- Add the eggs last. By mixing the eggs into the cheesecake batter last, you’re ensuring that the batter will not be overmixed AND it gives you the opportunity to taste test the batter without risk. This way you can add in a little more vanilla or lemon to your taste, without consuming raw egg.
- Use a water bath. This is the best way to bake a cheesecake while preventing cracks. The water bath allows the cake to bake in a gentle and even heat, preventing the edges of the cheesecake from getting overcooked and cracked while you wait for the center to bake through.
- Bake your cheesecake in a cake pan vs a springform pan. This is unconventional, but I really recommend baking cheesecakes in a high sided cake pan instead of a springform pan. I actually learned this from Alton Brown’s Sour Cream Cheesecake recipe, and have never looked back. Springform pans have a tendency to let in water, even when they’re wrapped in foil, so by baking your cheesecake in a cake pan, you eliminate that risk.
- Let the cheesecake sit in the oven with the door cracked. After the cheesecake is done baking, turn off the oven, but leave the door cracked for one hour. This will protect the cheesecake from a temperature shock and will allow it to cool gently, preventing cracks. This will also help finish the cooking process.
- Avoid low fat or reduced fat products. Low fat cream cheese and sour cream contain a lot more water than full fat products. This leads to evaporation during the cooking process, which will cause a drier and cracked cheesecake. The texture will not be as creamy either. Let’s be honest, if you’ve committed yourself to making a cheesecake, don’t cut corners, get the decadent stuff.
Cutting your Cheesecake

When it’s time to slice up your cheesecake, have a sharp chef’s knife and some clean towels handy.
The trick is to wipe off the knife after each slice you make, giving you perfectly clean and smooth slices of cheesecake. This can be done with or without the cherry topping.
Some people like to dip their knives in hot water in between slices, I don’t find it necessary, but that’s something you can do as well!
Freezing Cherry Cheesecake
Cheesecake freezes BEAUTIFULLY.
Once your cheesecake is completely cooled, it can be frozen in slices or frozen whole. If you are freezing this cheesecake whole, or with the intention of making it ahead to be served at a later date, I’d recommend either freezing the cherry topping separately or making the topping closer to the date you need it. The cherry sauce topping can be made a week in advance.
If you’re looking to freeze leftovers, then freezing the cake with the cherry sauce on top is completely fine.
When you’re ready to serve your cheesecake, take out the quantity needed, keep it covered, and allow it to thaw completely overnight in the fridge. Once your cheesecake is thawed, enjoy!

Why did my cheesecake crack?
Cheesecake is notorious for cracking. If you find yourself with a cracked cheesecake, one of these reasons may be to blame.
- Overmixing: Overmixing the cheesecake batter, especially the eggs can lead to cracks.
- The cake is overcooked: Baking a cheesecake too long will cause the surface to dry out and eventually crack. A cheesecake is done when it is slightly puffed around the edges and still jiggles. It should jiggle like gelatin, not like liquid. The cake will finish cooking while it’s sitting in the oven with the door cracked.
- Drastic temperature drop: Cheesecakes don’t do well when the temperature drops suddenly (like taking it out of the oven immediately). It shocks the cake which causes a lot of pulling and tearing, thus leading to cracks. By letting the cake sit in an off oven for an hour, the temperature can drop slowly, letting the cake relax and cool gently.
Variations:
- This cheesecake is baked using the water bath method for a perfect no fail and crack-free cake. But if you want to go the no bake route, try making my No Bake Lemon Cheesecake or no bake chocolate cheesecake with this sweet cherry topping instead.
- This recipe can also be made into mini cheesecake bites or slightly bigger individual cheesecakes for a cute sweet treat. Just follow the instructions for each recipe and top them with the cherry sauce!
- You can swap out the graham cracker crumbs for your favorite cookie crumbs. Make this cheesecake gluten-free by using almond flour shortbread cookies, or simply replace the graham crackers with your favorite flavor Oreo or butter cookie crumbs! For the swap, you’ll need 1 1/3 cups of crushed cookies.
Save This Recipe
Just enter your email below and we will send this recipe right to your inbox, plus we will send more yummy recipes and ideas.
Homemade Cherry Cheesecake
Ingredients
Sweet Cherry Topping
- 16 oz 3 rounded cups frozen cherries, a combo of sweet and tart
- 1/2 cup of granulated sugar
- 3 tablespoons of fresh lemon or lime juice
- 1 tablespoon of cornstarch
The Graham Cracker Crust
- 9 whole graham crackers
- 1 tablespoon of sugar
- 1/8 teaspoon of salt
- 5 tablespoons unsalted butter melted
Cheesecake Filling
- 24 oz of cream cheese softened at room temperature
- 1/2 cup of sour cream
- 1 cup of granulated sugar
- 3 – 4 tablespoons of fresh lemon juice
- 1 teaspoon vanilla extract
- 3 large eggs room temperature
Instructions
- To make the cherry sauce:In a 2 quart saucepan, combine the frozen cherries, sugar, lemon juice, and cornstarch. Stir to coat the cherries.
- Over medium high heat, heat cherries until boiling.
- Once the fruit mixture has come to a boil, allow the mixture to continue boiling for 5-7 minutes, stirring frequently to prevent burning. If the mixture bubbles too furiously, turn the heat down.
- The sauce is done when the cherry juice is thick and syrupy, it coats the back of a spoon, and the mixture has reduced to 2 cups.
- Allow the cherry mixture to cool completely before topping the cheesecake or storing in the fridge*. The sauce will thicken as it cools.
- To make the Graham Cracker Crust:Preheat the oven to 350º and spray an 8” or 9” springform pan or a cake pan with high sides with cooking spray. Line the bottom of the pan with a piece of round parchment paper and spray the parchment too.
- Crush the graham crackers into fine crumbs. This can be done in a food processor or with a rolling pin and a ziploc baggie.
- In a medium bowl, combine the graham cracker crumbs, sugar, and salt and give it a mix.
- Pour over the melted butter and stir until the crumbs are evenly moistened and will clump together when squeezed.
- Use a drinking glass with a flat bottom to press the crumbs into the bottom of the springform (or cake) pan.
- Bake the crust at 350º for 12-15 minutes until golden brown around the edges. Once baked, remove the crust from the oven and lower the oven temperature to 325º.
- To make the cheesecake filling: Add cream cheese to a large mixing bowl and beat on medium low speed until smooth—about 30-45 seconds.
- Add the sour cream and mix until incorporated. Once mixed, use a rubber spatula to scrape the sides and bottom of the bowl.
- Next, add the sugar and beat until well mixed. Turn the mixer down to low speed and add 3 tablespoons of lemon juice and vanilla extract, mix until blended. Give the batter a taste and add another tablespoon of lemon juice or a couple of drops more of vanilla if desired.
- Turn the mixer back up to medium low, and add the eggs one at a time, mixing each egg thoroughly before adding the next. Give the mixing bowl a final scrape and finish mixing until the batter is smooth and all the ingredients are completely blended.
- Pour the cheesecake filling over the prepared graham cracker crust.
- Next, you'll need to prepare your water bath. Grab another cake pan or a roasting pan that is larger than the cake pan holding the cheesecake.
- If using a springform pan, wrap the bottom and sides in foil to prevent water from getting into the cheesecake, if you're using a high sided cake pan, you can just set your cheesecake into the larger pan.
- Pour hot, steaming water into the roasting pan, being careful not to splash water into the cheesecake. Add enough water to the roasting pan so that it comes up to the same height as the batter sitting in the cake pan.
- Carefully transfer the water bath and cheesecake into the oven and bake at 325º for 55-65 minutes. The cheesecake is done when the sides have risen and puffed and the center jiggles but doesn't look wet. It should jiggle like gelatin, not like a liquid.
- Turn off the oven and stick a wooden spoon in the oven door to keep it open a crack. Let the cheesecake cool in the oven for 1 hour.
- Remove the cheesecake from the oven and the water bath and allow it to cool to room temperature before chilling overnight.
- Unmolding and topping the cheesecakeIf using a springform pan: Simply run a thin knife along the edge between the cheesecake and the pan to loosen, and make sure to get down to the crust. Unhook the buckle and gently lift off the ring of the springform pan.
- If using a cake pan without a removable bottom: Run a thin knife along the edge between the cake and the pan to loosen, and make sure to get down to the graham crust. Heat up some water until very hot and steaming, and pour it into a roasting pan or larger cake pan. Carefully dip the cheesecake pan in the very hot water for about 15 seconds and remove. Grab a dinner plate and place it over the top of the cheesecake pan and then flip the cake pan over. The cheesecake should slide out slowly onto the dinner plate, crust side up. If the cake doesn't slide out easily, dip the bottom of the cake pan again for a few seconds. Finally, grab your serving plate or a cake circle and carefully flip the cheesecake right side up.
- After unmolding, spoon the cherry topping over the cake and serve.

I made this and it turned out perfect. Thanks for the recipe!