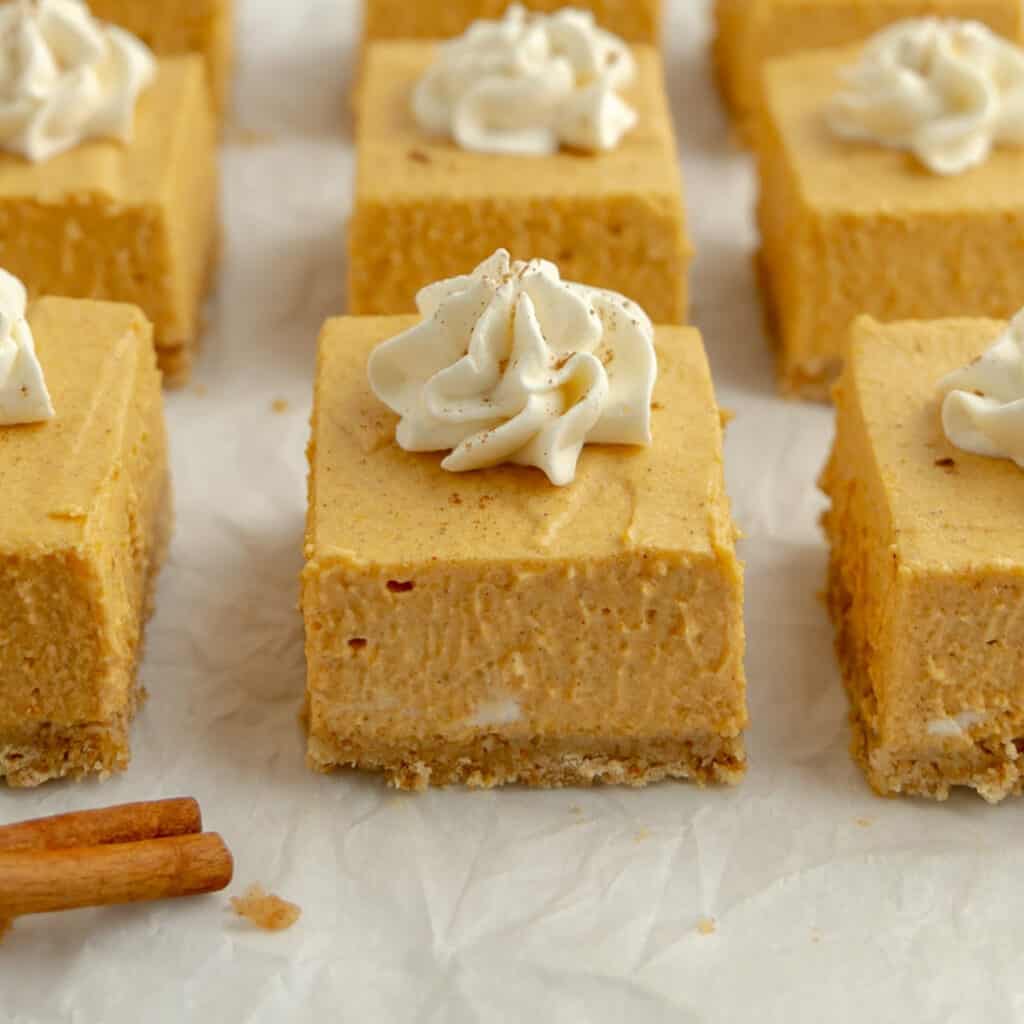
Pumpkin Pie With Graham Cracker Crust

This post may contain affiliate links, see my disclosure policy for details.
After 25 years of baking, I’ve learned that simple methods just taste better—especially during the holidays. This Homemade Pumpkin Pie with a Graham Cracker Crust skips the rolling pin and uses a crisp, toasted graham crust instead. The filling is traditional and I include step by step instructions, including how to know EXACTLY when the filling is baked. No guesswork, no fails. If you’re looking to simplify your Thanksgiving dessert lineup without sacrificing nostalgia or flavor, this pie is the one.
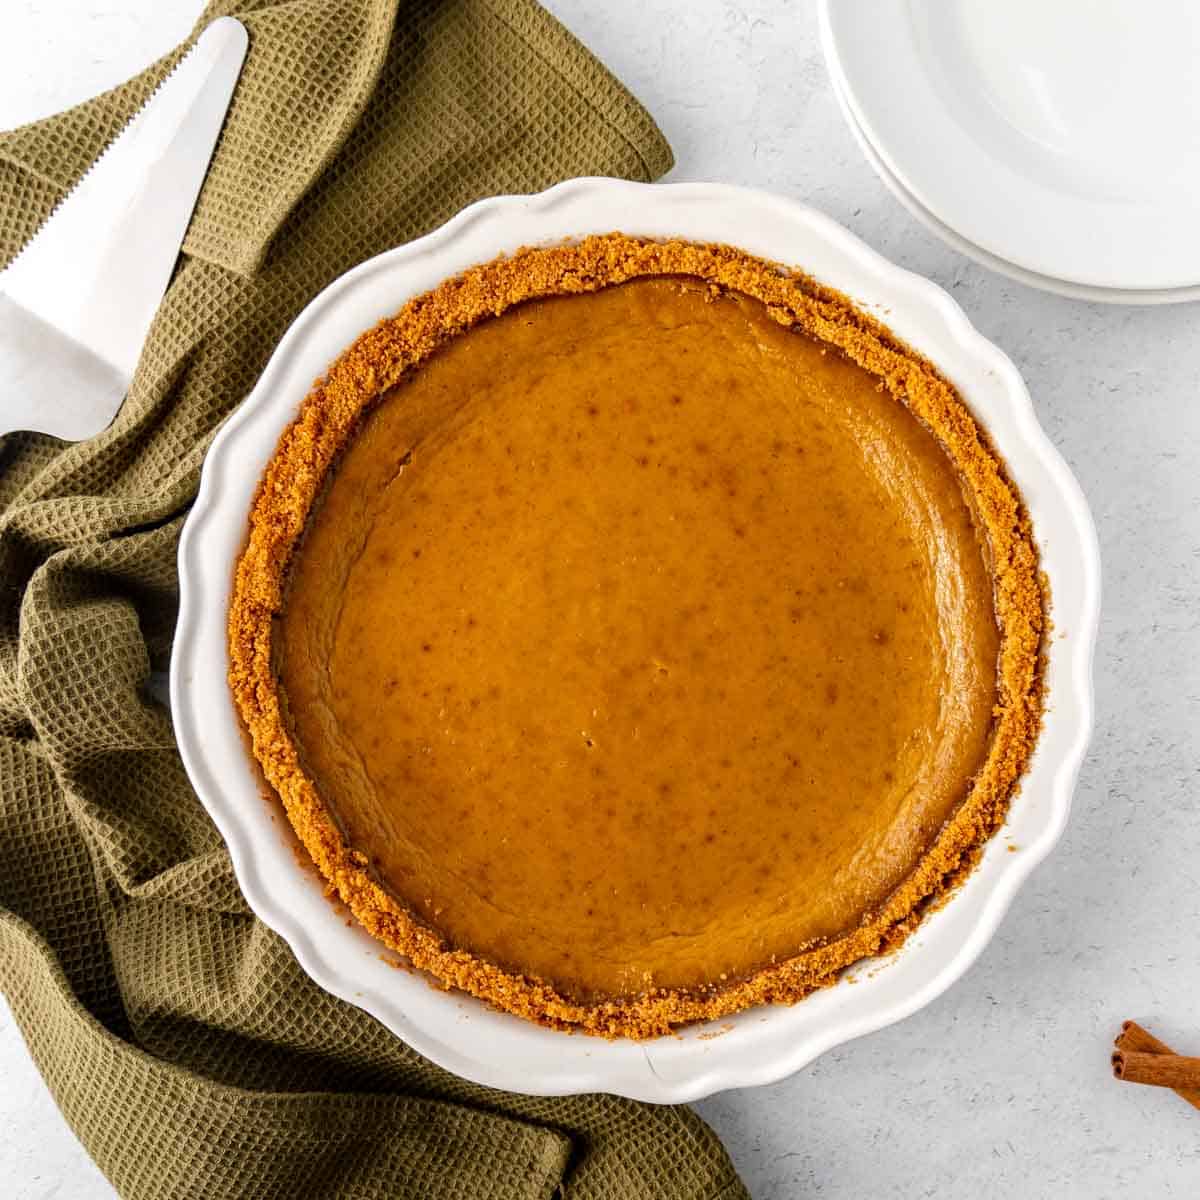
For this easy recipe, we create a rich and creamy pumpkin pie filling, all from scratch with no evaporated milk. Then we bake that delicious filling inside of a toasty, homemade buttery graham cracker crust.
I LOVE this combo because the crust is sweet and toasty, while the pie filling is super creamy and delightfully spiced. The whole pie is an absolute dream.
This delicious pie takes a lot less work than making the traditional version, so make sure to add it to your Thanksgiving dessert lineup this holiday season!
If you’re looking for more pumpkin pie inspiration for the holidays, try my Pumpkin Cheesecake Fluff or No Bake Pumpkin Cheesecake Bars.
Why You’ll Love this Pumpkin Pie Recipe with Graham Cracker Crust
This is a classic pumpkin pie filling with simple ingredients that come together while the graham cracker crust is baking. It’s an adaptation of Libby’s Pumpkin Pie Recipe, I just made it a little richer with the addition of cream and whole milk (no evaporated milk required).
I also deepened the flavor by adding a little ground nutmeg to the pumpkin spice and a touch of vanilla extract.
Full ingredient amounts and instructions can be found on the recipe card at the bottom of the post.
Ingredients You’ll Need
- Graham cracker pie crust: You can make your own crust using my easy graham cracker crust recipe or use a store-bought graham cracker crust. If you’re buying a crust already made, choose a 10″ deep dish crust for this recipe.
- Canned or fresh pumpkin puree: Do not use pumpkin pie filling. Just pure pumpkin puree for this recipe.
- Heavy cream: The cream adds richness and a velvety texture to the pie.
- Whole milk: For flavor and texture.
- Large eggs: The eggs are used two different ways. One way will bind the filling together and the second provides a moisture barrier for the graham cracker crust while it’s baking.
- Granulated sugar: White granulated sugar adds a nice sweetness and brings out the spices and pumpkin.
- Spices: Cinnamon, ginger, nutmeg, ground cloves give this pie a warm and spicey flavor.
- Kosher salt: For flavor and balance.
- Vanilla extract: For extra flavor and warmth.
Equipment You’ll Need
- 9″ or 10″ pie plate
- Food processor
- Medium size mixing bowl
- Whisk or hand mixer
- Baking sheet
How to Make Pumpkin Pie with Graham Cracker Crust
There are three parts to making this pie:
Part 1: Make the graham cracker crust (premade crust instructions included)
Part 2: Make the filling
Part 3: Baking and cooling the pie
Make The Graham Cracker Crust
Step 1: Add whole graham crackers to a food processor. If you don’t have a food processor, you can place the crackers in a large Ziploc bag and use a rolling pin to crush them.
Step 2: Add 2 tablespoons of granulated sugar and 1/8th teaspoon of kosher salt to the crackers in the food processor bowl. Pulse until the crumbs are almost entirely crushed.
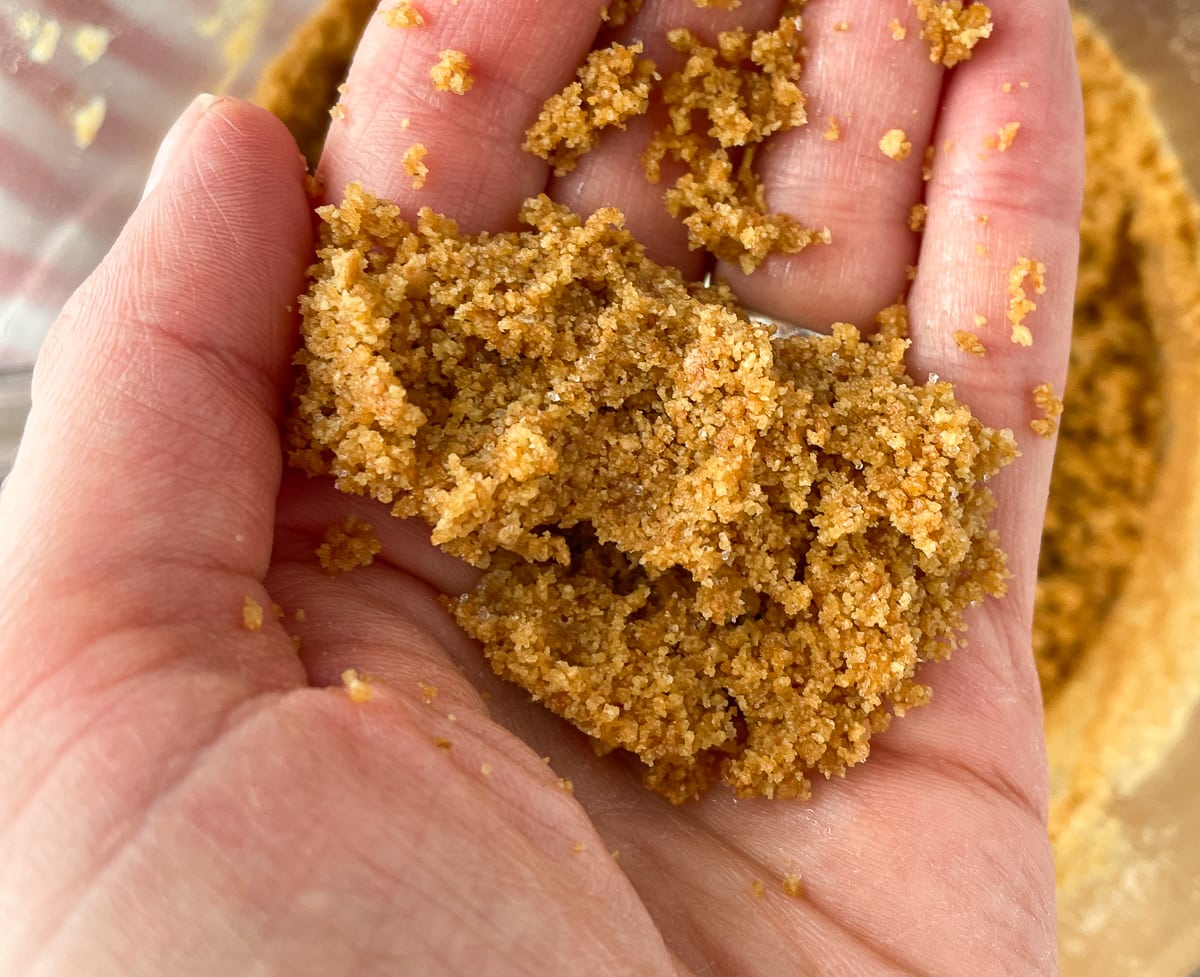
Step 3: Pour melted butter over the crumbs and finish pulsing the graham crackers until they are fine crumbs and evenly moistened by the butter. They should clump together when squeezed in your hand.
Step 4: Grab a 9 or 10″ pie plate and lightly spray it with cooking spray.
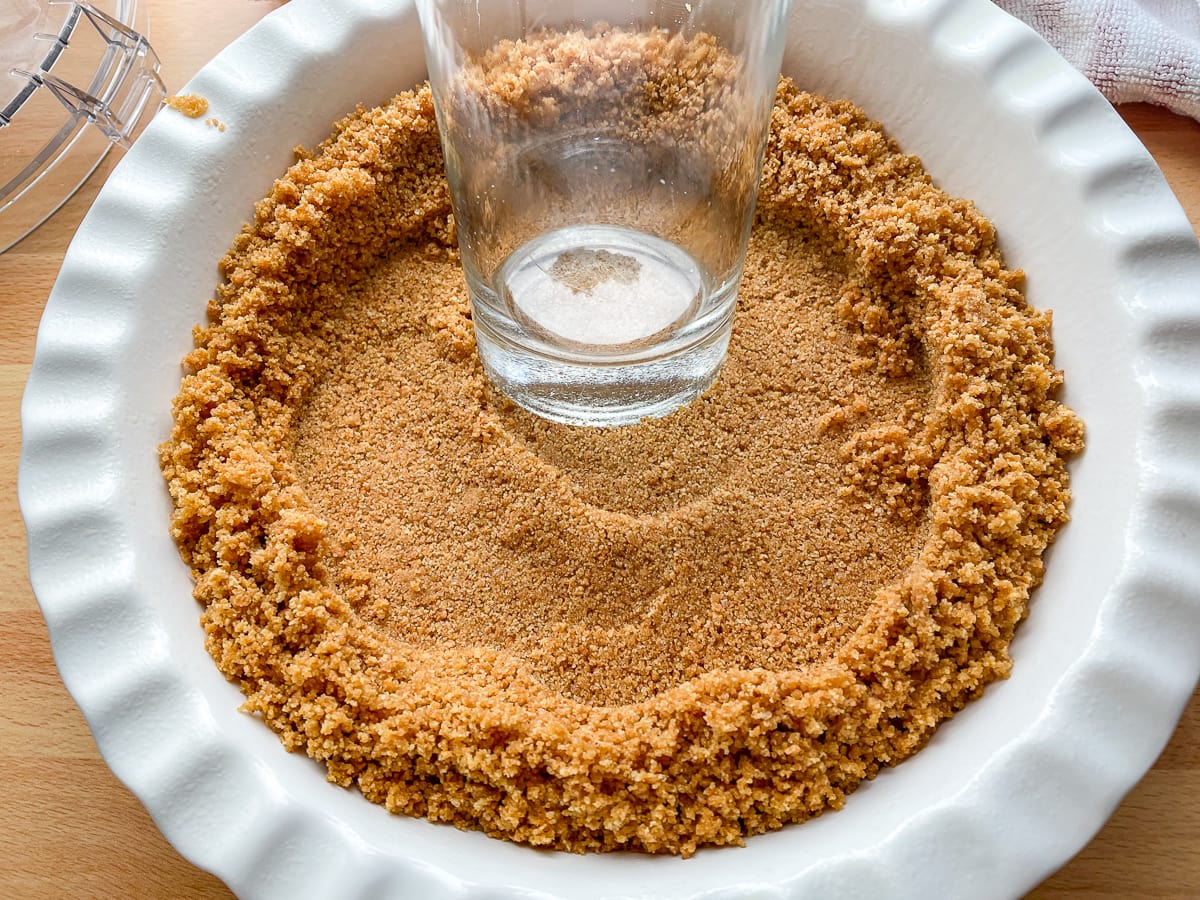
Step 5: Pour the graham cracker crumbs into the pie dish and press with a flat bottom glass to make a compact and even layer. Make sure to press up the sides of the pie plate as well.
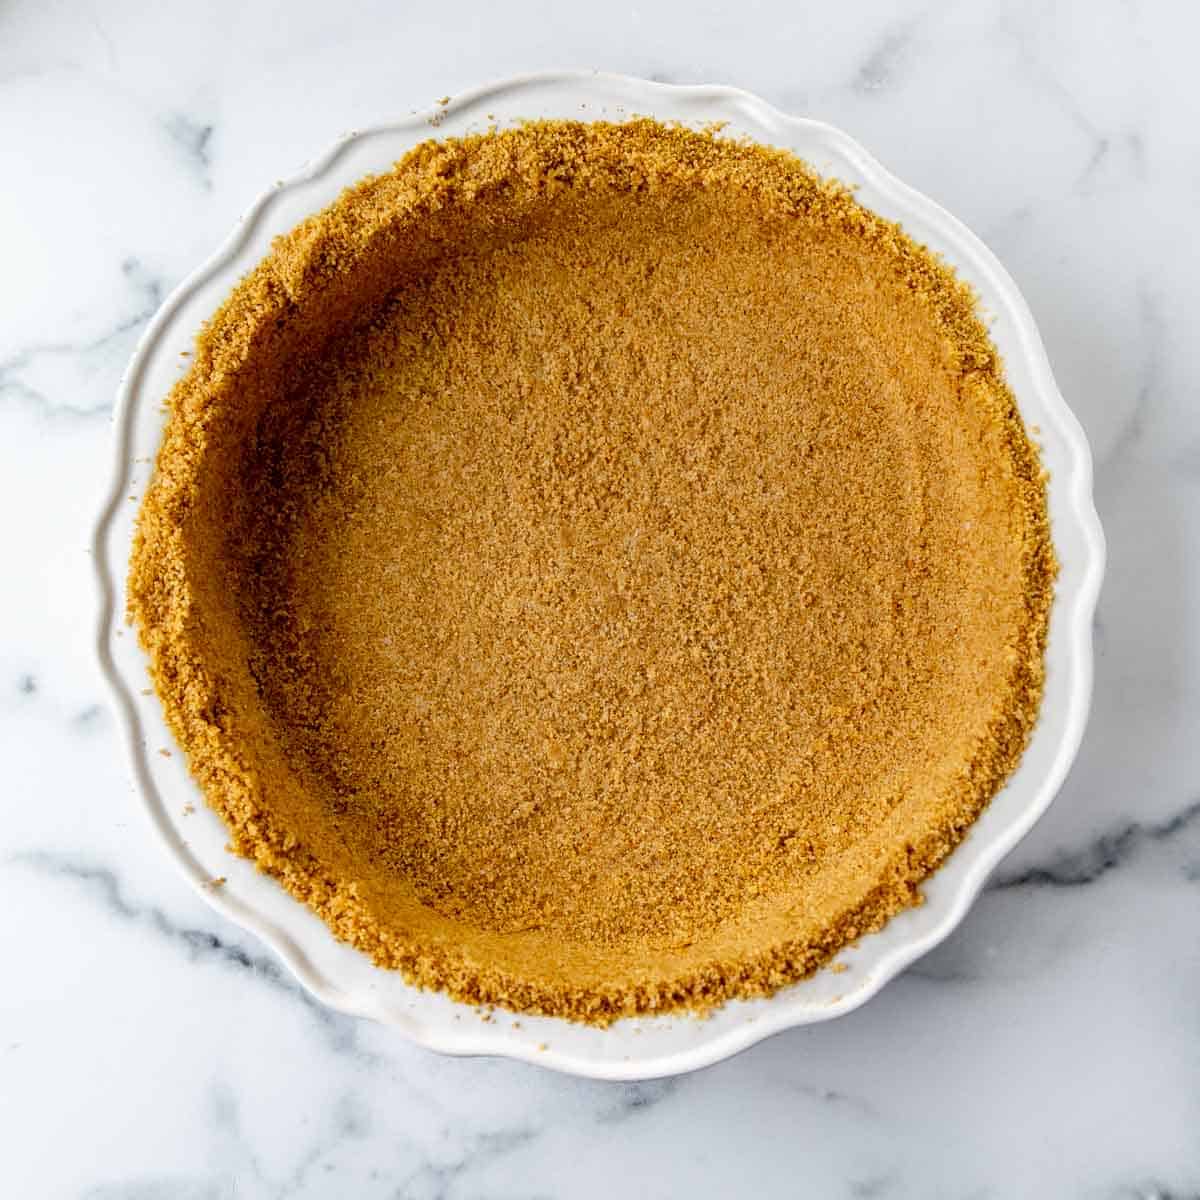
Step 6: Pop the pie plate in the freezer until the crust is firm–about 15-20 minutes.
Step 7: While your crust is firming up, beat one egg in a small dish, set aside, and preheat the oven to 350º. Move your oven rack to the third level from the bottom.
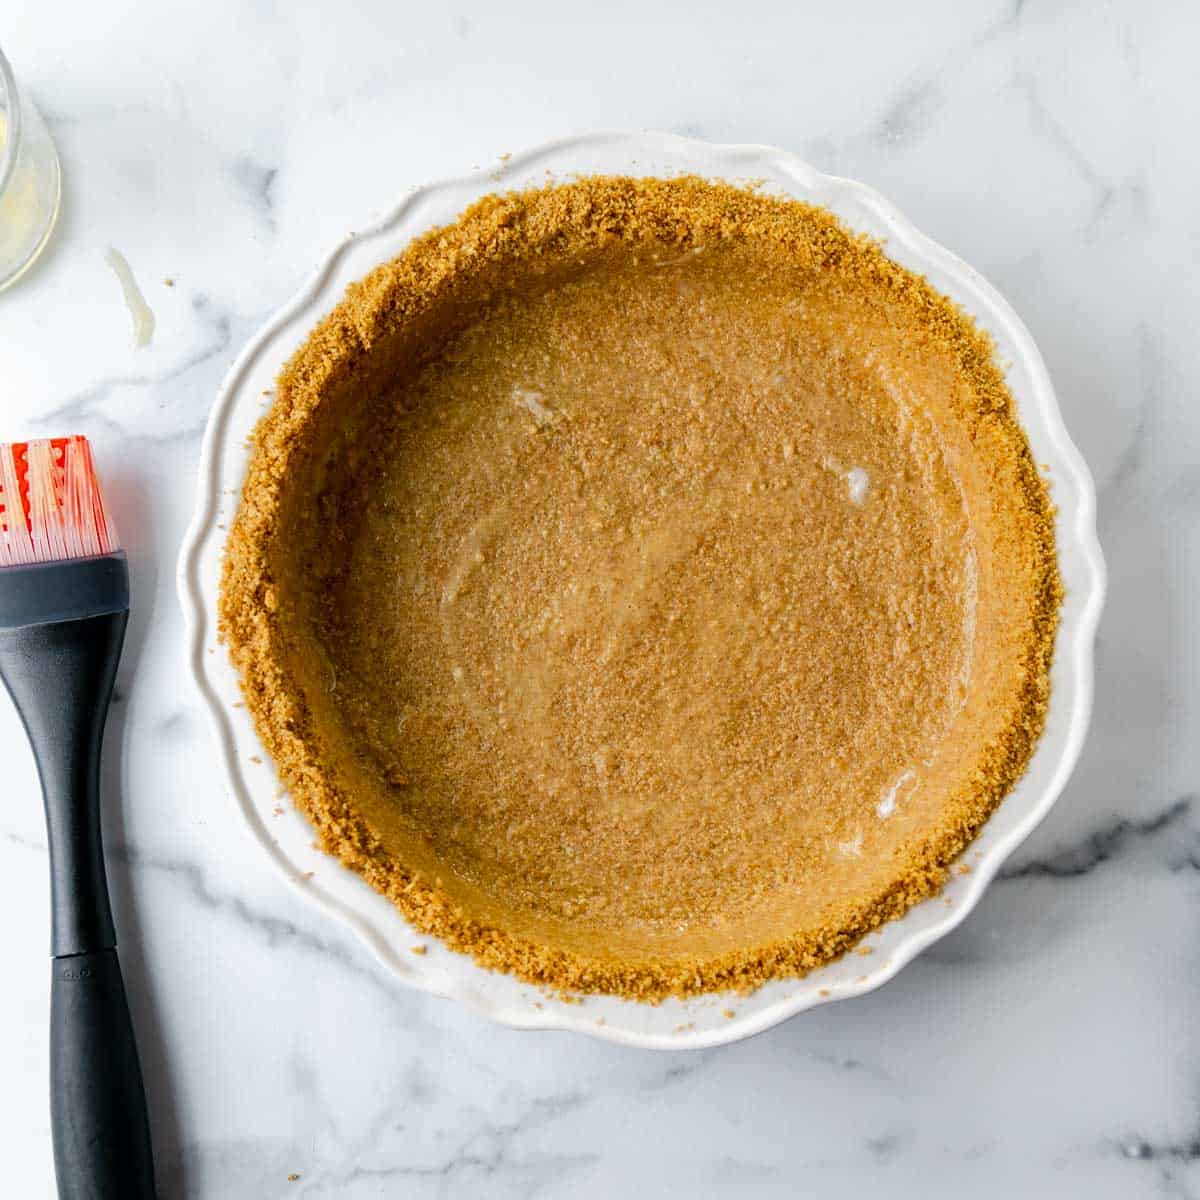
Step 8: After your crust is firm, use a pastry brush (or even a paper towel) to brush the egg wash on the bottom and sides of the graham cracker crust. You might not use all of the egg and that’s fine. Just brush on enough to give the crust a shiny egg layer.
Step 9: Bake at 350º for 12-15 minutes until the egg is cooked, and glossy and the crust is just starting to brown.
Tip: Using a Premade Graham Cracker Crust: To make this recipe even easier, you can use a premade graham cracker crust, just grab the 10″ crust or the deep dish version. When using a store-bought crust, skip the freezing step and just brush with the egg wash. You’ll still need to prebake the crust at 350º for 10-12 minutes.
Make The Pumpkin Pie Filling
Combine the pumpkin puree, milk, cream, eggs, sugar, spices, vanilla, and salt in a medium bowl.
Mix all the ingredients together with a whisk or handheld electric mixer until well blended and smooth. Set aside until your pie crust is done baking!
Bake Pumpkin Pie
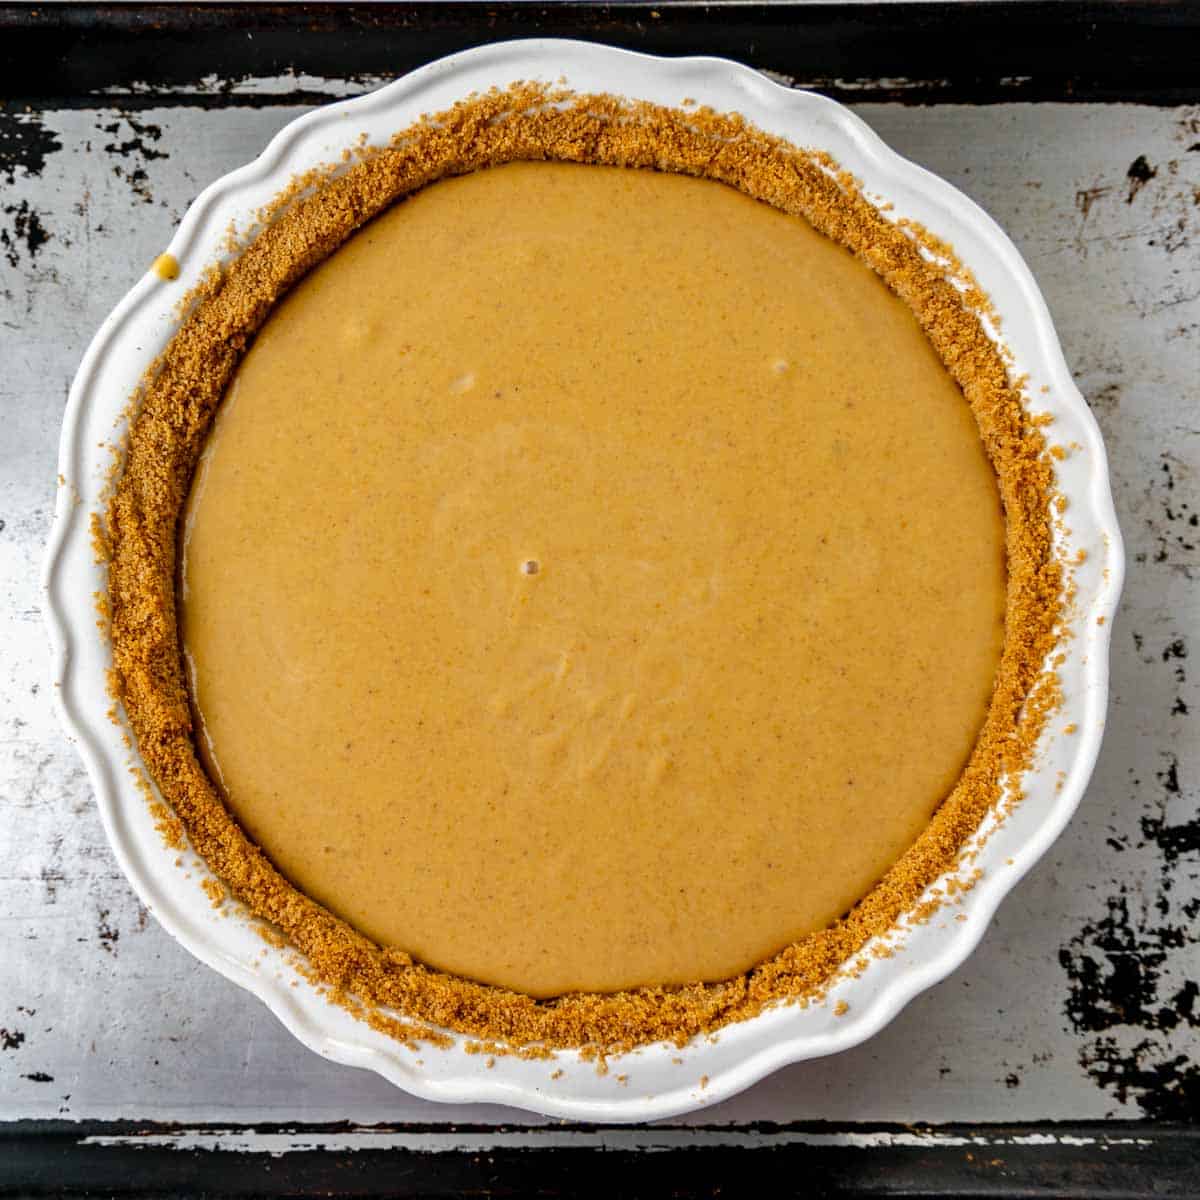
Once the crust has been baked, place it on a sheet pan and pour the pumpkin mixture straight onto the hot crust.
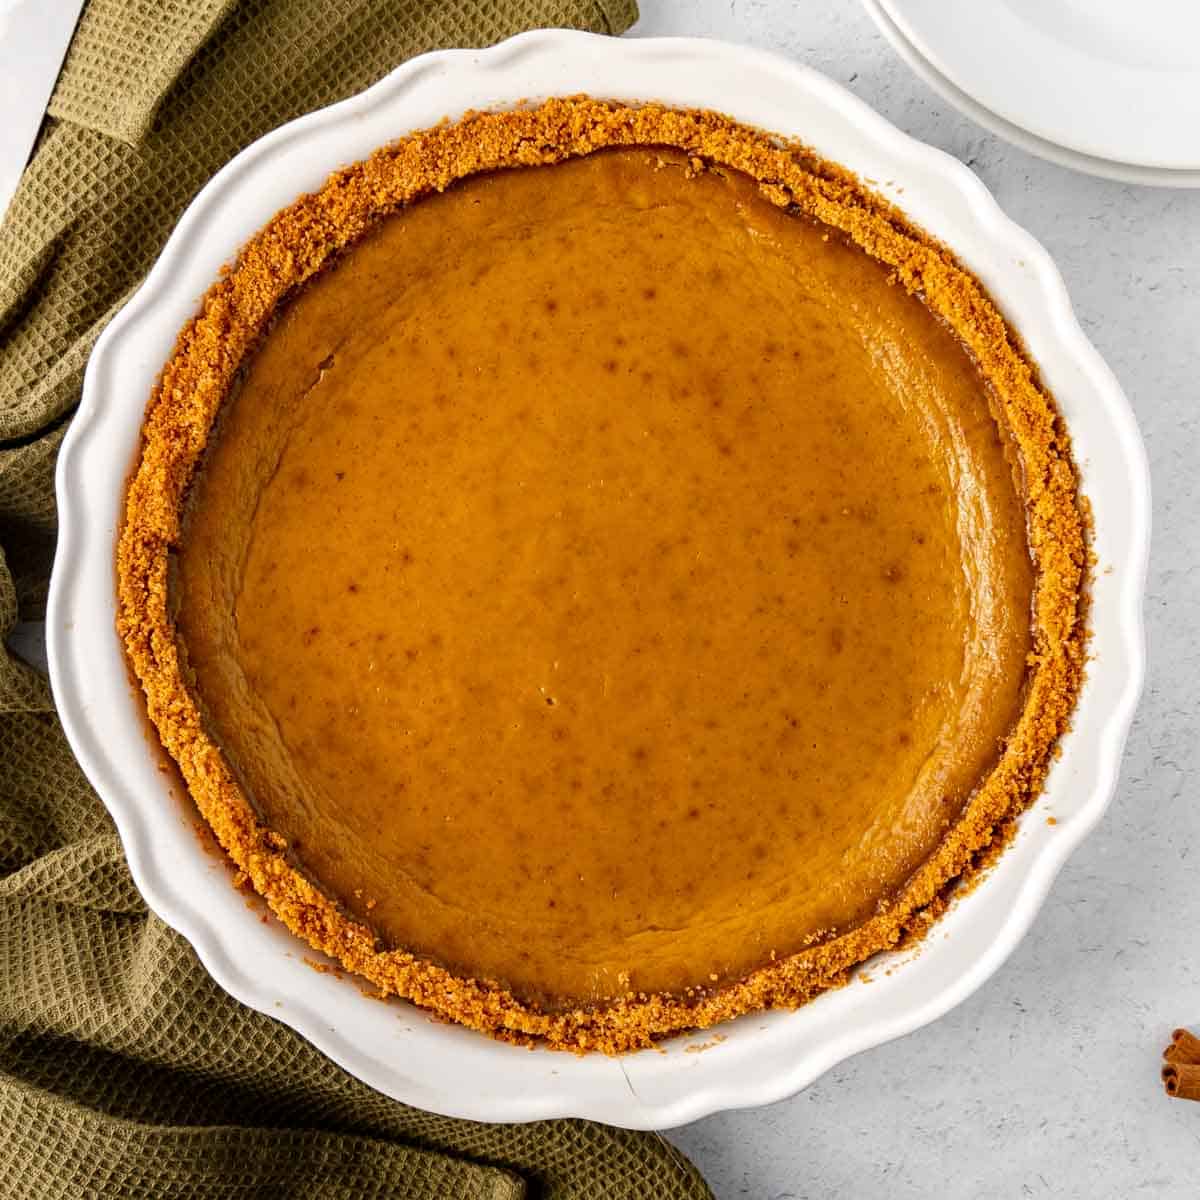
Pop the pie (on the sheet pan) back into the 350º oven and bake for 55-65 minutes or until the internal temperature reaches 175º on an instant read thermometer.
When the pie is done baking, turn off the oven and leave the oven door open a crack (you can use a wooden spoon or an oven mitt to prop the door open) for 1 hour. Leave the pie inside the oven.
After the hour, remove the pie from the oven and let it cool completely at room temperature on a wire rack before transferring it to the refrigerator. The pie should be left to set for a minimum of 6 hours but overnight is best.
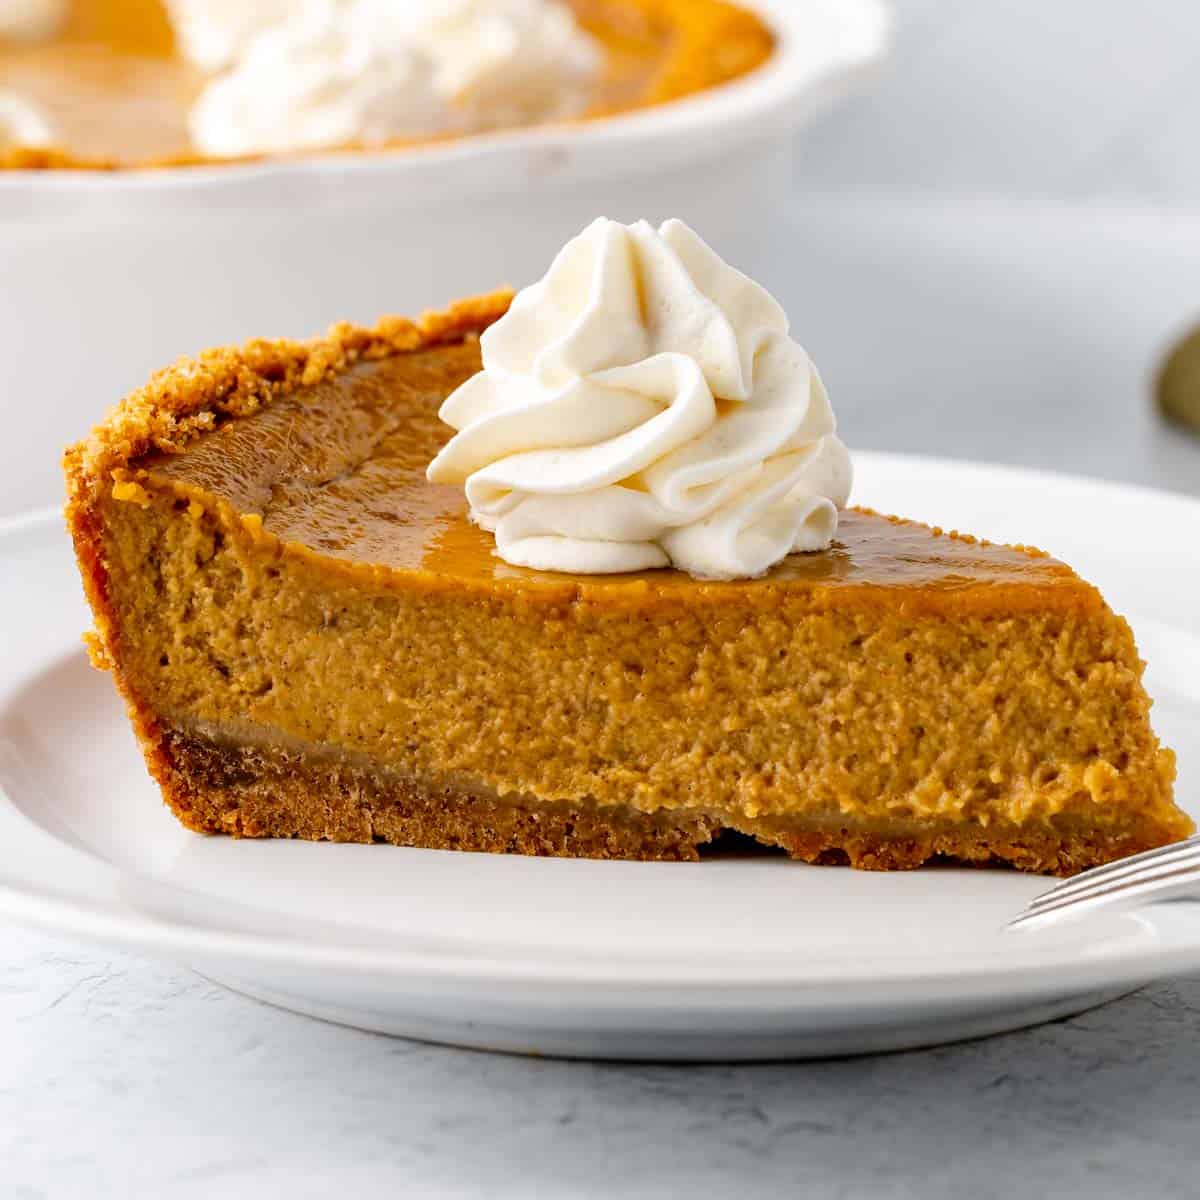
This pie is best served with a dollop of whipped cream or homemade vanilla ice cream, and fresh coffee right after a big Thanksgiving dinner.
How do you know when the pumpkin pie is done?
You’ll know the pie is done when the edges and the middle of the pie are puffed and a little rounded. The pie will still be jiggly, but it won’t look like liquid jiggling–it’ll look more like jello jiggling.
If you have an instant-read thermometer, you can use that! Once the center of the pie reaches 175º it’s done! Just to let you know, there will be a crack from where you took the temperature, so take that into consideration when you’re serving later.
For extra insurance, let the pie sit in the oven, turned off, with the door cracked for one hour. This will ensure the pie finishes cooking and will allow it to cool gently as the oven temperature comes down. I use the same cool down method for baking my Oreo Cheesecake and my Mini Cheesecakes.
Substitutions and Variations:
- Use a premade graham cracker crust instead of homemade. You’ll need to use the 10″ or “deep dish” version of the premade crust to hold all the pumpkin filling. I still recommend brushing it with an egg wash and prebaking before filling.
- Substitute 1 tablespoon of pumpkin pie spice for the spices in the filling.
- You can use shortbread cookies or gingersnaps in place of the graham crackers! You’ll need 2 1/2 cups of cookie crumbs.
- If you have your own favorite pumpkin pie filling, feel free to use that instead of the filling recipe listed above! I LOVE using Libby’s Famous Pumpkin Pie Filling for this. It does cook a little quicker, so start checking for doneness around the 45-minute mark.
- Want a regular pie crust? You can use my all butter pie dough for a delicious traditional pumpkin pie.
Pro Tips
- Brush the inside of the graham cracker crust with a beaten egg to keep it from getting soggy under the liquid pie filling.
- Prebake your crust to bring out the toasty caramel flavors and to keep it firm and held together under the filling
- Pour the filling onto the hot crust so that it begins to bake and set instantly. This helps keep the crust from getting soggy
- Allow the pie to set for a minimum of 6 hours but overnight is best. That way it’ll be just the right texture and the flavors will have time to develop
- If you notice the sides of your crust starting to get too brown during baking, you can cover them with foil
- Taking the pie’s temperature is the most accurate way to test for doneness, but it will create a crack where the thermometer was inserted. This can be easily covered with whipped cream for presentation purposes
Leftovers and Storage
Leftover pumpkin pie can be wrapped in plastic and stored in the refrigerator for up to 4 days.
You can also freeze this pie! Just wrap it really well in a freezer safe and airtight vessel to prevent freezer burn. It’ll keep for months.
When you’re ready to eat, just let it thaw for several hours (or overnight) in the fridge.
Frequently Asked Questions
I say yes. Once the pie has cooled completely after baking, I pop it in the fridge to chill and finish setting up before serving.
I prefer the texture and flavor of a chilled pumpkin pie and find that the pie lasts longer in the fridge. This pie in particular does contain cream, milk, and eggs, and although it is a baked pie, refrigerating will keep the pie fresh longer.
Yes. Especially when you’re dealing with a very runny filling like pumpkin pie.
Baking the crust ahead of time will help keep the crust’s shape for cutting and keep it from getting too soggy. I find that baking the crust ahead of time also brings out the natural toastiness of the graham crackers, and slightly carmelizes the sugars in the crust.
Brushing the crust with an egg wash before baking helps to create a moisture barrier, keeping the crust from getting too soft when the filling is added.
I pre-bake both my homemade and store bought graham cracker crusts!
The combination of the melted butter and the granulated sugar help to bind graham cracker crumbs into a sturdy pie crust. The melted butter helps to moisten and soften the crumbs, allowing them to clump together. This is useful for shaping and tamping the crust in place.
The sugar in between the crumbs will melt during the baking process, gluing all those cracker crumbs in place.
We use an egg wash in this recipe, which acts primarily as a moisture barrier, but it also helps to seal the graham cracker crumbs together! See my Homemade Graham Cracker Crust Recipe for even more tips!
If you make this recipe, give it a 5 STAR Rating and Leave a Comment!
More Recipes With Graham Cracker Crusts

More Favorites from Barefoot In The Pines
Save This Recipe
Just enter your email below and we will send this recipe right to your inbox, plus we will send more yummy recipes and ideas.
Pumpkin Pie Recipe (with graham cracker crust)
Ingredients
Homemade Graham Cracker Crust
- 14 honey graham cracker sheets
- 2 tablespoons granulated sugar
- 1/8 teaspoon kosher salt
- 7 tablespoons unsalted butter, melted
- 1 whole egg
If Using A Premade Crust
- 1 10" or "Deep Dish" Premade Graham Cracker Crust
Pumpkin Pie Filling
- 15 oz pumpkin puree, canned or fresh
- 1 cup heavy cream
- 1/2 cup whole milk
- 3/4 cup granulated sugar
- 1 teaspoon ground cinnamon
- 1/2 teaspoon ground ginger
- 1/2 teaspoon kosher salt
- 1/4 teaspoon nutmeg
- 1/4 teaspoon ground cloves
- 1 teaspoon vanilla extract
- 3 large eggs
Instructions
- TO MAKE THE GRAHAM CRACKER CRUST: Preheat the oven to 350℉ and lower your oven rack to the third level from the bottom. If using a pre-made graham cracker crust, skip ahead to step 7.
- Lightly spray a 9″ or 10″ pie plate with cooking spray.
- In the bowl of a food processor, add the graham crackers, sugar, and salt, and pulse until the crackers are almost completely ground.
- Add the melted butter to the food processor and pulse until the cracker crumbs are ground fine and the mixture is evenly moistened and clumping.
- Pour the crumbs into the pie plate and press into a compact and even layer. Use the bottom of a flat glass to help tamp down the crust. Press the graham crackers up the side of the pie plate as well, packing the crumbs together as tightly and evenly as possible.
- Pop the pie plate in the freezer for 15-20 minutes until firm.
- While the crust is in the freezer, beat one whole egg in a small dish.
- Once firm, remove the crust from the freezer or grab your premade crust.
- Using a pastry brush, lightly brush the inside bottom and sides of the pie crust with the egg wash. You might not use all the egg wash. Just make sure there's an even layer of egg coating the inside of the crust, but not saturating it.
- Bake a homemade graham cracker crust in a 350℉ oven for 12-15 minutes and bake a store bought crust at 350℉ for 10-12 minutes. You want the crust just beginning to turn brown and the egg wash baked on.
- To make the pumpkin pie filling: In a medium sized bowl, combine all the pie filling ingredients and whisk until smooth and well incorporated.
- Set the pie plate onto a sheet pan, and pour the pumpkin filling onto the hot graham cracker crust. Pop the pie plate (now on a sheet pan) back into the oven.
- Bake at 350℉ for 55-65 minutes, until the pie is puffed and jiggly, but not liquid. If you have an instant read thermometer, the internal temp should read 175º.
- Once the pie is done, turn the oven off and crack open the oven door. Leave the pie inside to cool for about 1 hour. After one hour, allow the pie to cool to room temperature and then transfer to the fridge to set for 6 hours or preferably overnight.


I’ve made this 4 or 5 times so obviously I like it. I slightly increase the spices but that’s just personal preference
Love to hear this! Thank you for sharing!!
How long do you think this would be good for if I made it ahead of time?
Hi! The crust can be made up to 3 days in advance and kept in the fridge until you’re ready to egg wash and fill. A fully baked pie can be made up to two days in advance. Happy baking!
Does the 3 egg count, for the one you use to cover the pie crust? Or is it 4 eggs in total? I didn’t want to use 1 egg on crust and 3 in the pie mix if it is supposed to be 1 on crust, and 2 in pie mix. Thank you and sorry if it’s says this already some where.
Hi!! It’s 1 egg for brushing on the crust and 3 eggs inside of the pumpkin filling! The recipe card at the bottom of the post goes into all the little details! Happy Thanksgiving!!
Hi, do I need to freeze the store bought crust as well? And when I pour the filling into the crust, does the crust have to be hot/warm/room temperature?
Hi!
Nope you do not need to freeze the pie shell with store bought graham cracker crust.
Just brush the crust with egg wash, bake it and add room temperature pie filling while the crust is still hot.
Happy baking!!