Under The Sea Cake-With Fondant Sea Animals
This post may contain affiliate links, see my disclosure policy for details.
Transform your homemade or store-bought cake into an adorable Under The Sea Cake! Below is everything you’ll need to create the sweetest fondant sea creatures and resources to the best cake and icing recipes!

This Under the Sea cake is right up there with my top favorite desserts I’ve ever made. My now three year old is obsessed with all things sea creature at the moment, so when it was time to pick a theme for her birthday party, “Under the Sea” was a no brainer.
And also every time we mentioned her birthday, she very matter of factly reminded us that she wanted a “sea creature cake”.
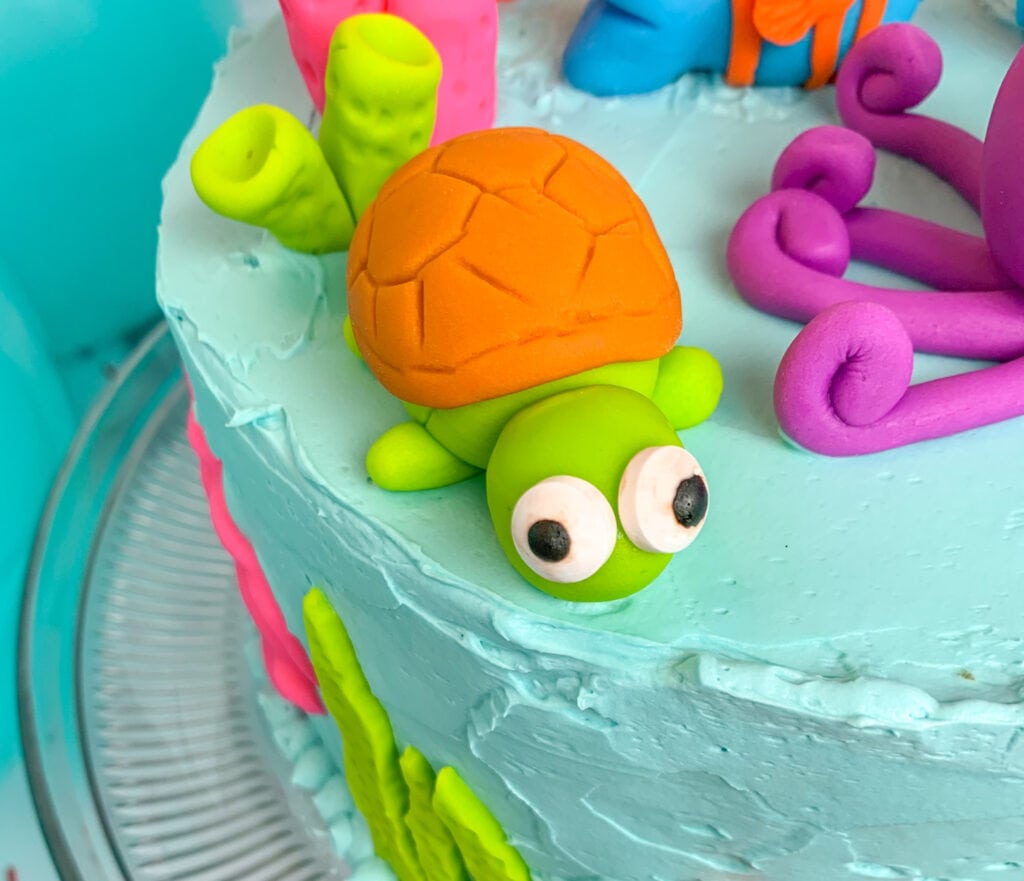
Well, she got it! This “Under the Sea” cake is the cutest cake you ever did see. It’s fun to make and is perfect for either a boy or a girl’s birthday party or baby shower!
Here’s how we make it:
What you’ll Need For Your Under The Sea Cake:
- One three layer 8 inch cake, frosted with blue or teal vanilla buttercream. The cake and frosting can be homemade, from a box, or store bought.
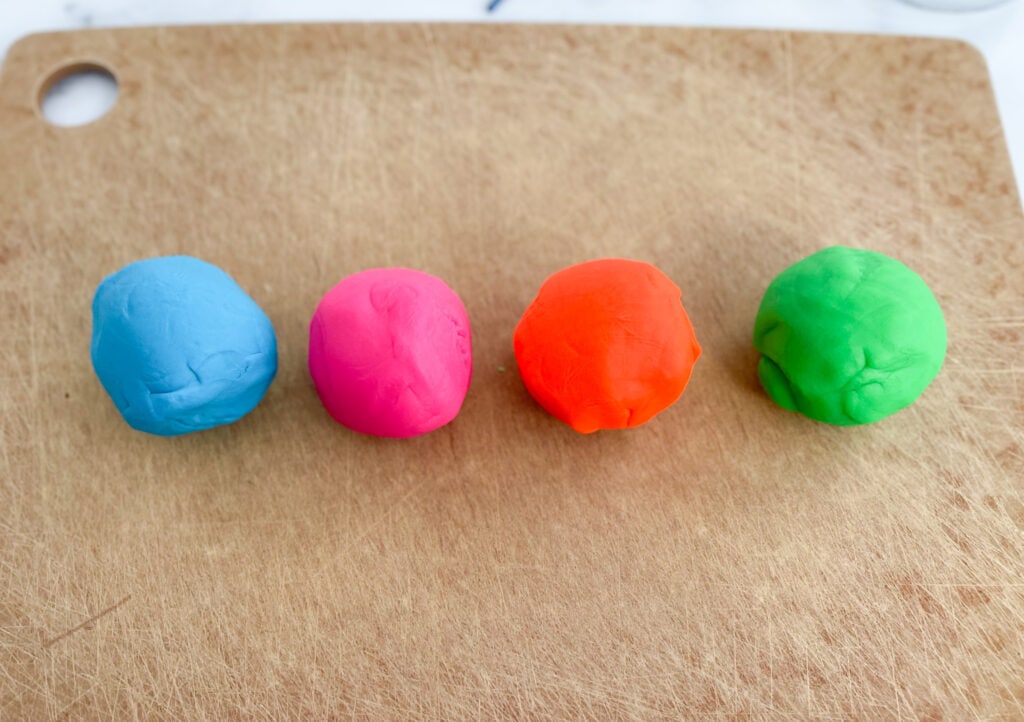
- Prepared Fondant- You can buy white and color it yourself with gel food coloring or buy pre-colored fondant (which is what I did). I used the “Preferred neon variety pack” from Wilton.
- Gel Food coloring (if you’re coloring your own fondant)
- Fondant Tool Set
- Candy Eyeballs
- Extra blue colored buttercream for decorating and fondant creature stabilizing
- Large cutting board or a sheet of parchment paper
- One batch of “fondant glue” (see below for instructions)
To make the “glue” for the fondant:
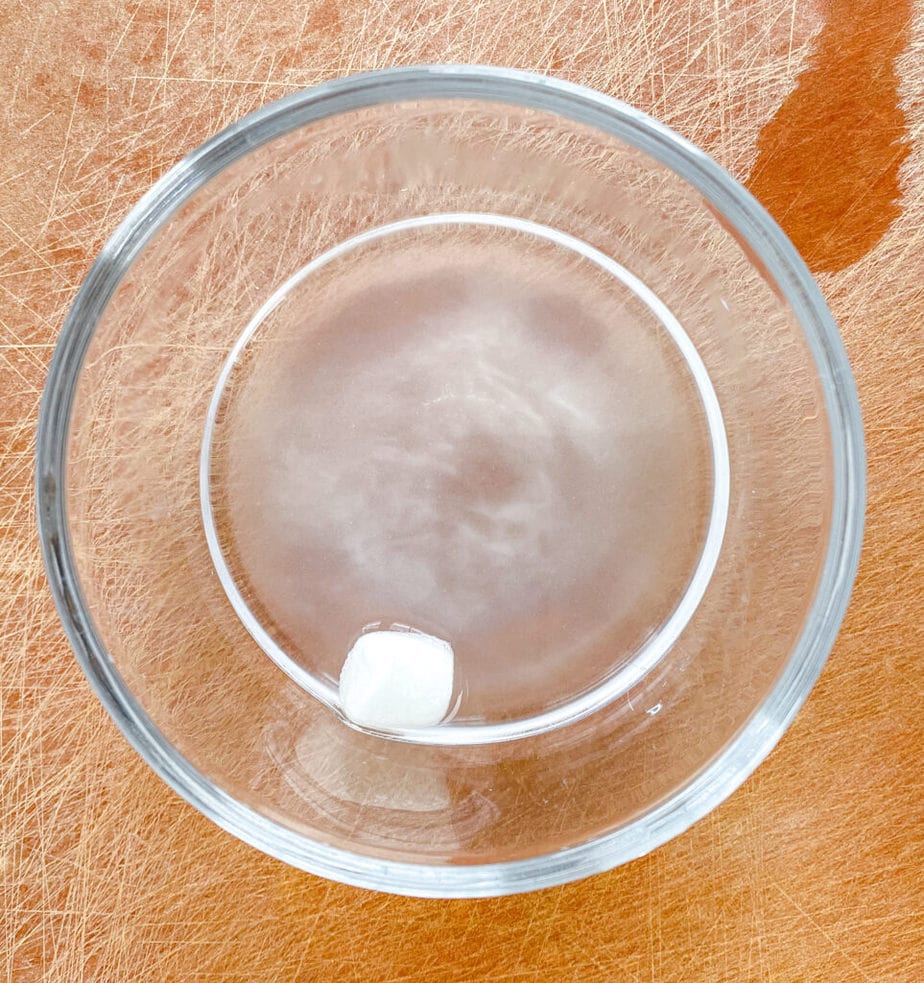
Place one mini marshmallow in a small dish with a few tablespoons of hot water. The marshmallow won’t melt completely, but the sugar from the marshmallow will start to dissolve in the water and act as a great glue for sticking things to the fondant decorations.
If you don’t have any marshmallows, you can dilute a little bit of corn syrup with water.
Be cautious when using fondant “glue”. You want to use water very sparingly around fondant, too much moisture may cause drips or meltage.
What is Fondant?
Fondant is a lot like play-doh, except you can eat it and it’s incredibly sweet. It’s great for covering cakes and creating more artful exteriors that buttercream just can’t give you.
Fondant is also great for sculpting and modeling little figurines (like sea creatures) to decorate cakes with.
You can buy fondant at any craft store these days in the baking section. The quantities range from small packs for small projects, to big ‘ol tubs to cover and adorn a three-tiered wedding cake.
Fondant is also available pre-colored or plain white, which gives you the ability to color it yourself with food coloring.
Most homemade recipes for fondant call for marshmallows, confectioners sugar, and a little bit of water. The gelatin and glycerin in the marshmallows help to give the fondant structure so it can be shaped and sculpted into all kinds of decorations!
What does fondant taste like?
In my opinion, it tastes just like a marshmallow! But it definitely does not have the same texture. It’s just like eating a piece of super sweet soft dough..
Tips for working with fondant:
- It’s important to keep any fondant you’re not using covered at all times! It dries out super quick, so keeping your unused fondant wrapped tightly in plastic wrap will keep it fresh and workable.
- Fondant can be a little sticky, so make sure you’re working on a nonstick cutting board or a piece of parchment or wax paper.
- Humidity is the worst. Sugar and humidity (any moisture really) are not friends. If the room conditions are too humid or very hot, you may run into some meltage or fondant that’s too difficult to work with. If you have to work in the heat, make sure to do it in an air-conditioned room.
Fondant Tools
While these aren’t 100% necessary, this basic fondant toolset is really useful when it comes to making these little sea creatures.

The toolset comes with a ball tool and cutter, which is great for smoothing, shaping, and cutting figures–like seaweed and fish fins. The paintbrush is great for brushing candy eyes with sugar water to attach to fondant figures and the end of the paintbrush is great for adding dimples to the sea creatures for texture and interest. Finally, the rolling pin is small and perfect for rolling fondant flat and evenly, with handy 1/4″ rings to guide the rolling pin.
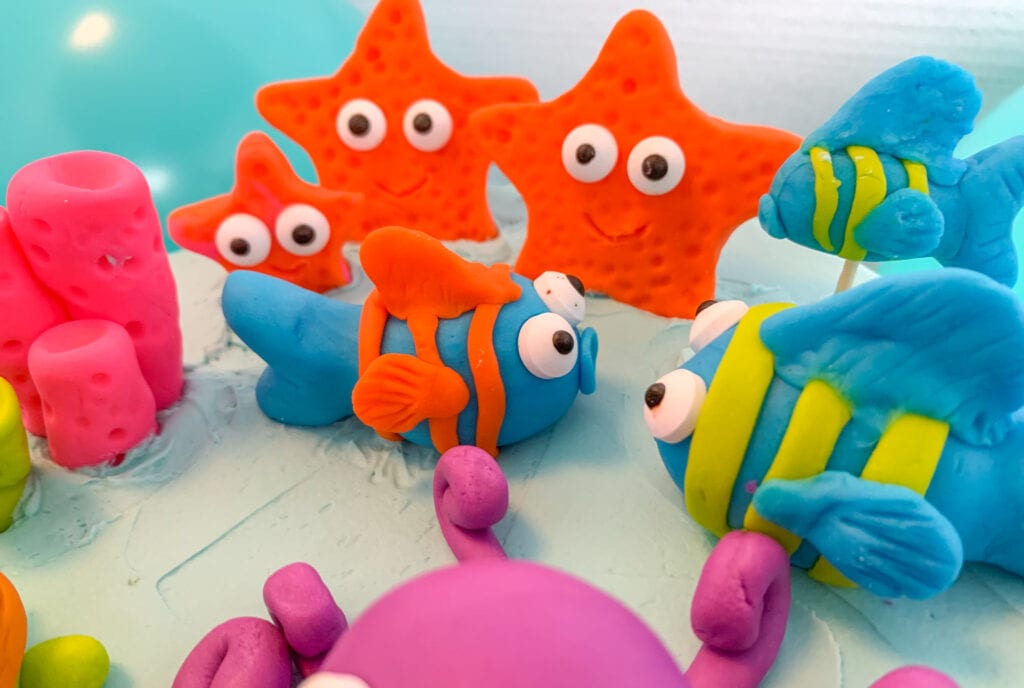
How to make the sea creatures for your Under the Sea Cake
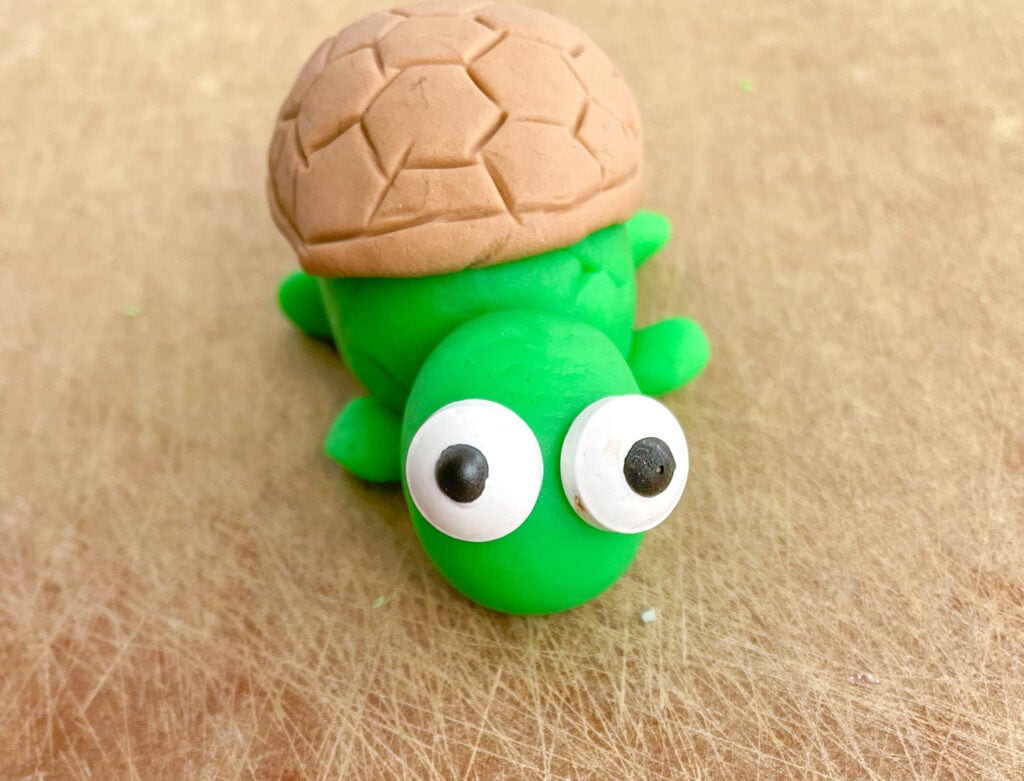
The Turtle:
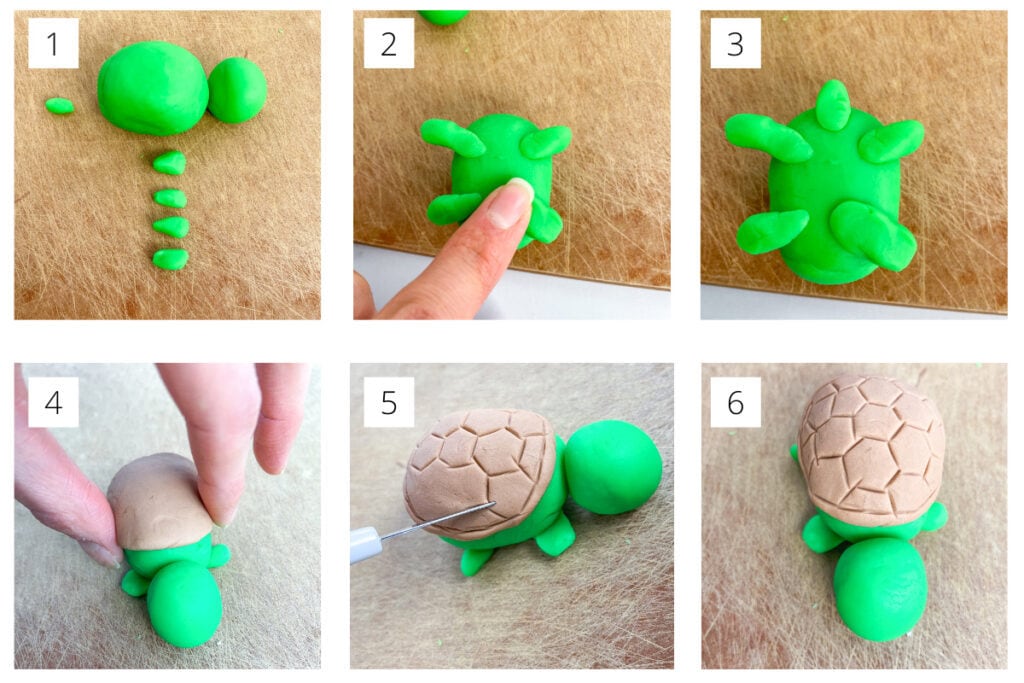
- Using green fondant, roll two balls. One large for the body and one small for the head. Create four small teardrop pieces of green fondant and one tiny piece of fondant for the tail.
- Attach the teardrop pieces to the bottom of the large ball and include the tiny piece at the tip of the ball to create a tail. Use your finger to press the pieces into the body.
- Now you have four legs and a tail sticking out.
- Flip your turtle back over so he can rest on his little legs. Roll a ball of brown fondant (if using the neon colors pack, mix together two parts orange and one part green to make brown). Flatten the brown ball into a disk and mold it over the turtle’s body, avoiding the head.
- Using your fondant knife, gently press all around the inside edge of the turtle shell to create a border. Then make hexagons, starting in the middle of the turtle shell, moving outward toward the edge.
- Attach the turtle’s head by dipping your paintbrush in your marshmallow water and lightly wetting the area where the head and body will meet. Press to adhere–it will be very delicate, but it’ll stay together when it sits on top of the cake!
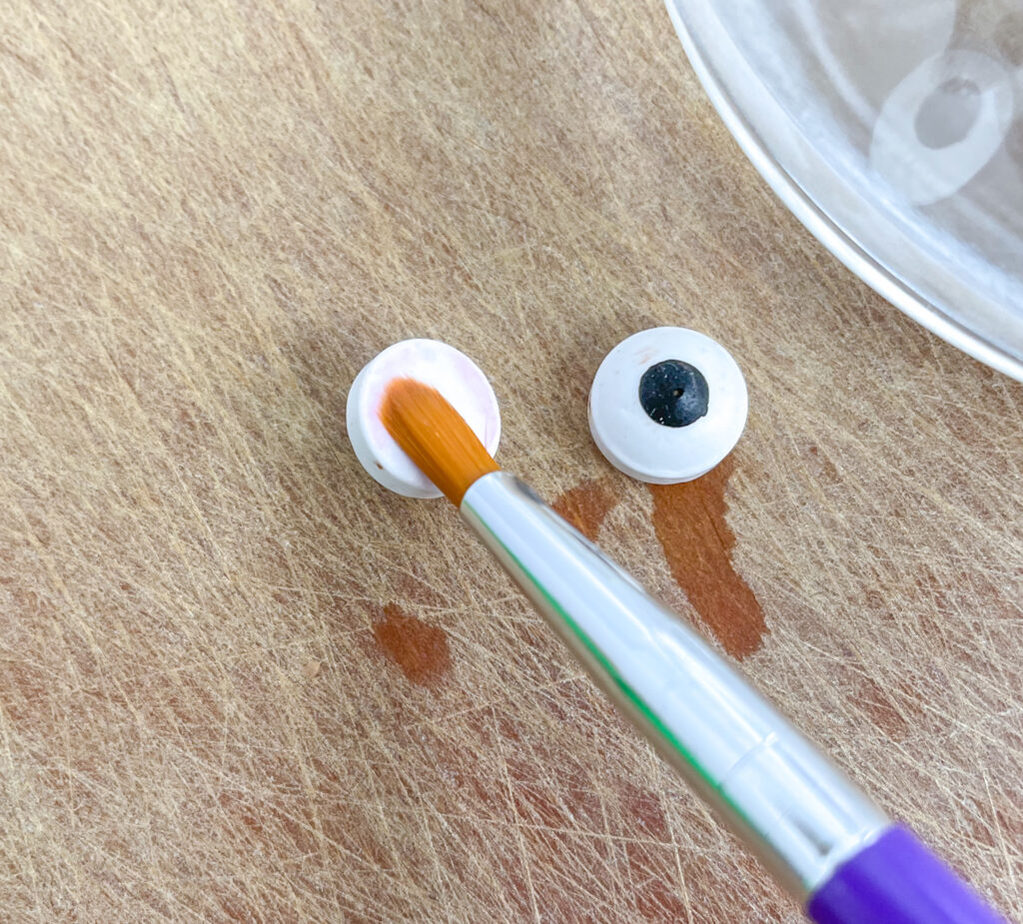
Add a little marshmallow glue to your candy eyes.
And press into the turtle’s head. Aim for close to the top of the head.
Once finished, cover in plastic until ready to top the cake.
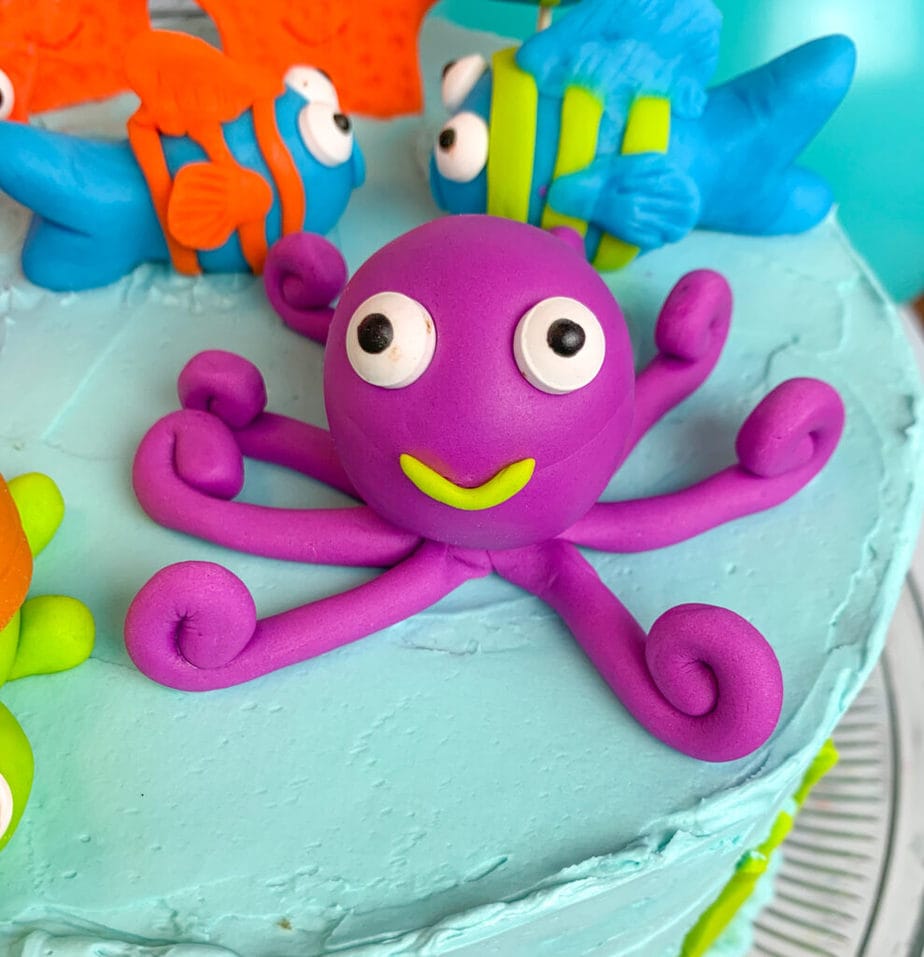
The Octopus:
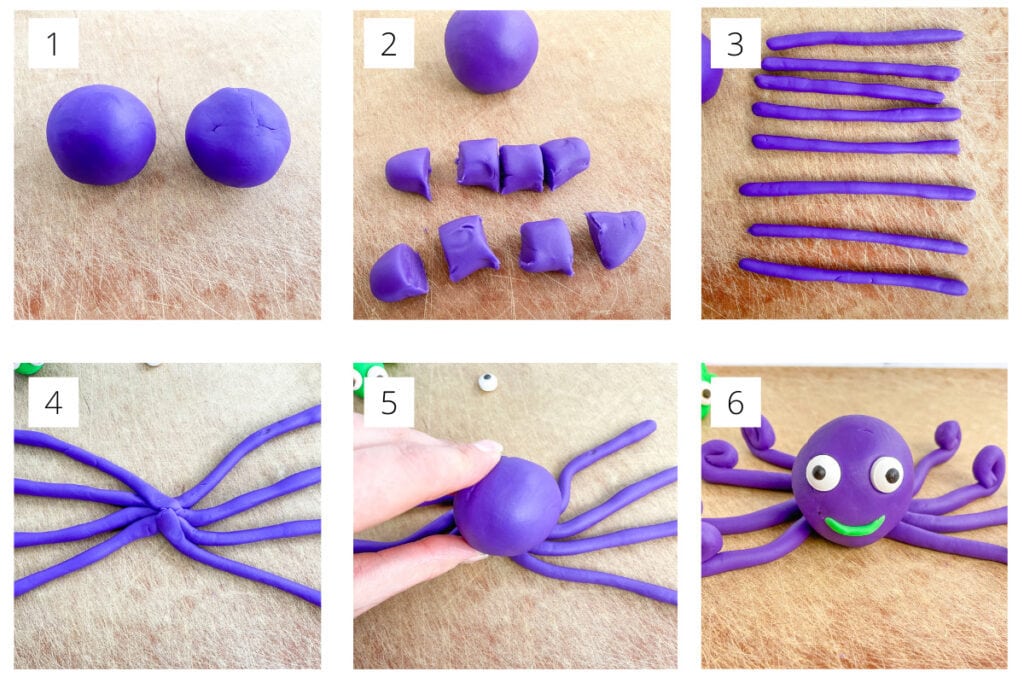
- Roll two purple balls of fondant. One should be slightly larger than the other. *If using the neon fondant pack, mix the pink and blue together to get purple.
- Roll the smaller ball of purple fondant into a log and cut into eight equal pieces.
- Roll each of the eight pieces into thin logs, these will be the octopus arms!
- Divide the arms into two sets of four. One set on the left and one set on the right. Bring the ends of the arms together in the middle and pinch to join together.
- Place the large purple ball on top of where the arms join. Press gently to adhere.
- Use your paintbrush to lightly brush the back of two candy eyes with your marshmallow glue. Press the eyes into the ball of fondant to make a face. Then curl up the ends of the arms. If they start to come unrolled, brush the tip of the arms with a little glue and reroll. To make the smile, you can draw it on with your fondant knife, or roll out a tiny piece of green fondant and gently press on to the octopus face.
To Make The Coral:
Choose any color combination you like! Break off two or three pieces of fondant. I like to vary the sizes– like having a set of three coral limbs in three different sizes.
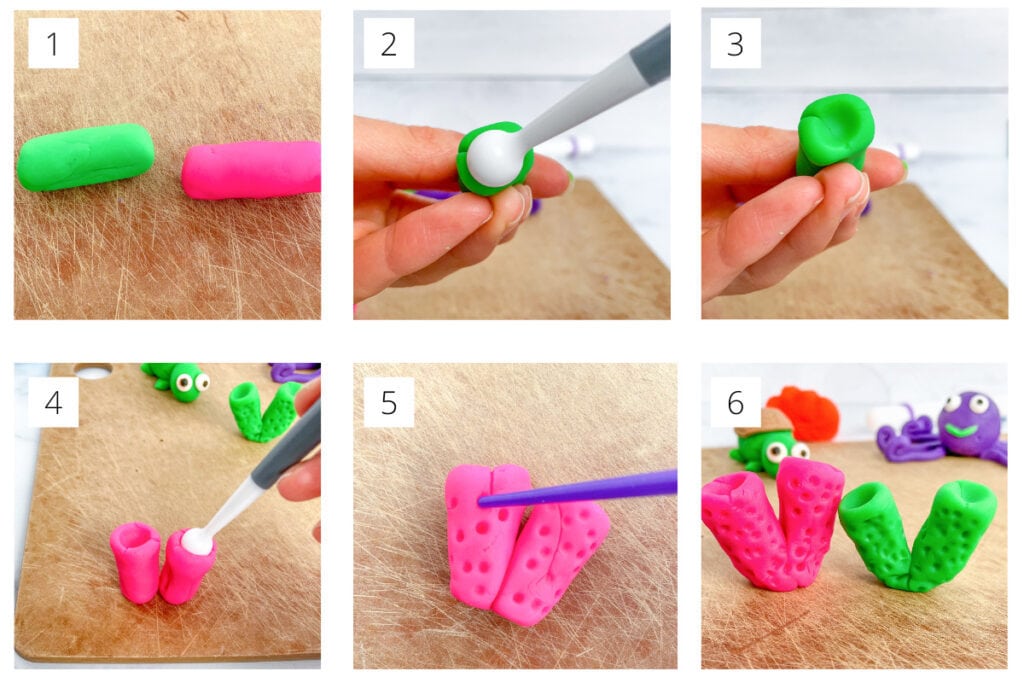
- Pinch off two or three chunks of your desired colored fondant and roll into a Tootsie Roll shape. Make sure to make varying sizes of fondant tootsie rolls.
- Use your ball tool and press into one end of your fondant roll.
- You’re creating a little fondant “tube” essentially.
- Repeat with your remaining fondant tootsie rolls.
- Gently lay your tubes onto your work surface and without flattening the tubes, use the opposite end of your paintbrush to make indents in the outside of your coral pieces. This will add visual interest! Make sure to do this on all sides!
- Pinch the bottoms of the coral pieces together to join and make a “V”. Then stand them up and gently flatten the bottom of the coral enough so that they can stand on their own.
Repeat this process with different colors and numbers of tubes to make fun coral pieces for the top of your Under the Sea Cake!
Making The Seaweed:
For the seaweed, I just free formed the shape by using my knife tool to create wavy leaves. I also used the bottom of my paintbrush to make little dimples for texture.
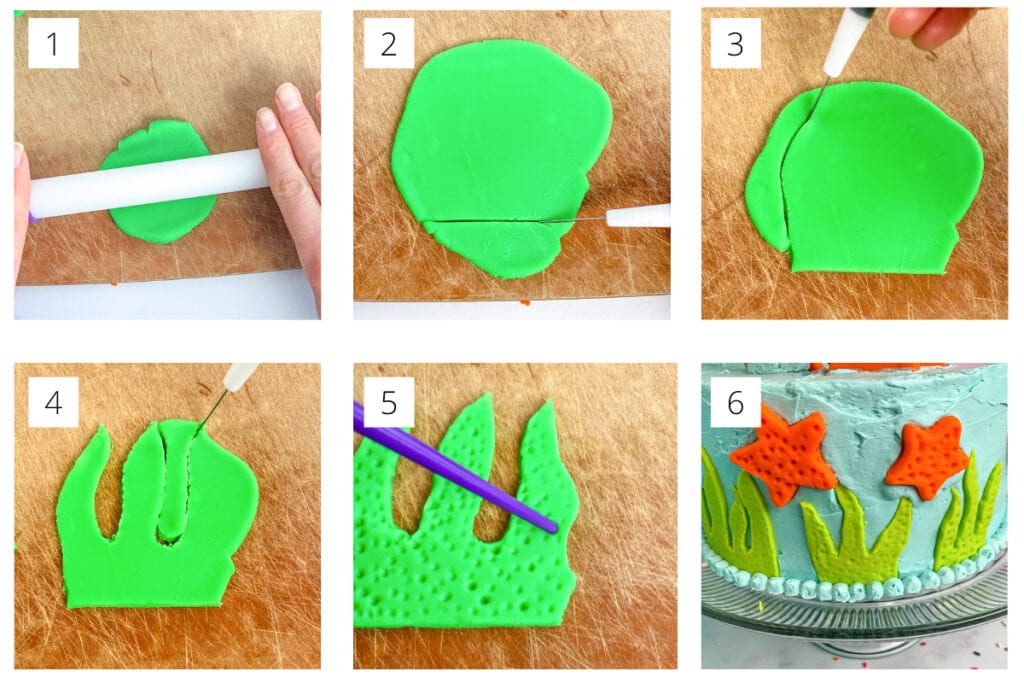
- Using your rolling pin with the 1/4″ guides, roll out a piece of green fondant.
- Trim the bottom to make a straight edge.
- Using your fondant knife, cut out wavy edges for your seaweed.
- Continue cutting out the seaweed leaves, making sure to give them a wavy, whimsical look. You want them to look like plants swaying under the water!
- Using the bottom edge of your paintbrush, make indents over the seaweed leaves for texture! Smooth out any rough outer edges at the same time.
- Repeat the above steps, varying the number of leaves you have in your seaweed set.
Making The Starfish
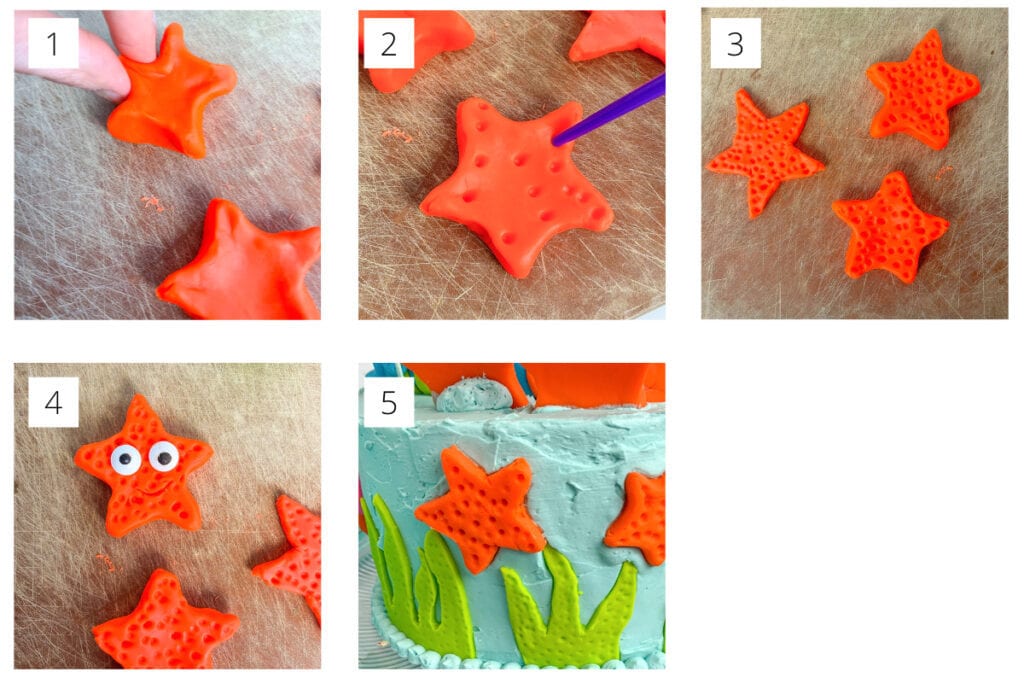
- For the starfish, you can either roll out your fondant to 1/4″ thick using your roller. Cut out star shapes using a star cutter or by hand using your fondant cutter. I also like to take a piece of fondant and pinch the edges into a star shape.
- Poke your stars with the bottom of your paintbrush for texture.
- Repeat the process, varying the sizes of stars. You want a good mix of larger and smaller sizes to go around the side of the cake and in between the seaweed!
- If you want to make starfish that will stand on top of the cake, roll the starfish a little thicker than 1/4″ or shape the fondant by hand by pinching the edges to create a star shape. The thicker stars will stand better in the buttercream. You can also add eyes to the starfish and draw on a little smile to give it a face!
- The thin stars will be arranged on the side of the cake and in between the seaweed!
Making The Fish
You can’t have an Under The Sea themed cake without fish!
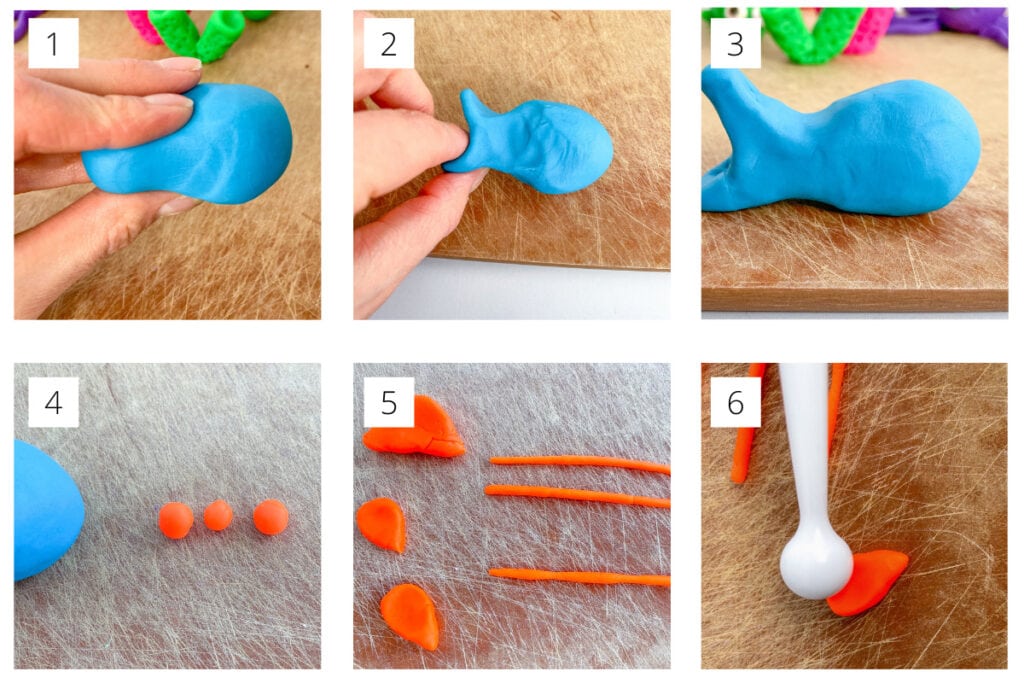
- Grab a hunk of fondant and pinch until the fondant resembles a pear shape.
- Continue to pinch the long end of the “pear” to make the fishtail and pinch the ends of the tail to shape the fins.
- Sculpt and shape the fondant until you have one end that looks like a round head and the other end is elongated with pointed fins.
- Pinch off three small pieces of fondant (any color you’d like).
- Roll the tiny fondant balls out into thin ropes–these will be the stripes for the fish. Pinch off three more pieces of fondant–two of equal size and shaped into teardrops and one larger piece shaped into a triangle for the backfin.
- Using the ball tool, flatten the teardrop pieces so that it looks more like a fin on the side of a fish!
Assembling The Fish
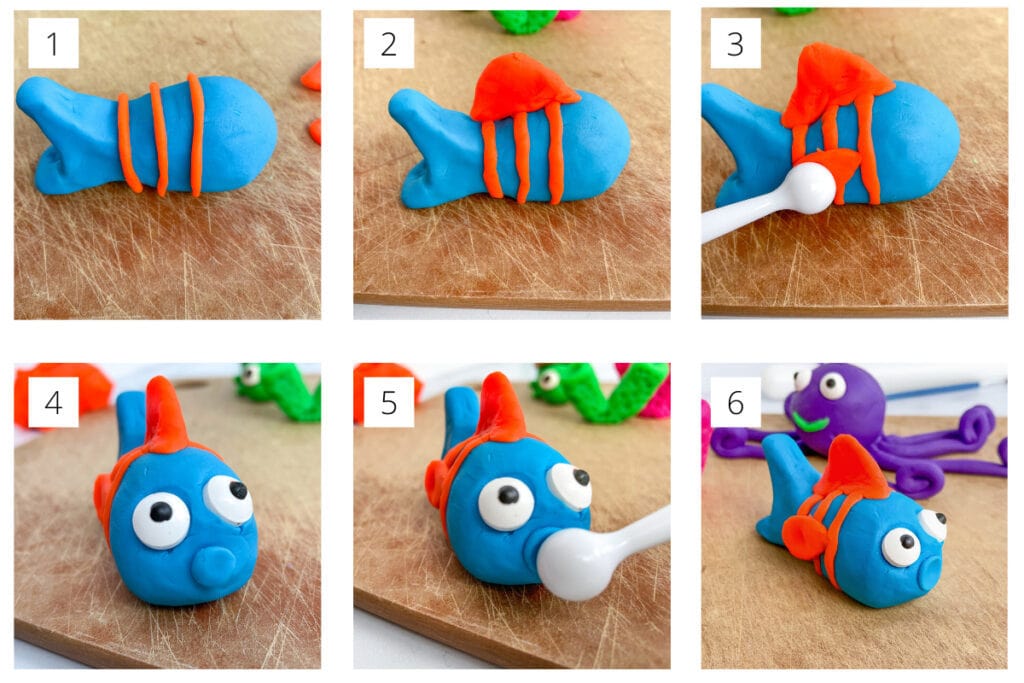
- Wrap your fondant ropes around the fish body. Trim off any excess if necessary or add more fondant if you come up short.
- Next, add your triangle backfin. Gently press it to the top of the fish to adhere. You can also lightly brush the bottom of the fin with your marshmallow glue to set.
- Attach your tear drop shaped fins to the side of your fish. I like to put the pointed end of the teardrop shape on the fish’s first stripe. Use your ball tool to gently adhere the fin to the side of the fish. I also pull the wide end of the fin a little bit away from the side of the body, but that’s optional.
- Using your marshmallow glue, brush the back of your candy eyes and gently press them onto the fish’s head. You can add a mouth by rolling a tiny piece of fondant into a ball and placing it below the eyes.
- Use your ball tool to gently press the mouth onto the fish face and give it fish lips!
- And you made a fish! Repeat the above steps to make a bunch of fish for the top of the cake!
Making The Jellyfish
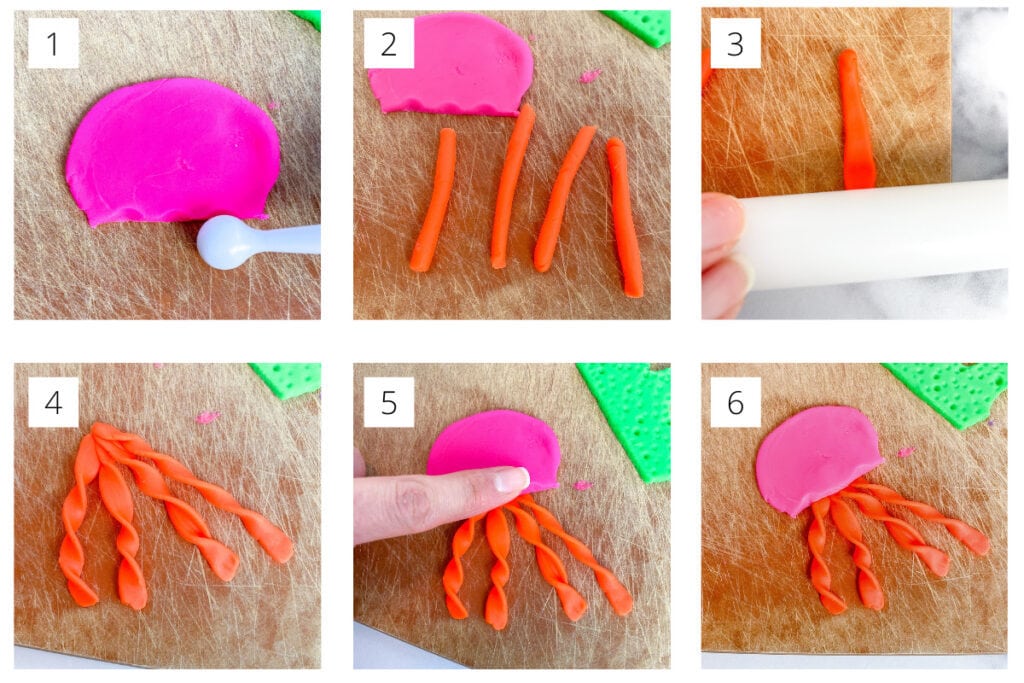
- Roll out a piece of fondant (any color you’d like) to about 1/4″ thick. Using your fondant knife, cut out a half circle. Using the ball tool, indent the bottom to make a scalloped edge.
- Pinch off four small pieces of fondant and roll into logs–these are the jellyfish legs! Trim them if necessary to make them all the same length.
- Using your rolling pin, lightly flatten your jellyfish legs. Repeat this with all four legs.
- Gently twist each leg so that they look curled. Gather all the legs at the top and pinch to join together.
- Place your scalloped half circle on top and gently press the jellyfish body onto the gathered part of the legs to adhere
- Repeat this process once or twice more to have jellyfish swimming among the seaweed on the side of the cake!
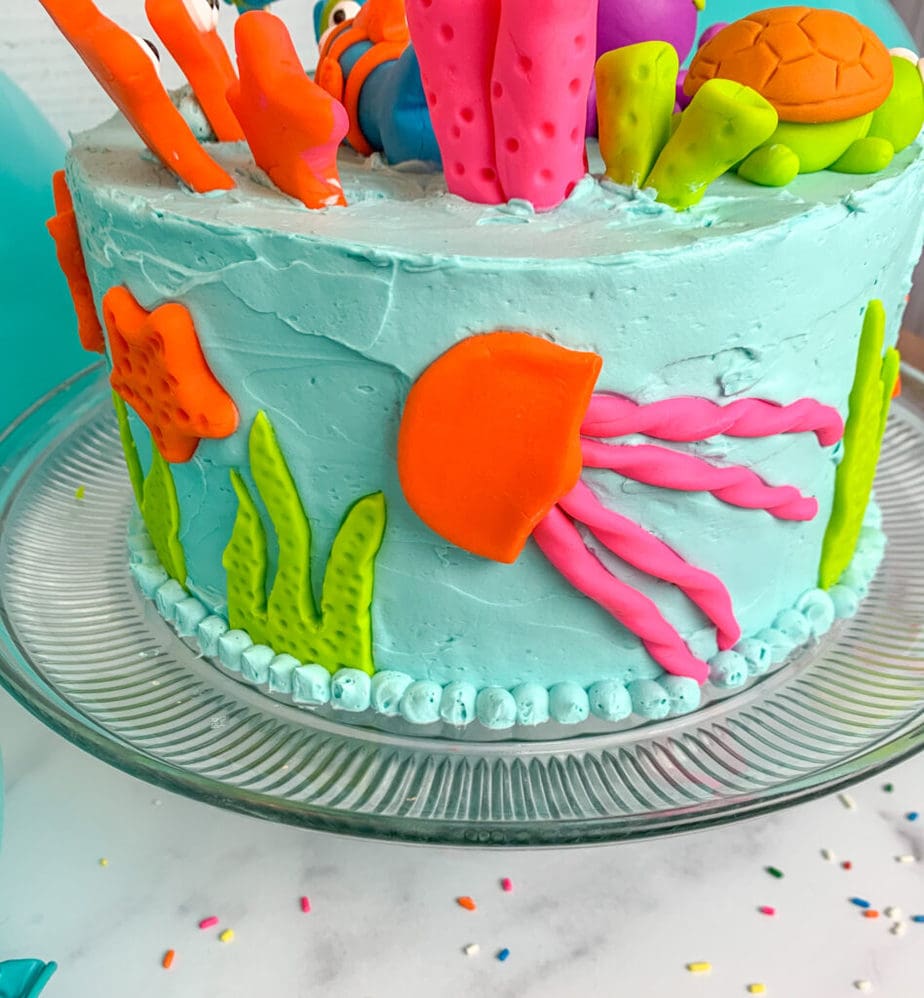
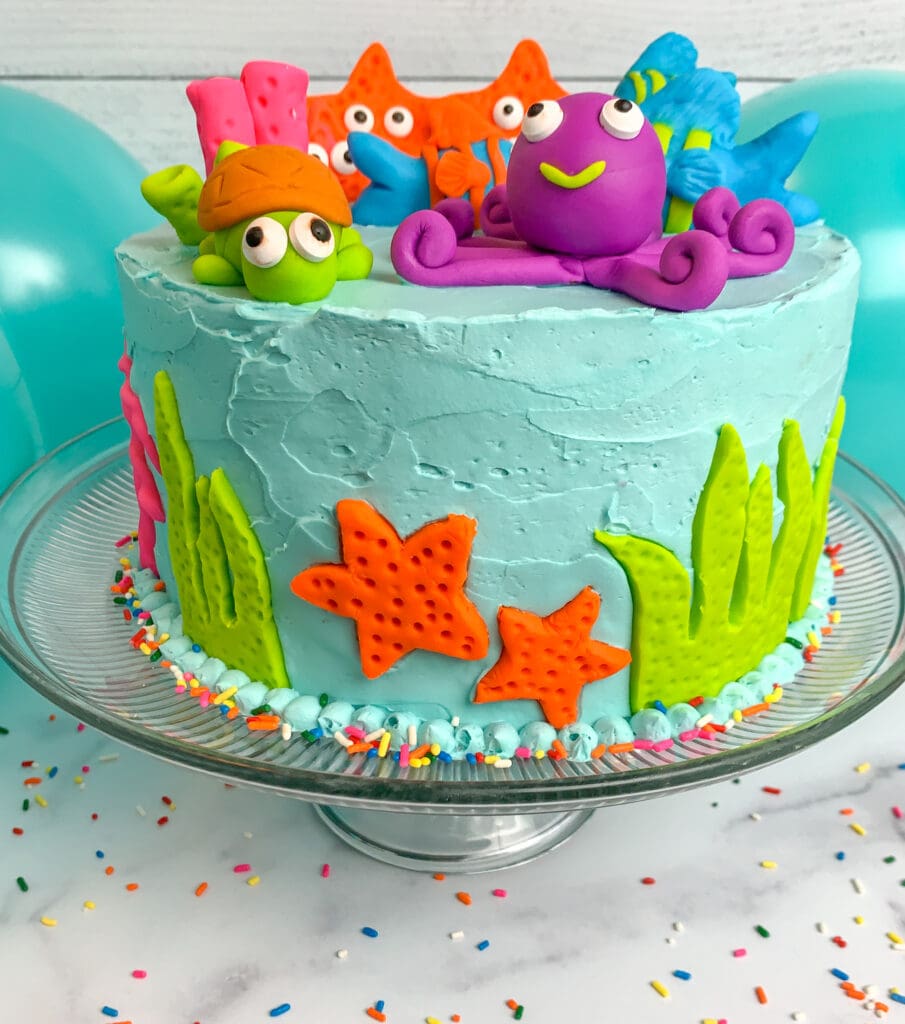
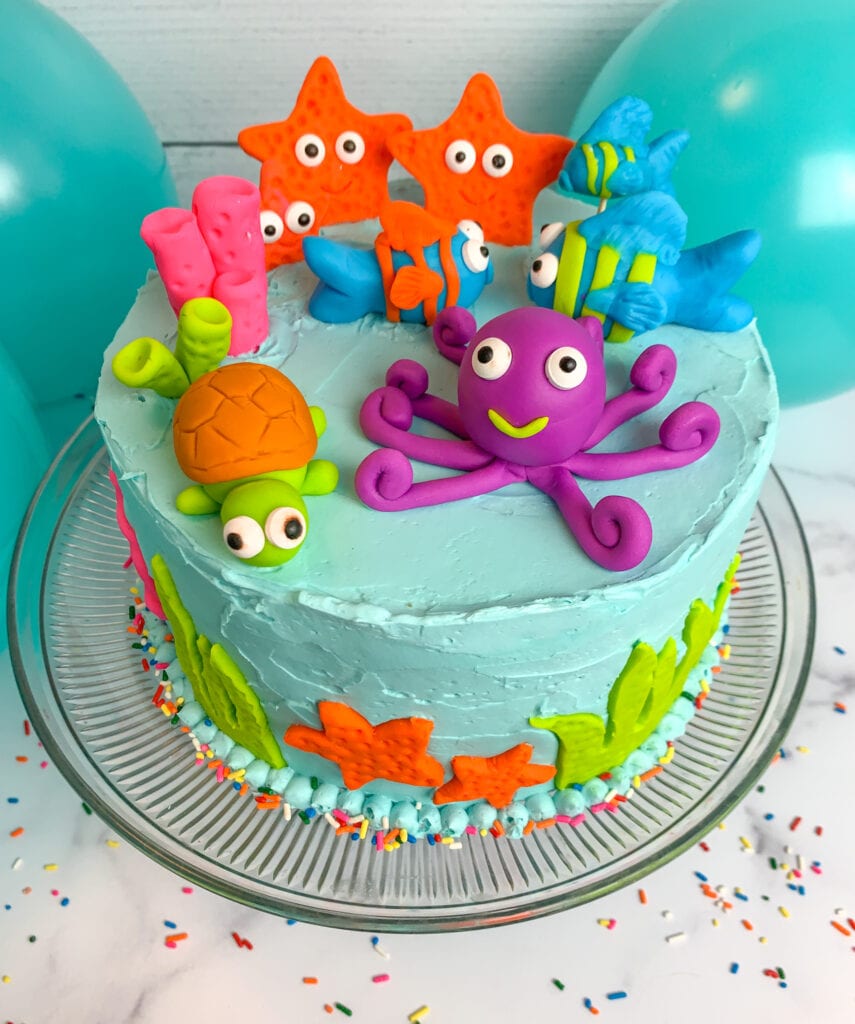
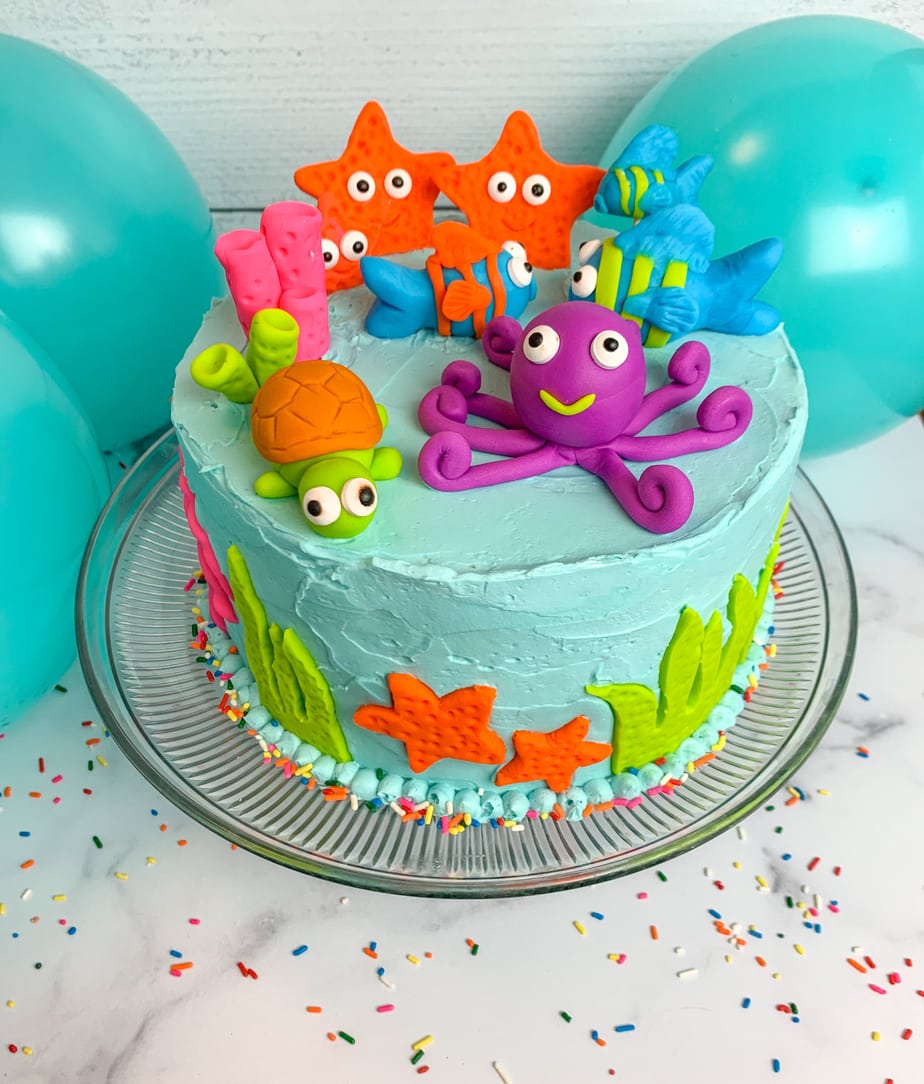
Assembling Your Under The Sea Cake and arranging the fondant sea animals
After you make all your fondant decorations, I recommend letting them sit out to dry for a few hours or overnight. This will make them much easier to move and manipulate on the cake.
Before placing the decorations on the cake, I suggest sketching out your design or practicing the placement (for the top decorations) on a clean cake pan. Just to get the idea of what and where things will fit best.
When you’re ready to assemble, make sure the cake is completely frosted and that the buttercream is still soft.
Start with decorating the sides of the cake. Maybe add the jellyfish first since they’re longer than the other decorations. Secure the body first to the side of the cake and then arrange the legs however you like.
To stick the decorations into the frosting, you want to gently press the fondant pieces into the soft buttercream, but don’t sink them too far so that they get buried in icing. Gently press them enough that they stick firmly and don’t fall off.
For the top decorations, the turtle, and octopus will sit flat on their own. The coral you’ll have to sink in the frosting a little to keep them standing. You can also pipe a little buttercream mound on the top of the cake for them to sit in.
For placing the fish, the big fish will sit on the cake easily and I recommend sticking smaller fish on a toothpick to give them some height and to look like they’re swimming around.
I added a starfish family (per the birthday girl’s request) to the top of the cake in addition to the ones on the side. I piped little mounds of buttercream for them to stand in and I piped a little behind the starfish for back support–to keep them from tipping over.
Storing and Serving Your Under The Sea Cake
After you’ve decorated the cake and you’ve patted yourself on the back for how cool it looks, pop that baby in the fridge.
This will allow the frosting to set firm and glue those fondant pieces in place.
As far as refrigerating fondant, when it comes to little fondant figures, I’ve never had a problem with it. I don’t recommend refrigerating cake or fondant for any longer than a day because everything gets too dry. So make sure to decorate this cake the night before serving.
A few hours before you’re ready to serve, take the cake out of the fridge and allow it to get to room temp.
Serve, enjoy, and know that your recipient is over the moon in love with the cake and the amount of effort you put in to it!
Any leftovers can be stored in an airtight container, at room temperature. The cake will stay fresh for 3-4 days.
If you have quite a bit of cake leftover or a container that just isn’t big enough, you can leave the cake out at room temperature, just cover the exposed cut edges with plastic wrap.
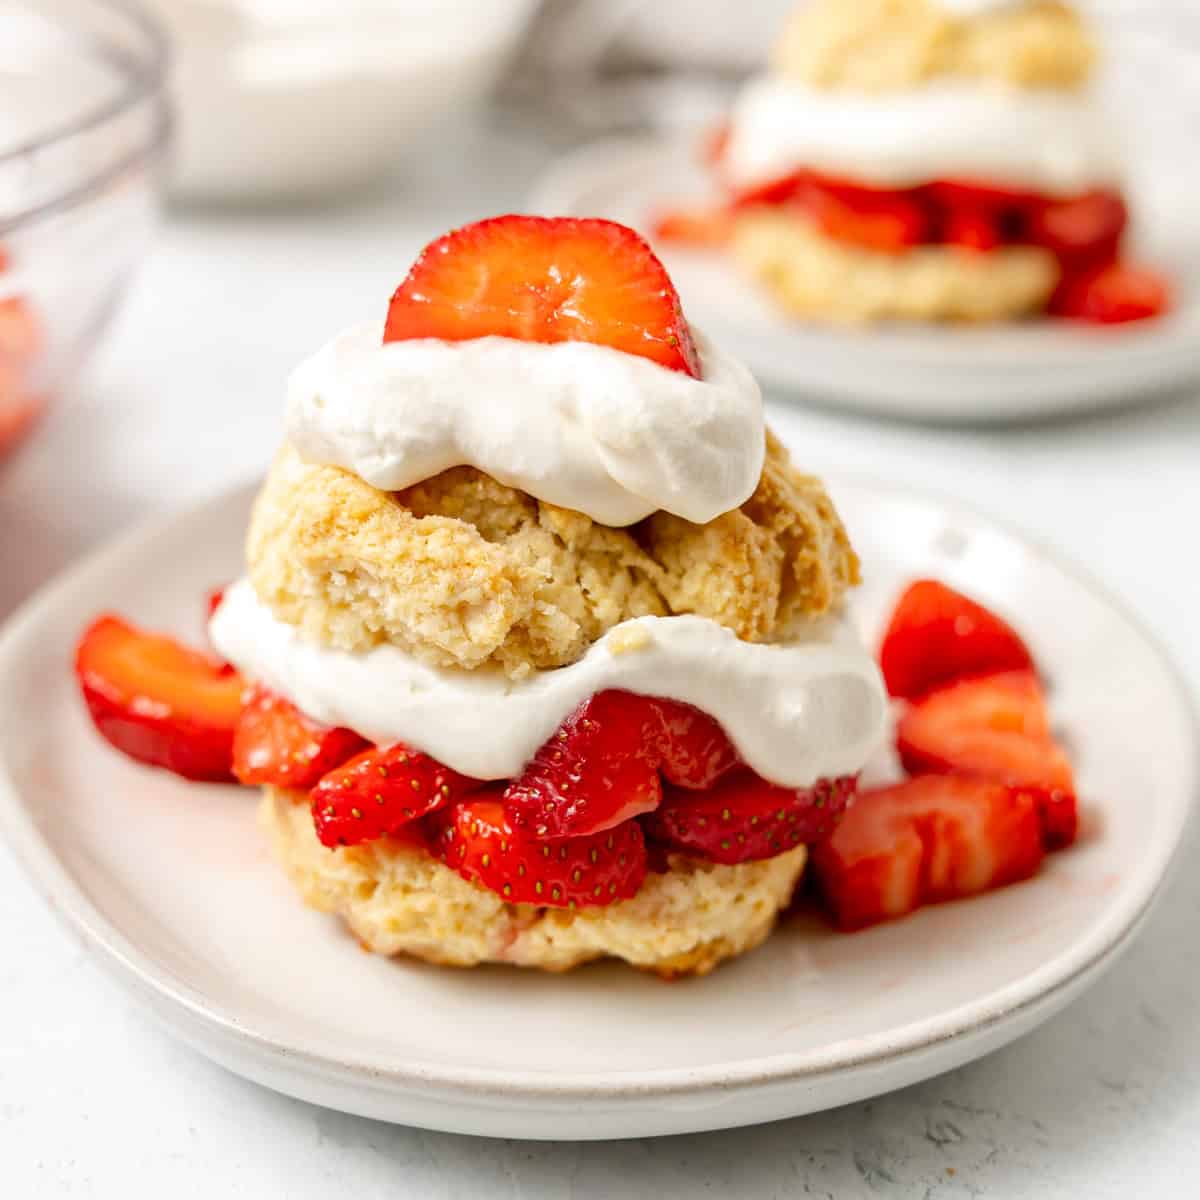
Other Desserts Perfect For a Party:
From Scratch Birthday Cake Cookies
No Bake Lotus Biscoff Cheesecake
Save This Recipe
Just enter your email below and we will send this recipe right to your inbox, plus we will send more yummy recipes and ideas.
Under The Sea Cake With Fondant Sea Animals
Transform your homemade or store-bought cake into an adorable Under The Sea Cake! Below is everything you'll need to create the sweetest fondant sea creatures and resources to the best cake and icing recipes!
Ingredients
- One three layer 8 inch cake, frosted with blue or teal vanilla buttercream. The cake and frosting can be homemade, from a box, or store bought.
- Prepared Fondant- You can buy white and color it yourself with gel food coloring or buy pre-colored fondant which is what I did. I used the “Preferred neon variety pack” from Wilton.
- Gel Food coloring if you’re coloring your own fondant
- Fondant Tool Set
- Candy Eyeballs
- Extra blue colored buttercream for decorating and fondant creature stabilizing
- Large cutting board or a sheet of parchment paper
- One batch of “fondant glue” see below for instructions
- Assorted Fondant Sea Creautes see blog post for tuturial
Instructions
- To Make The Fondant Glue:Place one mini marshmallow in a small dish with a few tablespoons of hot water. The marshmallow won’t melt completely, but the sugar from the marshmallow will start to dissolve in the water and act as a great glue for sticking things to the fondant decorations.
- If you don’t have any marshmallows, you can dilute a little bit of corn syrup with water.
- Be cautious when using fondant “glue”. You want to use water very sparingly around fondant, too much moisture may cause drips or meltage.
- Assembling The CakeAfter you make all your fondant decorations, I recommend letting them sit out to dry for a few hours or overnight. This will make them much easier to move and manipulate on the cake.
- Before placing the decorations on the cake, I suggest sketching out your design or practicing the placement (for the top decorations) on a clean cake pan. Just to get the idea of what and where things will fit best.
- When you’re ready to assemble, make sure the cake is completely frosted and that the buttercream is still soft.
- Start with decorating the sides of the cake. Add the jellyfish first since they’re longer than the other decorations. Secure the body first to the side of the cake and then arrange the legs however you like.
- To stick the decorations into the frosting, you want to gently press the fondant pieces into the soft buttercream, but don’t sink them too far so that they get buried in icing. Gently press them enough that they stick firmly to the side of the cake and don’t fall off.
- For the top decorations, the turtle and octopus will sit flat on their own. The coral you’ll have to sink in the frosting a little to keep them standing. You can also pipe a little buttercream mound on the top of the cake for them to sit in.
- For placing the fish, the big fish will sit on the cake easily and I recommend sticking smaller fish on a toothpick to give them some height and to look like they’re swimming around.
- I added a starfish family (per the birthday girl’s request) to the top of the cake in addition to the ones on the side. I piped little mounds of buttercream for them to stand in and I piped a little frosting behind the starfish for back support–to keep them from tipping over.
- Once decorations are placed, allow the cake to chill and set in the fridge until firm.
- 3-4 hours before you’re ready to serve, allow the cake to come to room temperature.
- Slice, serve, and enjoy!


Thank you so much for this tutorial! I followed everything and our cake came out beautifully, it was an absolute hit and I thoroughly enjoyed making it. Thank you for giving me the confidence to make such a cool thing myself ( this wasn’t first decorated cake 😊😊)
I’m happy to share my results if you’d like.
I’d love to see it! I am so happy to hear this, I’m so glad it was a hit 🙂