Graveyard Brownies | Spooky Halloween Dessert!

This post may contain affiliate links, see my disclosure policy for details.
Looking for a fun and spooky dessert idea for Halloween? Make these adorable Graveyard Brownies!
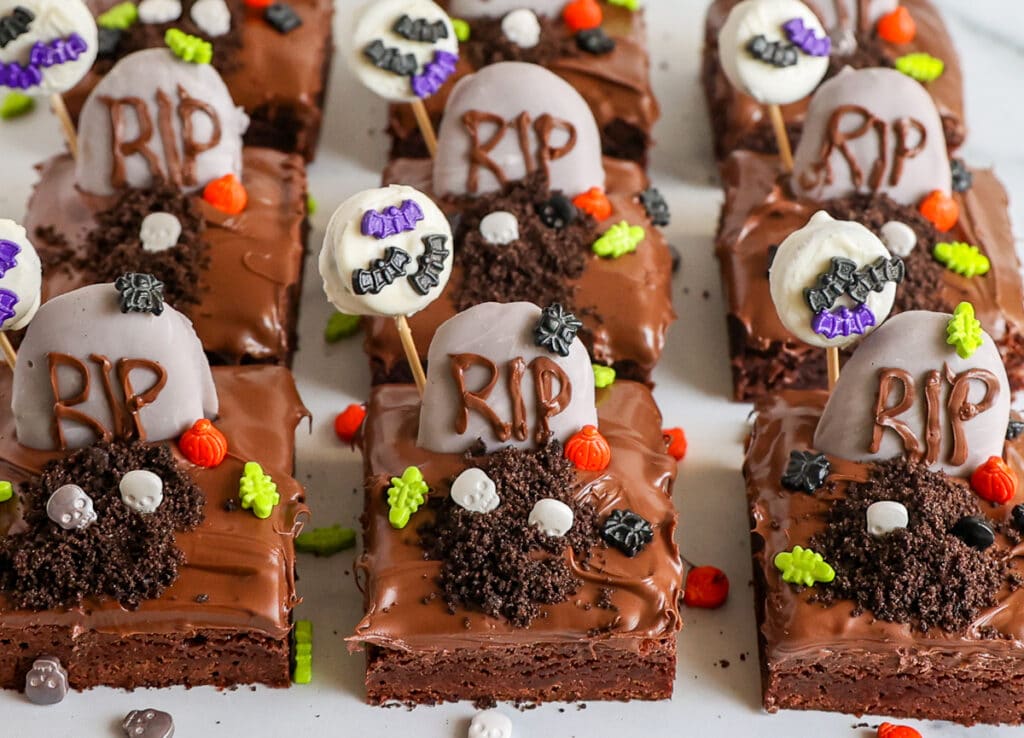
Perfect for both kids and adults, these fudgy chocolate brownies are made easy with a box of brownie mix (homemade or cocoa brownies are 100% ok if you’re up for it!), iced with creamy Nuttella frosting, and topped with spooky Milano cookie graves, creepy Halloween sprinkles, and even a bat-filled full moon!
If you love this recipe, check out my full collection of Children’s Halloween Treats for more fun recipes!
Ingredients
Makes 9 Graveyard Brownies
- 1 box of brownie mix (18-18.3oz) or your favorite homemade brownies recipe.
- 1 cup + 1 tablespoon of Nutella hazelnut spread
- 6 oz of vanilla candy coating or almond bark
- 12 Oreo “Thins Bites”, white fudge covered
- 6 Milano cookies, cut in half
- 2-4 standard chocolate Oreos, ground into fine crumbs
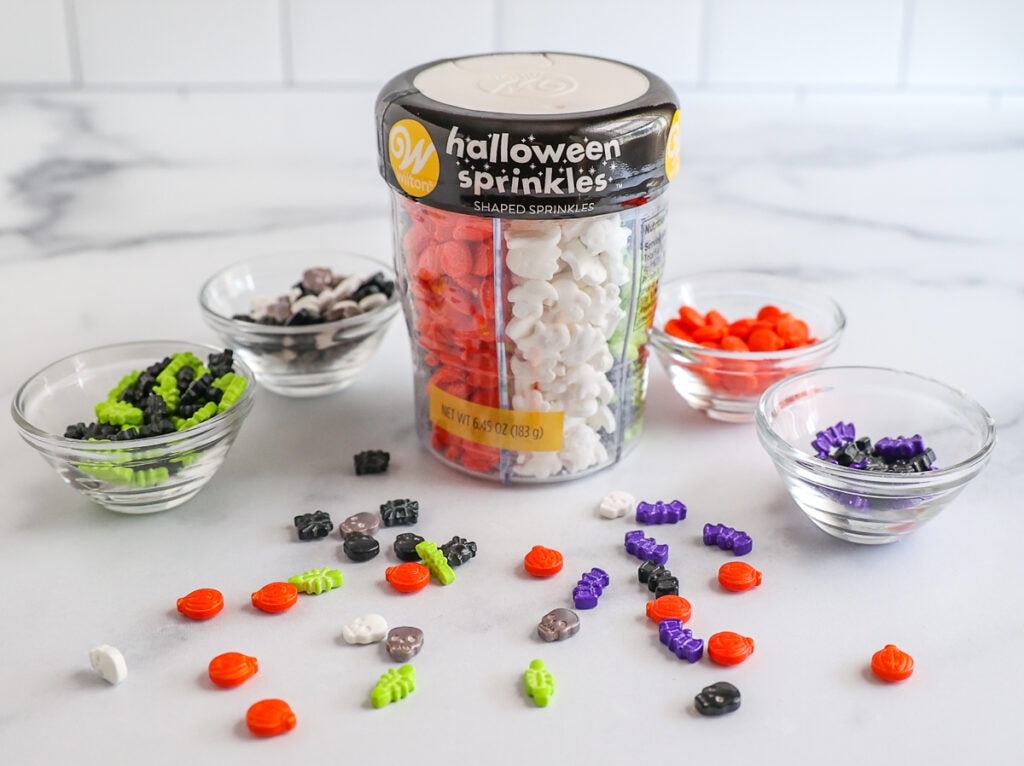
- Assorted Halloween themed sprinkles including (but not limited to)candy pumpkins, bats, bones, and creepy bugs.
Equipment Needed
- 9″ x 9″ baking dish
- Heatproof bowl
- Pastry Bag
- Toothpicks
- Oil-based Black food coloring. For coloring the headstones (optional)
Tip: Oil based food coloring is specifically made to color candy or chocolate. If you can’t find it, sub with black cocoa powder or melted dark chocolate.
Instructions
There are four parts to making Graveyard Brownies:
- Make the brownie base
- Full moon cookies (optional)
- Cookie Headstones
- Assembling the final Graveyard Brownies
Aside from the brownies, you can make as much or as little of the above decorations as you have time for. And each step is customizable.
Step 1: Make The Brownie Base

Line a 9″x 9″ baking pan with foil or parchment paper, and grease with cooking spray. Allow the parchment paper to hang over the sides of the pan.
Tip: The parchment paper will be used as a sling for easy brownie removal later.
Prepare the brownie mix per the recipe or instructions on the box and pour the brownie batter into the prepared pan.
Follow the baking times listed for the recipe you’re using.
Remove the brownies from the oven and cool for just 5 minutes.

While the brownies are still very warm, add 1 cup of Nutella to the top. Using an offset spatula or a spoon, spread the Nutella frosting evenly over the top of the brownies.
Allow the brownies to finish cooling completely.
Step 2: Make The Full Moon Cookies
Melt the vanilla candy coating in the microwave until completely smooth.

Grab 12 mini white fudge-covered Oreos and your Halloween sprinkles.
Using a toothpick, spread a little of the melted vanilla candy coating on the front of your mini Oreo.
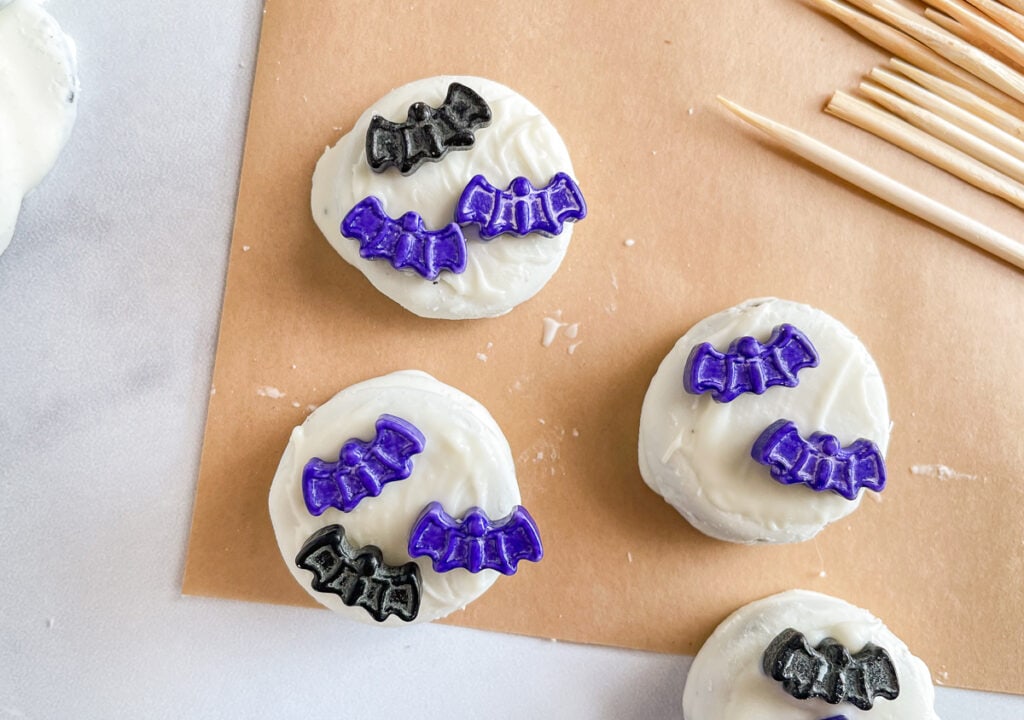
Working quickly, place 2-3 bat sprinkles on the candy coating to stick.
Repeat until all 12 mini cookies have bats attached.
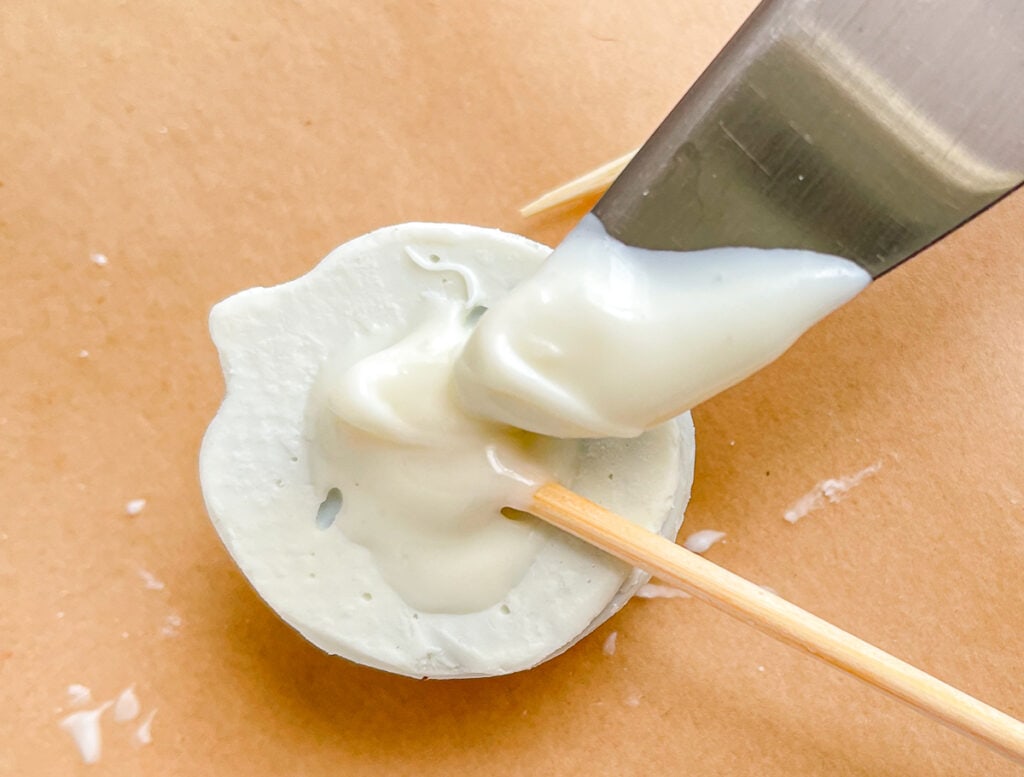
Flip over your moon cookies and add a dollop of melted candy coating to the back. This will be the “glue” to stick your toothpicks to the cookies.
Place a toothpick in the candy coating and press down to submerge. Add more melted coating if needed to make sure the toothpick really sticks.
Repeat this process until all the toothpicks are glued to the back of your full moon cookies. Pop in the fridge for 5 minutes to set.
Tip: Do not throw away any unused melted coating, save it for the headstones in the next step.
Step 3: Making Milano Cookie Headstones

Grab your halved Milano cookies, a fork, and a sheet of parchment or wax paper.
Remelt your candy coating for 10 seconds if necessary. It needs to be runny enough for dipping cookies.

Once the vanilla candy coating is melted and smooth again, add in your black food coloring (or cocoa powder). Stir in a little at a time to reach the desired shade of tombstone gray.
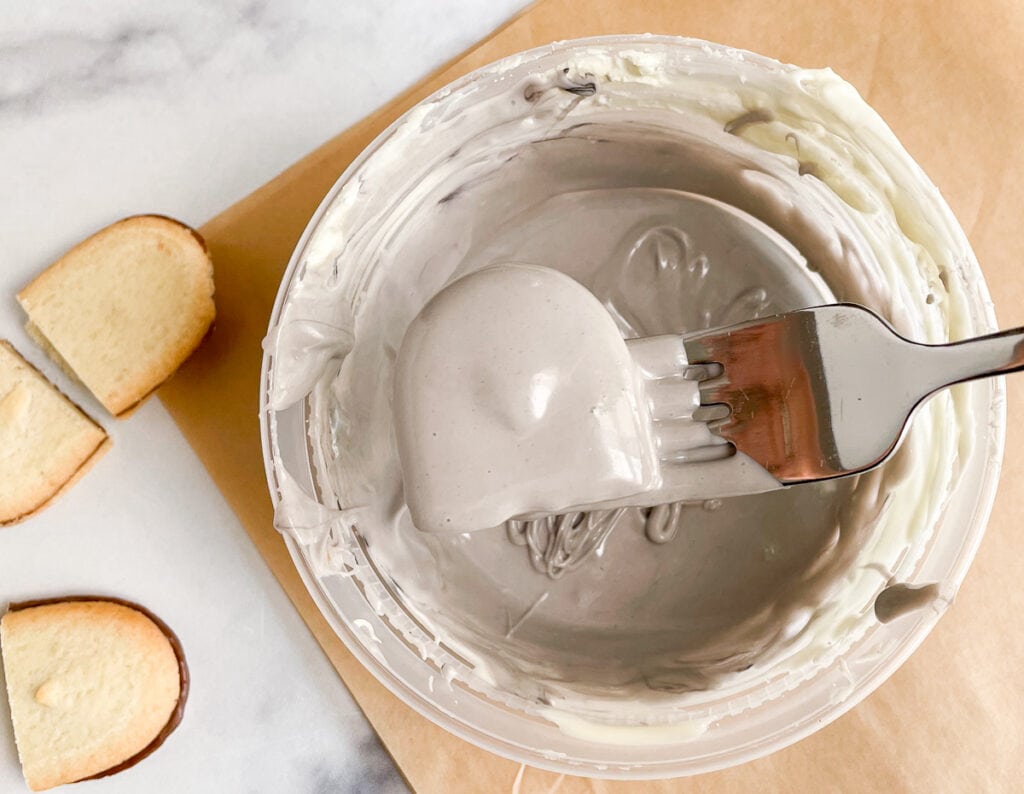
Use a fork, to dip the Milano cookies into your gray coating. Cover the cookie completely and shake off any excess coating back into the bowl.
Place dipped cookies onto the parchment or wax paper and let the coating set.
Repeat the process until all 12 cookies are coated and set.
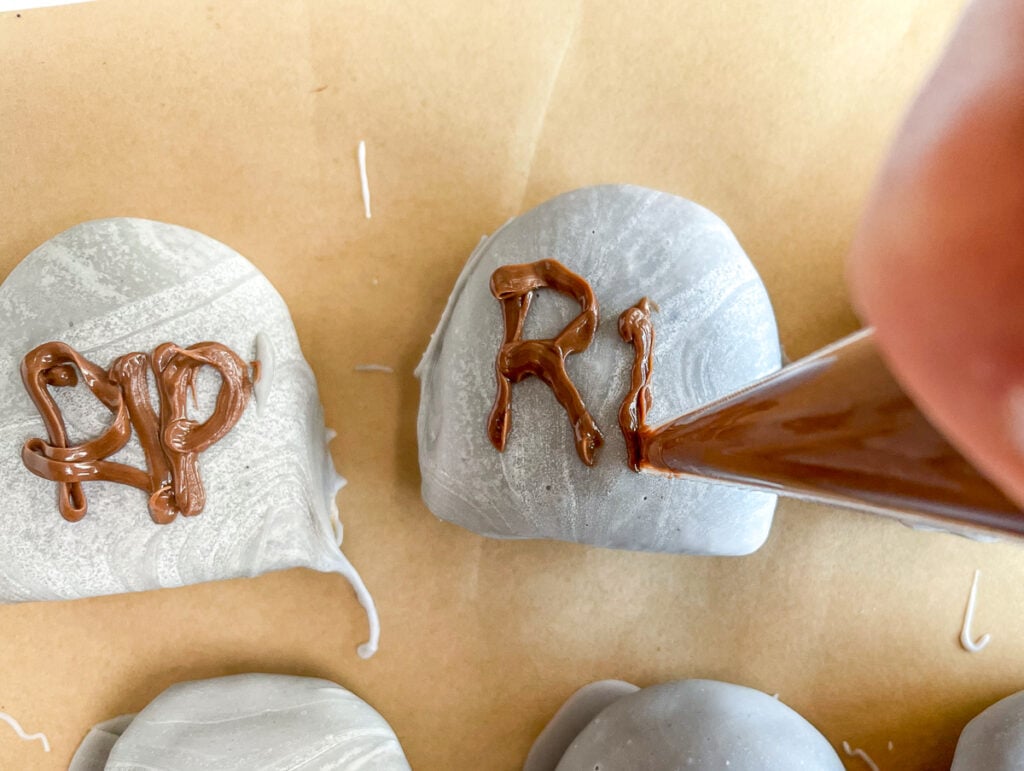
Once the tombstones are completely set, place 1 tablespoon of Nutella into a pastry bag or squeeze bottle.

Pipe “RIP” or any design you like on the tombstone cookies to make spooky graves. Set aside.
Step Assembling the Graveyard Brownies
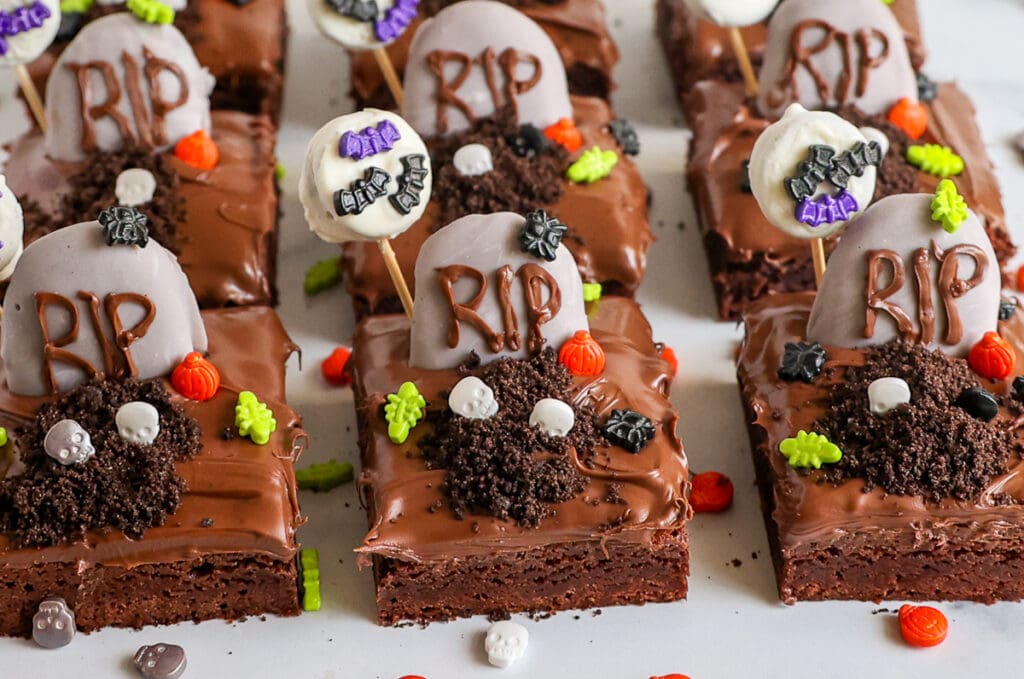
This is the fun part! Grab your crushed Oreos, sprinkles, tombstones, and moons!

Once the brownies have completely cooled, use your foil sling to remove them from the pan. Discard the foil and set the brownies on a cutting board.
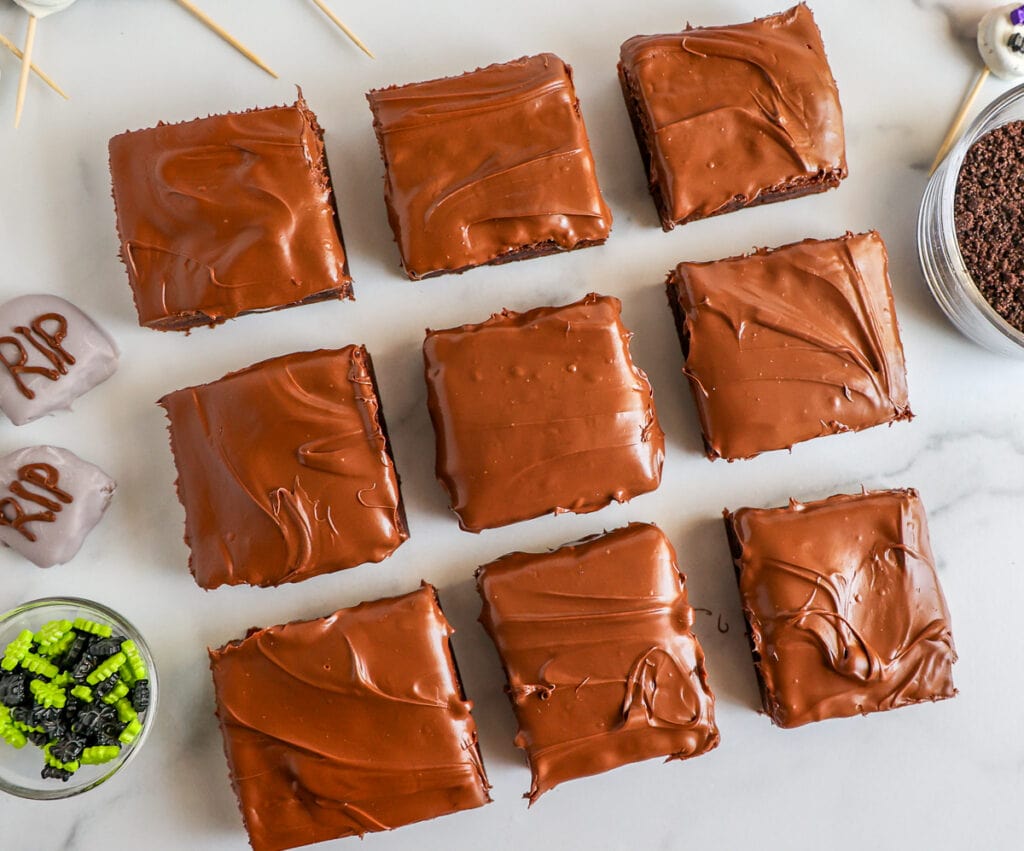
Trim the edges to make an even square, and cut your brownies into 9 equal squares.
Place a cookie tombstone onto the brownie, sinking it in a little for support.

Stick your full moon into the brownie behind the tombstone (so that the tombstone hides most of the toothpick).
Using your crushed Oreo cookies, sprinkle some graveyard dirt in front of the cookie tombstone, for a fresh dirt effect.
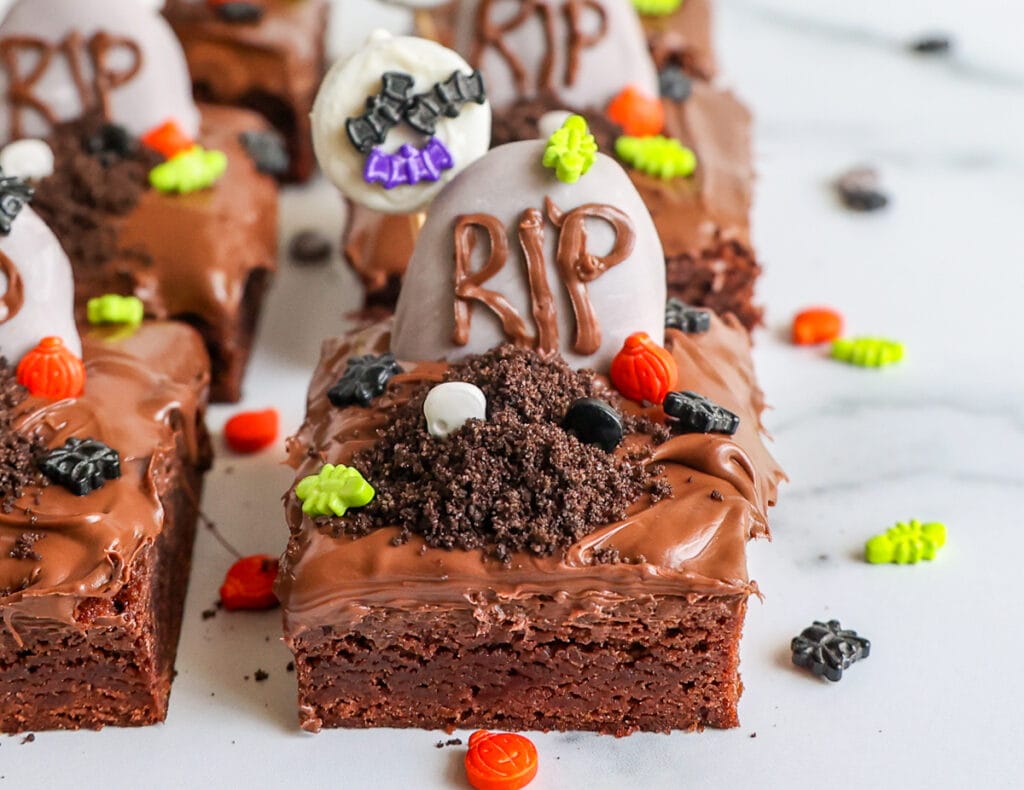
Finally, add the sprinkles! Add bugs in and around the dirt, leave some candy skulls here and there, and use dots of Nutella to stick sprinkles to the cookie headstones.
Top Tip
Let your creativity fly and have fun! Don’t worry about making everything from scratch and making it look perfect for Instagram. Just grab the kids, make a mess, and have fun!
Storing The Brownies
Loosely cover the brownies with plastic wrap until ready to serve or if you have a deep Tupperware container, store them in there.
The brownies are best kept at room temperature and eaten within 1-2 days.
Make Ahead
Every component of these graveyard brownies can be made ahead. The moons and graves can be made several days ahead and stored at room temperature until ready to use.
Baked and unsliced brownies can be made ahead 1-2 days and wrapped well so that no air gets in and dries them out.
If you don’t have time to top the brownies with Nutella fresh out of the oven, that’s ok to do later too. You can melt 1 cup of the hazelnut spread and pour it over the top of the cooled brownies, before cutting them up. Just let the Nutella set before slicing and decorating.
Can I make these Graveyard Brownies in a 13″ x 9″ pan?
Yes! If you’re making these for Halloween parties or a big family gathering, a 13″ x 9″ recipe will make 12 large or 16 smaller brownies.
- Increase brownies: If you have a favorite homemade recipe, double it to fit a 13′ x 9″ pan or if using a boxed brownie mix, get the one labeled “family sized”.
- Increase the Nutella: Up the Nutella from 1 cup to 1 1/2 cups to accommodate the extra surface area.
- The original recipe will make a dozen full moons and tombstones. If you opt for the 16 portions, just melt 8 oz of the candy coating instead of 6 oz to cover the extra cookies.
Decorations and Variations
For these graveyard brownies, I wanted big impact and easy to find, affordable ingredients. You can get these ingredients at the local craft store, but feel free to use what you have on hand or anything available locally!
Wilton Halloween Sprinkles – These can be found at the craft store for super cheap. I love these sprinkles because they have everything you need in one container– bone candy, bats, creepy bugs, skulls, pumpkins, ghosts, and witches’ hats!
Food Coloring For Chocolate– These food colorings are oil-based and made specifically for coloring chocolate and candy melts. Regular food coloring won’t work. If you can’t find oil based food coloring, use some dark cocoa powder or melted dark chocolate mixed with white candy melts!
Milano Cookies– I used the milk chocolate variety, but use what you love! If you can’t find Milano cookies, use rectangles of graham crackers, Biscoff cookies, or any other oblong cookie.
White Fudge Dipped Oreo Bites – I used these for the full moons and glued the toothpicks on the backs with candy melts.
Vanilla Candy Coating– I’ve been loving Target’s vanilla candy coating from their Good and Gather brand. I also love, love, love Ghirardelli’s vanilla melting wafers. They taste so much better than typical melting wafers from the craft store.
More Halloween Treats


If you make this recipe, give it a 5 STAR Rating and Leave a Comment!
Save This Recipe
Just enter your email below and we will send this recipe right to your inbox, plus we will send more yummy recipes and ideas.

Graveyard Brownies
Ingredients
- 1 box of brownie mix 18-18.3oz or your favorite homemade recipe
- 1 cup + 1 tablespoon of Nutella hazelnut spread
- 6 oz of vanilla candy coating or almond bark
- 12 Oreo “Thins Bites” white fudge covered
- 6 Milano cookies cut in half
- 2-4 standard chocolate Oreos ground into fine crumbs
- Assorted Halloween themed sprinkles including but not limited to bats, bones, and creepy bugs.
- 9 ” x 9″ baking pan
- Pastry Bag
- Toothpicks
- Black or purple food coloring made specifically for candy/chocolate (optional)
Instructions
- How To Make Graveyard BrowniesLine a 9″x 9″ baking pan with foil or parchment paper, and grease with cooking spray. Allow the parchment paper to hang over the sides of the pan, this will be used as a sling for easy brownie removal later.
- Prepare the brownie mix per the instructions on the box or if you're using a homemade recipe, follow the recipe as it's written. Follow the baking times for a 9″ x 9″ pan.
- Remove the brownies from the oven and allow them to cool for about 5 minutes, but do not let them cool completely.
- While the brownies are still very warm, add 1 cup of Nutella to the top. Using an offset spatula or a spoon, spread the Nutella evenly over the top of the brownies.
- Allow the brownies to finish cooling completely.
- While the brownies cool, you can make your tombstones and full moons!
- Making the Full Moon CookiesHeat your vanilla candy coating in the microwave or in a heatproof bowl set over barely simmering water. Melt and stir until completely smooth.
- Grab 12 mini white fudge-covered Oreos and your Halloween sprinkles.
- Using a toothpick, spread a little of the melted vanilla candy coating on the front of your mini Oreo. Working quickly, place 2-3 bat sprinkles on the candy coating to stick. Now it looks like you have bats flying in the moonlight!
- Repeat until all 12 mini cookies have bats attached.
- Once your bats have adhered, flip over your moon cookies and add a little dollop of melted candy coating to the back. This will be the “glue” to stick your toothpicks to the cookies.
- Place a toothpick in the candy coating and press down to submerge. Add more melted coating if needed to make sure the toothpick really sticks.
- Repeat this process until all the toothpicks are glued to the back of your full moon cookies. Pop in the fridge for 5 minutes to set.
- Making The Milano Cookie TombstonesGrab your halved Milano cookies, a fork, and line a baking sheet with parchment or wax paper.
- After making your full moons, you may need to remelt your candy coating. You can do this by microwaving for 10 seconds, or putting the candy back over a pan of simmering water for a few minutes.
- Once the vanilla candy coating is melted and smooth again, add in your black chocolate-friendly food coloring (if using). Add a little at a time to reach the desired shade of tombstone gray.
- Using a fork, dip the Milano cookies into your gray vanilla candy coating. Ensure that the cookie is completely coated and shake off any excess coating back into the bowl. Place dipped cookies onto the parchment or wax paper lined cookie sheet.
- Repeat the dipping and coating process until all 12 cookies are coated.
- These will start to set pretty immediately, but 5 minutes in the fridge will set them completely.
- Once the tombstones are completely set, place 1 tablespoon of Nutella into a pastry bag or a ziploc bag. Cut the tip off the bag just enough so that you can pipe very thin lines. This is how you'll write on the tombstones!
- Pipe “RIP” or any design you like on the tombstone cookies to make spooky graves. Set aside.
- Assembling the Graveyard BrowniesThis is the fun part! Grab your crushed Oreos, sprinkles, tombstones, and moons!
- Once the brownies have completely cooled, remove them from the pan using your parchment or foil sling. Discard the parchment paper and set the brownies on a cutting surface.
- Trim the edges to make an even square, and cut your brownies into 9 equal squares.
- Place a cookie tombstone onto the brownie, sinking it in a little for support.
- Stick your full moon into the brownie behind the tombstone (so that the tombstone hides most of the toothpick).
- Using your crushed Oreo cookies, sprinkle some graveyard dirt in front of the cookie tombstone, for a fresh grave effect.
- Then go nuts adding your sprinkles! Add bugs in and around the dirt, leave some candy skulls here and there. Some ghosts…wherever your ghoulish heart leads you!
- You can also use the Nutella in the piping bag to glue spiders and bones to the Milano cookie graves.
- Let your creativity fly and have fun!