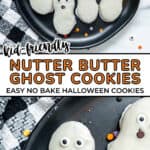
Nutter Butter Ghosts (No Bake Halloween Cookies)
This post may contain affiliate links, see my disclosure policy for details.
I’m all about Halloween treats that are big on fun but short on effort—and these no bake Nutter Butter Ghosts check all the boxes. As a mom who’s always looking for projects my kiddo can actually help with, I love that these come together in minutes without even turning on the oven.

I’ve shared lots of seasonal recipes over the years–like my Halloween Rice Krispie Treats and Marshmallow Popcorn Balls, so I can tell you these cookies are always a hit at parties and Halloween get-togethers. They’re cute, simple, tasty, and guaranteed to VANISH fast.
Why You’ll Love These Halloween Ghost Cookies
- No bake & easy to make! Just melt some vanilla candy coating, dip, and decorate.
- Kids LOVE adding the eyes and mouths to make spooky creatures. These cookies are a fun, kid-friendly activity that doesn’t take up a lot of time!
- Perfect for serving at Halloween parties, pumpkin carving night, or adding to a bowl of Halloween Chex Mix or Halloween Dirt Cups!
Ingredients You’ll Need
You only need 3 simple ingredients, plus any decorations your heart desires! Exact ingredient amounts and step-by-step directions are on the recipe card below.

- Vanilla candy melts- I like using Ghirardelli vanilla melting wafers or white almond bark. They melt fast and set fast. If you can’t find melting wafers, you can use a bag of white chocolate chips instead!
- Nutter Butter cookies– Nutter Butters are the perfect shape for ghosts!
- Candy eyeballs– because ghosts need to see of course!
- Mini chocolate chips or round black sprinkles- These are for the mouths of the ghosts!
How To Make Ghost Nutter Butters
Step 1:
Line a sheet pan with parchment paper or wax paper and set aside.
Step 2:

In a microwave-safe bowl, heat the candy melts or white chocolate chips for 30 seconds.
Stir and continue microwaving in 15-second intervals until smooth.
Step 3:

Dip each Nutter Butter cookie in the melted candy coating, flipping with a fork to coat both sides.
Use the fork to lift the coated cookie out of the melted almond bark, letting the excess drip off. Place the dipped Nutter Butter on the prepared baking sheet.
Step 4:

While the coating is still wet, press on two candy eyes and one black sprinkle or mini chocolate chip for the mouth.
Chill the cookies until the coating sets. Once the coating has hardened, the Nutter Butter ghosts are ready to eat!
Tips for Success
- Melt your candy coating slowly and stir often to avoid burning or seizing. If you don’t have a microwave, set your candy melts in a heatproof bowl over steaming water (double boiler) and melt them that way.
- A fork works best for dipping, so your hands stay clean. The fork also allows the excess coating to drip off easily.
- The vanilla coating sets quickly, so don’t wait too long to add the candy eyes and mouth. Add any decorations while the coating is still wet.
Storing Your Halloween Ghost Cookies
Store the ghost cookies in an airtight container at room temperature for up to 1 week. No refrigeration is needed unless your kitchen is super warm.

Variations & Fun Ideas
- Use different colored candy melts to make purple, green, orange, or black ghosts.
- Dip only half the peanut butter cookie so it looks like the ghost has a tail or a ragged sheet covering it.
- The craft store has fun Halloween themed sprinkles so you can decorate your ghosts with candy spiders, bugs, and bats!
- If you need a peanut-free ghost cookie, you can use Milano cookies instead of Nutter Butters.
How to Serve Nutter Butter Ghost Cookies
- On a platter for a Halloween charcuterie (char-BOO-terie) board or to top Pudding Dirt Cups
- As fun treats during pumpkin carving night with the kids.
- Packaged in clear treat bags to gift to friends or classmates.
- Paired with other fun kid-friendly Halloween snacks for a cute and spooky spread.
Whether you’re planning a party, looking for a fun kitchen activity, or just want a no-stress Halloween dessert for the kids, these ghost cookies are exactly what you need. Quick, cute, and a little creepy (in a good way).
More Halloween Dessert Ideas


Save This Recipe
Just enter your email below and we will send this recipe right to your inbox, plus we will send more yummy recipes and ideas.

Ghost Nutter Butters
Ingredients
- 10 oz white candy melts or white chocolate chips
- 12 Nutter Butter Cookies
- 20 Candy Eyeballs
- 10 mini chocolate chips or black circle sprinkles
Instructions
- Line a sheet pan with parchment or wax paper and set aside.
- Add the melting wafers (or white chocolate chips) to a microwave-safe bowl and heat for 30 seconds. Keep microwaving in 15-second intervals, stirring frequently until the candy melts are completely melted and smooth.
- Dip the Nutter Butters one at a time in the white candy coating. Use a fork to flip and dip the cookie until it’s completely coated.
- Lift the cookie out with the fork and let any excess candy coating drip back into the bowl.
- Set the dipped cookie onto the prepared sheet pan and add two candy eyeballs, and a mini chocolate chip (flat bottom up) for the mouth.
- Repeat the process until all the cookies are coated and decorated.
- Chill the cookies until the candy coating sets. Once the cookies have hardened, then they're ready to eat!
Notes
- You can use 1 3/4 to 2 cups white chocolate chips instead of vanilla melting wafers.